#はじめに
G Suite向けに『Google Hangouts Chat』が正式リリースされましたので、Rundeckのジョブ実行結果の通知先として実装してみました。
#実装イメージ
Rundeckには実行結果の通知方法として、デフォルトで Webhook も用意されています。ただ、この Webhook を利用した場合、POSTリクエストボディがXML形式で送信されますので、Hangouts ChatがWebhook受信できるよう、JSON形式のメッセージフォーマットに変換して渡す必要があります。
そこで「Amazon API Gateway」+「AWS Lambda」を利用し、下図のようなトポロジを構成して実装しました。
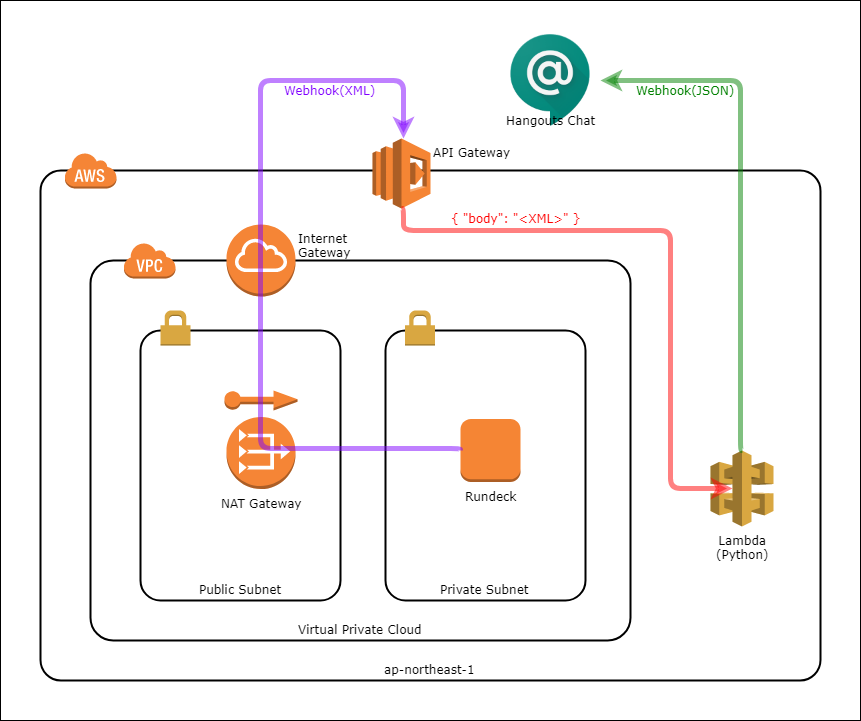
##Rundeck Webhookリクエストデータ
RundeckのWebhookリクエストボディは、次のような構造のXMLフォーマットとなります。
<notification trigger='success' status='succeeded' executionId='1154'>\n
  <executions count='1'>
    <execution id='1234' href='http://exzample.com/project/MISC/execution/follow/1154' permalink='' status='succeeded' project='MISC'>
      <user>hoge</user>
      <date-started unixtime='1520401717000'>2018-03-07T05:48:37Z</date-started>
      <date-ended unixtime='1520401730000'>2018-03-07T05:48:50Z</date-ended>
      <job id='XXXXXXXX-XXXX-XXXX-XXXX-XXXXXXXXXXXX' averageDuration='16294' href='XXXXXXXX-XXXX-XXXX-XXXX-XXXXXXXXXXXX' permalink='http://example.com/project/MISC/job/show/XXXXXXXX-XXXX-XXXX-XXXX-XXXXXXXXXXXX'>
        <name>TestJob</name>
        <group></group>
        <project>MISC</project>
        <description>テストジョブ</description>
        <options>
        </options>
      </job>
      <description>ls -l ~/</description>
      <argstring></argstring>
      <successfulNodes>
        <node name='examle.com' />
      </successfulNodes>
    </execution>
  </executions>
</notification>
#チャットルームとBOTの準備
##チャットルームの作成
Hangouts Chat サービスページにアクセスします。
左メニュー上部にあるユーザー、チャットルーム、botを検索をクリックし、チャットルームを作成をクリックします。
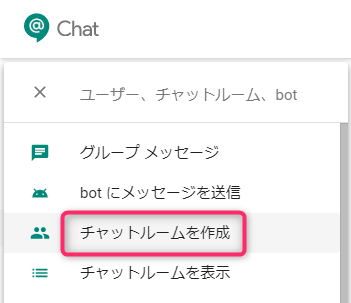
チャットルーム名に任意のルーム名を入力し、作成ボタンをクリックします。
今回はRundeck notificationというチャットルーム名にしました。

##BOT(Webhook)の作成
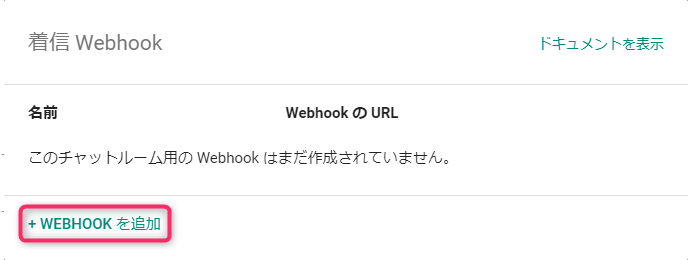
作成したチャットルームを開き、上部のルーム名をクリックし、Webhook を設定をクリックします。
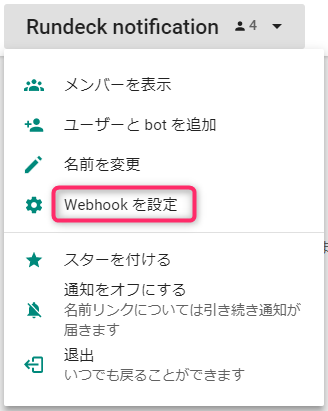
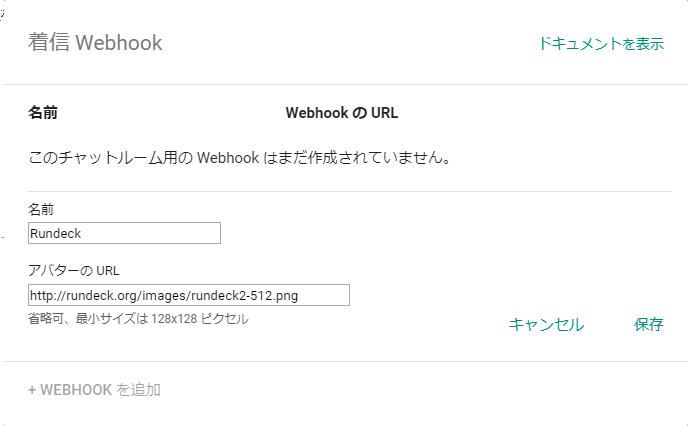
名前に任意の名称(これがBOTの名前となります。今回はRundeckとしました。)と、アバターのURLにBOTのアイコンとなるイメージ画像のURL(今回はRundeck公式サイトにあるアイコンのURL)を入力して保存をクリックします。
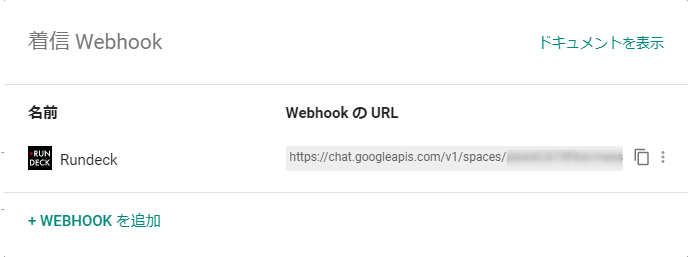
以上でWebhookが作成されます。またWebhook の URLに記載されているURLがWebhookのエンドポイントとなり、このURLにメッセージリクエストをPOSTすることで、チャットルームに通知することができます。
#Amazon API Gateway
##AWS Lambdaの作成(最低限の設定のみ)
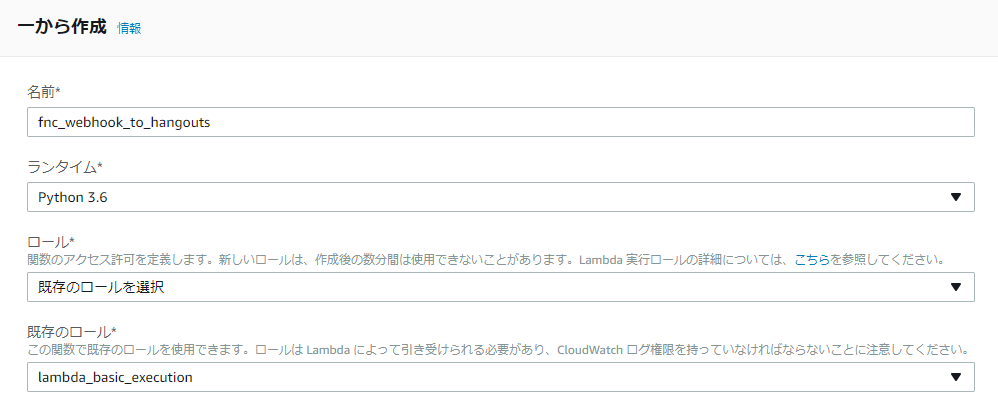
API GatewayにLambdaをバックエンドとして設定する際、指定されたLambda関数の存在をチェックされますので、下図の通り最低限の情報でLambda関数を作成します。今回は関数名をfnc_webhook_to_hangoutsとし、ランタイムにPython 3.6を指定して作成しました。
##API Gateway 設定
新しいAPIを作成します。今回はapi_rundeck_webhookというAPI名で作成しました。

リソース /api/v1を作成し、そのリソースにPOSTメソッドを作成します。更に統合ポイントのタイプにLambda関数を選択し、前述で作成したLambda関数のリージョンと関数名を指定します。
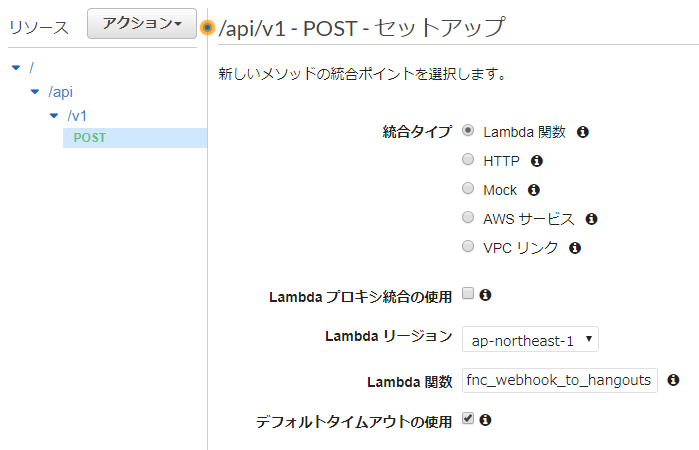
メソッドの実行ページにある統合リクエストを開きます。
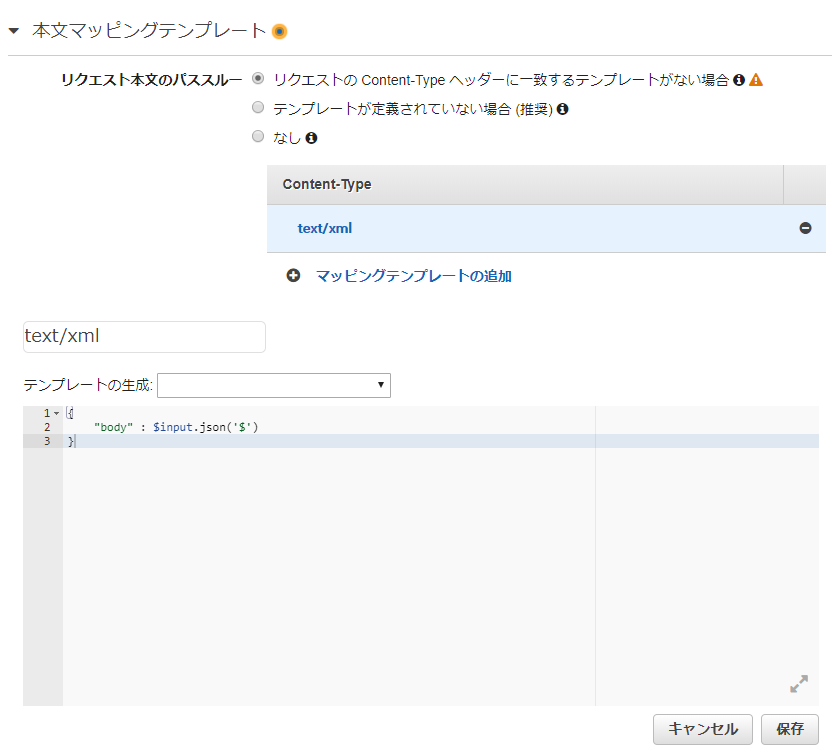
更に統合リクエストページの最下部にある本文マッピングテンプレートを展開し、Content-Typeにtext/xmlを作成(RundeckのWebhookリクエストヘッダーの Content-type がtext/xmlな為)、マッピングテンプレートは次の内容を入力します。
{
    "body" : $input.json('$')
}
このマッピングテンプレートにより、RundeckのWebhookリクエストボディのXMLデータが、JSON要素のbodyにくるまれてLambda関数に渡されます。
これでAPI Gatewayの設定が終わりましたので、リソースをステージにデプロイします。
今回はprodというステージにデプロイしました。
またステージprodの POST メソッドのURLの呼び出しにあるURIが、Rundeckから見た Webhook 送信先となります。

#AWS Lambda
##開発環境の準備
ローカルマシンに Python3.6 の開発環境を用意します。(開発環境の構築手順は割愛します)
更にLambda関数で利用するモジュールを、lambda_function.pyを作成するカレントディレクトリ直下にインストールします。
httplib2
xmltodict
pytz
pip install -r requirements.txt -t .
##AWS Lambda関数の作成
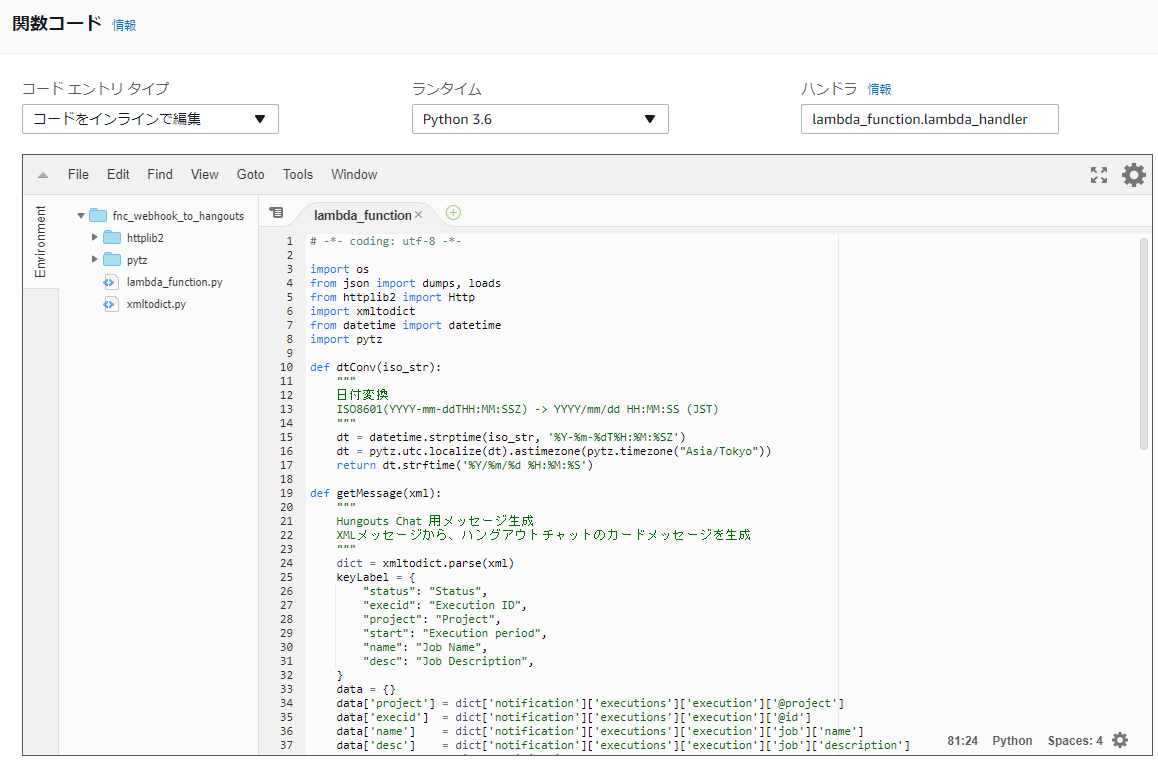
Lambda関数本体となるファイルlambda_function.pyを作成します。
今回は次の内容で書きました。
# -*- coding: utf-8 -*-

import os
from json import dumps, loads
from httplib2 import Http
import xmltodict
from datetime import datetime
import pytz

def dtConv(iso_str):
    """
    日付変換
    ISO8601(YYYY-mm-ddTHH:MM:SSZ) -> YYYY/mm/dd HH:MM:SS (JST)
    """
    dt = datetime.strptime(iso_str, '%Y-%m-%dT%H:%M:%SZ')
    dt = pytz.utc.localize(dt).astimezone(pytz.timezone("Asia/Tokyo"))
    return dt.strftime('%Y/%m/%d %H:%M:%S')

def getMessage(xml):
    """
    Hungouts Chat 用メッセージ生成
    XMLメッセージから、ハングアウトチャットのカードメッセージを生成
    """
    dict = xmltodict.parse(xml)
    keyLabel = {
        "status": "Status",
        "execid": "Execution ID",
        "project": "Project",
        "start": "Execution period",
        "name": "Job Name",
        "desc": "Job Description",
    }
    data = {}
    data['project'] = dict['notification']['executions']['execution']['@project']
    data['execid']  = dict['notification']['executions']['execution']['@id']
    data['name']    = dict['notification']['executions']['execution']['job']['name']
    data['desc']    = dict['notification']['executions']['execution']['job']['description']
    data['status']  = dict['notification']['@status']
    data['start']   = dtConv(dict['notification']['executions']['execution']['date-started']['#text'])
    data['finish']  = dtConv(dict['notification']['executions']['execution']['date-ended']['#text'])
    data['url']     = dict['notification']['executions']['execution']['@href']
    data['group']   = dict['notification']['executions']['execution']['job']['group']

    message = {'cards': [{'header':{},'sections': [{'widgets': []}]}]}
    message["cards"][0]['header']['title'] = "Job '" + data['name'] + "' " + data['status']


    for key, val in data.items():
        if key in {"url", "group", "finish"}:
            continue
        KeyVal = {"keyValue":{}}
        KeyVal["keyValue"]["topLabel"] = keyLabel[key]
        if key == "execid":
            KeyVal["keyValue"]["content"] = "#" + val
            KeyVal["keyValue"]["onClick"] = {}
            KeyVal["keyValue"]["onClick"]["openLink"] = {}
            KeyVal["keyValue"]["onClick"]["openLink"]["url"] = data["url"]
        elif key == "name":
            group = data["group"] if data["group"] is not None else ''
            KeyVal["keyValue"]["content"] = "%s/ %s" % (group, val)
        elif key == "start":
            KeyVal["keyValue"]["content"] = val + " - " + data['finish']
        else:
            KeyVal["keyValue"]["content"] = val
        message["cards"][0]["sections"][0]["widgets"].append(KeyVal)

    return(message)

def lambda_handler(event, context):
    API_URI = os.environ['API_URI']
    xml = event['body']
    message = getMessage(xml)
    #print(dumps(message, indent=4))

    try:
        message_headers = { 'Content-Type': 'application/json; charset=UTF-8'}

        http_obj = Http()

        response = http_obj.request(
            uri=API_URI,
            method='POST',
            headers=message_headers,
            body=dumps(message),
        )

        print(response)
        return(True)

    except Exception as e:
        raise(e)
この関数により、eventで受け取ったJSON要素bodyにくるまれたXMLデータを取り出し、Hangouts Chat カードメッセージのフォーマットに変換しています。
##AWS Lambda関数、関連モジュールのデプロイ
lambda_function.py、とカレントディレクトリにインストールした各モジュールを、ZIPファイルにアーカイブします。
zip -r upload.zip lambda_function.py httplib2 xmltodict.py pytz
アーカイブしたZIPファイルを、前述の「最低限のみ」設定したLambda関数fnc_webhook_to_hangoutsにアップロードします。
##AWS Lambda 環境変数の設定
Lambda関数に環境変数API_URIを設定します。変数の値には Hangouts Chat で作成した Webhook RundeckのWebhook の URLを入力します。

#Rundeck ジョブの Webhook 設定
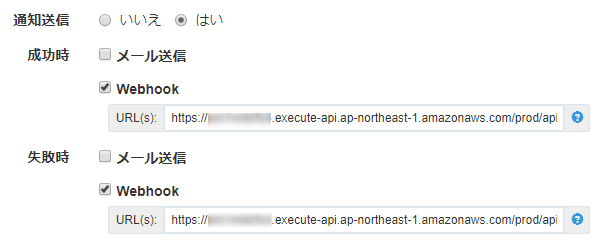
ここまでの手順で Hangouts Chat へメッセージを通知する準備が整いましたので、Rundeckのコンソールにアクセスし、Webhook通知を送りたいジョブにAPI GatewayのURLを設定します。
#実行結果通知の確認
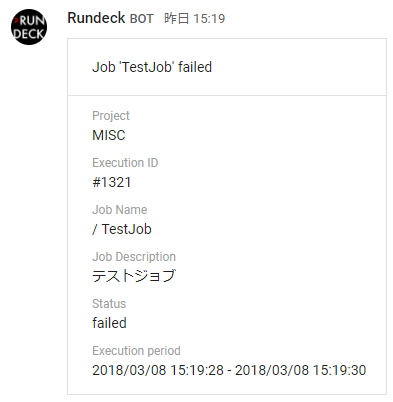
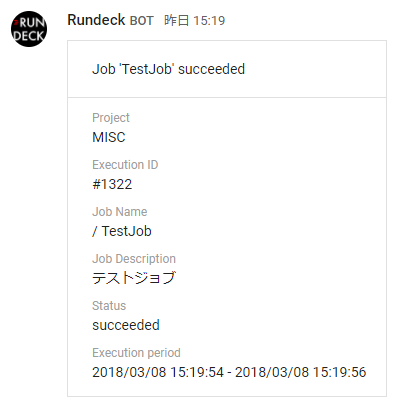
Hangouts Chat のチャットルームに、ジョブ実行結果が次のようなBOTメッセージとして通知されます。
(ジョブ実行成功時)
#参考ページ
https://developers.google.com/hangouts/chat/
http://rundeck.org/docs/manual/jobs.html#webhooks
