はじめに
Hangouts ChatにBOTを実装する場合、その応答を簡単なテキスト文で返す「テキストメッセージ」、複雑なUI要素で返す「カードメッセージ」と、2種類のメッセージフォーマットに対応することができます。
前回までのBOTは、前者の「テキストフォーマット」で応答していましたが、今回は「カードメッセージ」で応答するBOTを実装してみます。
尚、開発環境は前回までの環境を利用していますので、デプロイ等の方法は省略します。
カードメッセージの構造
カードメッセージについて、簡単ですが以下にまとめます。
またカードメッセージのフォーマットについての詳細は、公式のこのページにまとめられています。
構成イメージ
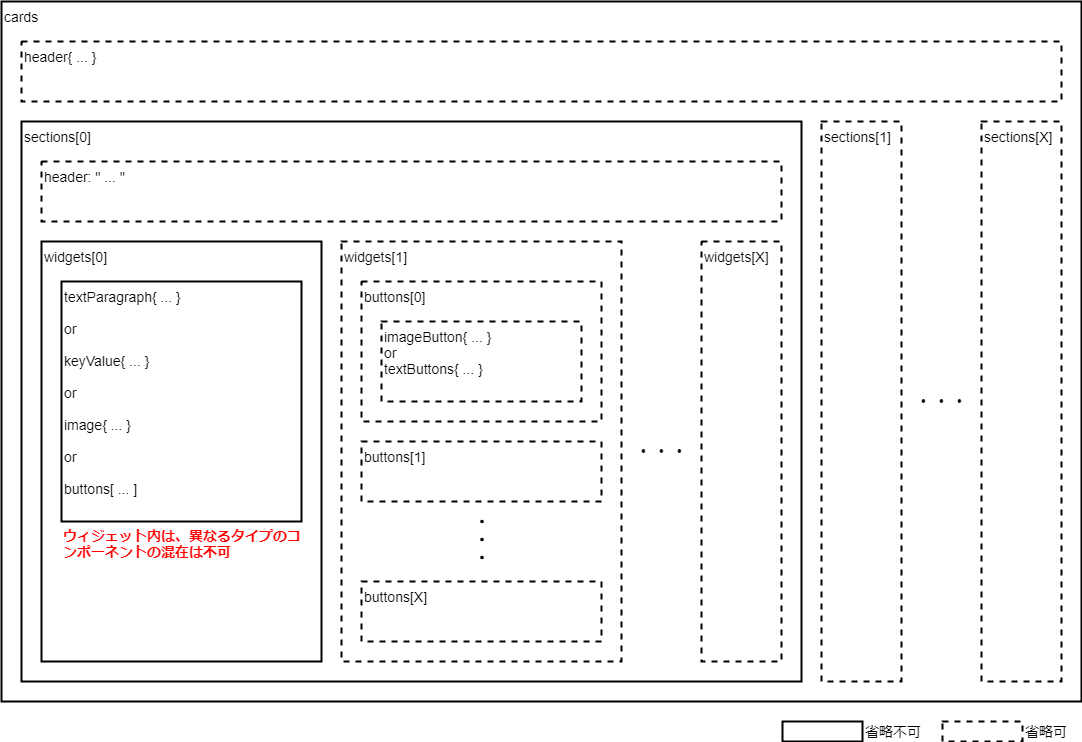
カードメッセージは JSON フォーマット で定義する必要があり、figure-1 はカードメッセージの構成をイメージで表したものです。
(figure-1)
カード
カードメッセージは cards オブジェクトと、コンポーネントと呼ばれるメンバーで構成されます。
{
  "cards": [
    {
      ... <コンポーネント>
    }
  ]
}
コンポーネント
カードメッセージに定義できるコンポーネントは、次の通りです。
ヘッダー(header)
カードやセクションには、それぞれ1つのヘッダーを定義することができます。
{
  "cards": [
    {
      "header": { ... },
      "sections": [
        {
          "header": " ... ",
          "widgets": [
            { ... }
          ]
        }
      ]
    }
  ]
}
セクション&ウィジェット(sections, widgets)
カードには、1つ以上のセクションが含まれている必要があります。
更にセクションには1つ以上のウィジェットが含まれている必要があります。
尚、各ウィジェットには、異なるタイプの要素(コンポーネント)は定義できません。
例えば、同一ウィジェット内にテキスト行(textParagraph)とイメージ(image)を混在できません。
{
  "cards": [
    {
      "sections": [
        {
          "widgets": [
            { ... },
            { ... }
          ]
        },
        {
          "widgets": [
            { ... },
            { ... }
          ]
        }
      ]
    }
  ]
}
テキスト行(textParagraph)
改行を含むテキスト文章を表示します。
尚、テキスト行では一部のHTMLタグをサポートしています。
{
  "cards": [
    {
      "sections": [
        {
          "widgets": [
            {
              "textParagraph": {
                "text": "<b>ネスト</b>が<br>深すぎ"
              }
            }
          ]
        }
      ]
    }
  ]
}
キー値(keyValue)
コンテンツ(値)にラベル(上、下)を付けて表示します。
{
  "cards": [
    {
      "sections": [
        {
          "header": {
            "title": "お品書き"
          },
          "widgets": [
             {
              "keyValue": {
                "topLabel": "ラーメン",
                "content": "500円",
                "contentMultiline": "false"
              }
            },
            {
              "keyValue": {
                "topLabel": "替玉",
                "content": "100円",
                "contentMultiline": "false"
              }
            },
            {
              "keyValue": {
                "topLabel": "替肉、替ネギ",
                "content": "200円",
                "contentMultiline": "false"
              }
            }
          ]
        }
      ]
    }
  ]
}
イメージ(image)
指定されたURLより取得した画像を、全幅で表示します。
また表示される画像には、URLリンクを定義することもできます。
{
  "cards": [
    {
      "sections": [
        {
          "widgets": [
            {
              "image": {
                "imageUrl": "https://example.com/....png",
                "onClick": {
                  "openLink": {
                    "url": "https://example.com/"
                  }
                }
              }
            }
          ]
        }
      ]
    }
  ]
}
ボタン(buttons)
1つ以上のボタン(テキスト、イメージ)を表示します。
コンポーネント内に複数のボタンを定義すると、水平方向に並んで表示されます。
またイメージボタンは組み込みアイコン、または独自画像をURLで指定できます。
{
  "cards": [
    {
      "sections": [
        {
          "widgets": [
            {
              "buttons": [
                "imageButton": {
                  "iconUrl": "https://....png",
                  "onClick": {
                    "openLink": {
                      "url": "https://example.com/..."
                    }
                  }
                },
                "imageButton": {
                  "icon": "EMAIL",
                  "onClick": {
                    "openLink": {
                      "url": "mailto:hoge@example.com"
                    }
                  }
                },
                "textButton": {
                  "text": "Webサイト",
                  "onClick": {
                    "openLink": {
                      "url": "https://example.com/..."
                    }
                  }
                }
              ]
            }
          ]
        }
      ]
    }
  ]
}
実装
上記仕様を踏まえ、実際にカードメッセージで応答するBOTを作成します。
まず、カードメッセージのフォーマットは構造が複雑、かつネストも深いため、各コンポーネントを生成して返してくれる cards.py モジュールを自作しました。
# !/usr/bin/env python
# -*- coding: utf-8 -*-

'''
カードメッセージの各コンポーネントを生成、取得するモジュール
'''

from collections import OrderedDict
from urlparse import urlparse

def get_header(title='', subtitle='', imageUrl='', imageStyle='IMAGE'):
    '''
    headerコンポーネント生成、取得
    引数: タイトル, サブタイトル, アイコンURL, アイコンスタイル
    戻値: {'header': { ... }}
    '''
    header = {'header': {}}
    header['header'] = OrderedDict()
    header['header'].update({'title': title})
    if subtitle:
        header['header'].update({'subtitle': subtitle})
    if imageUrl:
        header['header'].update({'imageUrl': imageUrl})
        header['header'].update({'imageStyle': imageStyle})
    return(header)


def get_key_value(topLabel='', content='', bottomLabel='', contentMultiline='false', url=''):
    '''
    keyValueコンポーネント生成、取得
    引数: 上部ラベル, コンテンツ, 下部ラベル, コンテンツ改行, リンクURL
    戻値: {'keyValue': { ... }}
    '''
    keyValue = {'keyValue': {}}
    keyValue['keyValue'] = OrderedDict()
    keyValue['keyValue'].update({'topLabel': topLabel})
    keyValue['keyValue'].update({'content': content})
    keyValue['keyValue'].update({'contentMultiline': contentMultiline})
    if bottomLabel:
        keyValue['keyValue'].update({'bottomLabel': bottomLabel})
    if url:
        keyValue['keyValue'].update({'onClick': {}})
        keyValue['keyValue']['onClick'].update({'openLink': {}})
        keyValue['keyValue']['onClick']['openLink'].update({'url': url})
    return(keyValue)


def get_text_paragraph(text=''):
    '''
    textParagraphコンポーネント生成、取得
    引数: テキスト
    戻値: {'textParagraph': {'text': ' ... '}}
    '''
    textParagraph = {'textParagraph': {}}
    textParagraph['textParagraph'].update({'text': text})
    return(textParagraph)


def get_image(imageUrl='', linkUrl=''):
    '''
    imageコンポーネント生成、取得
    引数: 画像URL, リンクURL
    戻値: {'image': { ... }}
    '''
    image = {'image': {}}
    image['image'] = OrderedDict()
    image['image'].update({'imageUrl': imageUrl})
    if linkUrl:
        image['image'].update({'onClick': {}})
        image['image']['onClick'].update({'openLink': {}})
        image['image']['onClick']['openLink'].update({'url': linkUrl})
    return(image)


def get_image_button(icon='', linkUrl=''):
    '''
    imageButtonオブジェクト生成、取得
    引数: アイコンURL|組み込みアイコン, リンクURL
    戻値: {'imageButton': { ... }}
    '''
    imageButton = {'imageButton': {}}
    imageButton['imageButton'] = OrderedDict()
    if len(urlparse(icon).scheme):
        imageButton['imageButton'].update({'iconUrl': icon})
    else:
        imageButton['imageButton'].update({'icon': icon})
    if linkUrl:
        imageButton['imageButton'].update({'onClick': {}})
        imageButton['imageButton']['onClick'].update({'openLink': {}})
        imageButton['imageButton']['onClick']['openLink'].update({'url': linkUrl})
    return(imageButton)


def get_text_button(text='', linkUrl=''):
    '''
    textButtonオブジェクト生成、取得
    引数: 表示文字列, リンクURL
    戻値: {'textButton': { ... }}
    '''
    textButton = {'textButton': {}}
    textButton['textButton'] = OrderedDict()
    textButton['textButton'].update({'text': text})
    if linkUrl:
        textButton['textButton'].update({'onClick': {}})
        textButton['textButton']['onClick'].update({'openLink': {}})
        textButton['textButton']['onClick']['openLink'].update({'url': linkUrl})
    return(textButton)

def get_buttons(arrButton=[]):
    '''
    buttonsコンポーネント生成、取得
    引数: buttonオブジェクトのリスト
    戻値: {'buttons': [ ... ]}
    '''
    buttons = {'buttons': []}
    buttons['buttons'].extend(arrButton)
    return(buttons)


def get_section(header='', widgets=[]):
    '''
    ウィジェットのリストから、単一セクションを生成、取得
    引数: セクションヘッダー文字列, ウィジェットのリスト
    戻値: {'widgets: [ ... ]'}
    '''
    section = OrderedDict()
    if header:
        section.update({'header': header})
    section.update({'widgets': []})
    section['widgets'].extend(widgets)
    return(section)


def get_card(header={}, sections=[]):
    '''
    セクションのリストから、単一カードを生成、取得
    引数: カードヘッダーコンポーネント, セクションのリスト
    戻値: {'sections: [ ... ]'}
    '''
    card = OrderedDict()
    if header:
        card.update(header)
    card.update({'sections': []})
    card['sections'].extend(sections)
    return(card)


def get_message(cards=[]):
    '''
    カードのリストから、メッセージを生成、取得
    引数: カードのリスト
    戻値: {'cards': [ ... ]}
    '''
    message = {'cards': []}
    message['cards'].extend(cards)
    return(message)
cards.py モジュールを利用して、BOTに実装します。
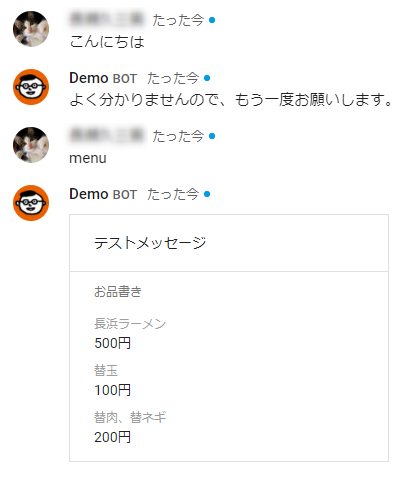
今回はBOTに menu とメッセージを送ると、「お品書き」を返してくるBOTを作成してみます。
# !/usr/bin/env python
# coding: utf-8
"""Example bot that returns a synchronous response."""

from flask import Flask, request, json

app = Flask(__name__)

import os
import re
import cards as cd

@app.route('/', methods=['POST'])
def on_event():
    """Handles an event from Hangouts Chat."""
    event = request.get_json()
    if event['type'] == 'ADDED_TO_SPACE' and event['space']['type'] == 'ROOM':
        text = 'Thanks for adding me to "%s"!' % event['space']['displayName']
    elif event['type'] == 'MESSAGE':
        req = re.sub(r'^@.* ', '', event['message']['text'])

        if req == 'menu':
            # keyValueを作成し、ウィジェットリストに格納
            widgets = []
            widgets.append(
                cd.get_key_value(
                    topLabel='長浜ラーメン',
                    content='500円'
                )
            )
            widgets.append(
                cd.get_key_value(
                    topLabel='替玉',
                    content='100円'
                )
            )
            widgets.append(
                cd.get_key_value(
                    topLabel='替肉、替ネギ',
                    content='200円'
                )
            )

            # ウィジェットリストを元にセクションを生成し、リストに格納
            header = 'お品書き'
            sections = []
            sections.append(cd.get_section(header, widgets))

            # セクションリストを元にカードを生成し、リストに格納
            cards = []
            header = cd.get_header('テストメッセージ')
            cards.append(cd.get_card(header, sections))

            # カードリストを元にカードメッセージを生成
            res = cd.get_message(cards)
        else:
            res = {'text': 'よく分かりませんので、もう一度お願いします。'}
    else:
        return
    return json.jsonify(res)

if __name__ == '__main__':
    app.run(port=8080, debug=True)
ちなみにこのBOTから menu への応答は、次のレスポンスが返されます。
{
  "cards": [
    {
      "header": {
        "title": "テストメッセージ"
      },
      "sections": [
        {
          "header": "お品書き",
          "widgets": [
            {
              "keyValue": {
                "topLabel": "ラーメン",
                "content": "500円",
                "contentMultiline": "false"
              }
            },
            {
              "keyValue": {
                "topLabel": "替玉",
                "content": "100円",
                "contentMultiline": "false"
              }
            },
            {
              "keyValue": {
                "topLabel": "替肉、替ネギ",
                "content": "200円",
                "contentMultiline": "false"
              }
            }
          ]
        }
      ]
    }
  ]
}
動作テスト
GAEにデプロイ後、Hangouts Chat から動作を確認します。