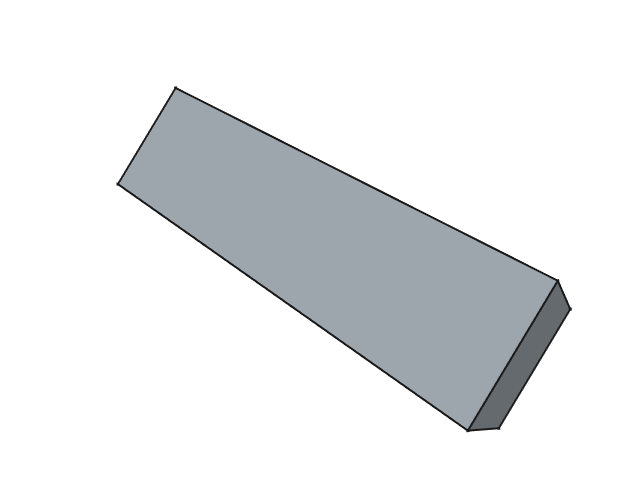
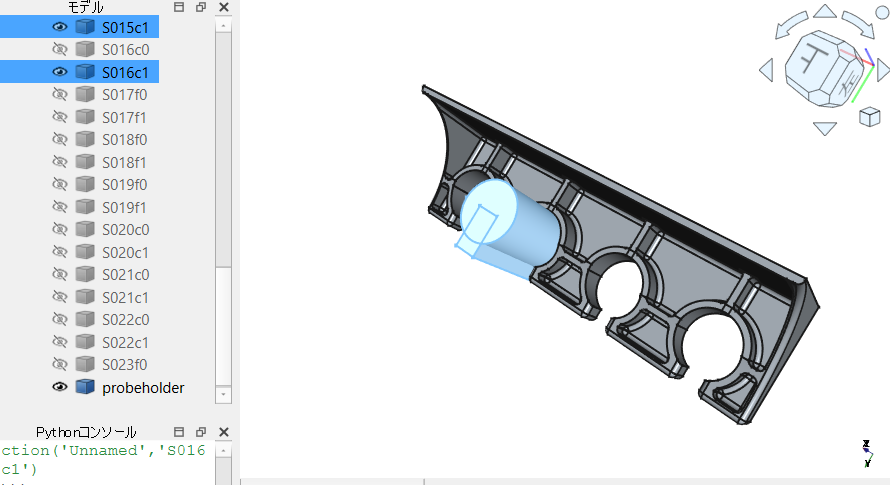
プローブホルダーの生成過程
オシロスコープのプローブホルダーをFreeCADのPythonスクリプトで作ってみたの生成過程を連続画像に保存するようにしてみました。
import math
import FreeCAD as App
import FreeCADGui as Gui
import Part
from pivy import coin

# パラメーター
wt = 1.35   #肉厚
filletR = 1 #フィレット半径
sizeX = 90  #外形(x)
sizeY = 25  #外形(y)
sizeZ = 25  #外形(z)
hPosX = [12, 34, 56, 78]    #プローブ穴位置(x)
hPosY = 16  #プローブ穴位置(y)
hDia = 13   #プローブ穴直径
hSlit_w = 5     #プローブスリット幅
hSlitb_w = 10   #プローブスリットの壁部分の幅
hSlit_t = 5     #プローブスリット開口部の厚み
hDepth = 7      #プローブ穴の深さ

ProgSave = True         #途中経過を残すか
PicDir = 'c:/tmp/'      #画像保存先ディレクトリー
PicName = 'making'      #画像ファイル名
PicExt = '.png'         #画像拡張子
PicNum = 0              #画像通し番号
PicSize = [640, 480]    #画像サイズ
PicBg = 'White'         #画像背景
ShNum = 0   #showhideの通し番号
View = None

def box(
    xsize, ysize, zsize,    #サイズ
    pos = (0, 0, 0)         #位置
):
    bx = Part.makeBox(xsize, ysize, zsize, App.Vector(pos), App.Vector(0, 0, 1))
    return bx

def cylinder(
        r,      #半径
        len,    #長さ
        pos = (0, 0, 0),    #位置
        dir = (0, 0, 1),    #方向
        mat = App.Matrix()  #変形matrix
):
    cy = Part.makeCylinder(r, len, App.Vector(0, 0, 0),App.Vector(dir))
    if mat != App.Matrix():
        cy = cy.transformGeometry(mat)
    cy = cy.translate(App.Vector(pos))
    return cy

def setview(
        shape,
        str,
        msgs0 = ['PerspectiveCamera', 'ViewRear', 'ViewFit'],
        vec = (5, 0, 3),
        angle = math.pi * 0.5,
        msgs1 = ['ViewFit']
):
    global View
    Part.show(shape, str)
    obj = Gui.ActiveDocument.ActiveObject
    View = Gui.ActiveDocument.ActiveView
    for m in msgs0:
        Gui.SendMsgToActiveView(m)
    rot = coin.SbRotation()
    rot.setValue(coin.SbVec3f(vec), angle)
    cam = Gui.ActiveDocument.ActiveView.getCameraNode()
    nrot = cam.orientation.getValue() * rot
    cam.orientation = nrot
    for m in msgs1:
        Gui.SendMsgToActiveView(m)
    obj.Visibility = False

def save_image():
    global PicNum
    View.saveImage(f'{PicDir}{PicName}{PicNum:03}{PicExt}', *PicSize, PicBg)
    PicNum += 1

def showhide(
        shapes,
        str
):
    global ShNum
    objs = []
    for i, s in enumerate(shapes):
        Part.show(s, f'S{ShNum:03}{str}{i}')
        objs.append(Gui.ActiveDocument.ActiveObject)
        save_image()
    for o in objs:
        o.Visibility = False
    ShNum += 1

def cut(a, b):
    if ProgSave:
        showhide([a, b], 'c')
    a = a.cut(b)
    return a

def fuse(a, b):
    if ProgSave:
        showhide([a, b], 'f')
    a = a.fuse(b)
    return a


#外形の箱
ph = box(sizeX, sizeY, sizeZ)
if ProgSave:
    setview(ph, 'outline')
bx = box((sizeX - wt*2), (sizeY - wt*2), sizeZ, (wt, wt, wt))
ph = cut(ph, bx)

#リブ(横)
bx = box((sizeX - (wt*2)), wt, (hDepth-wt), (wt, (hPosY -(wt/2)), wt))
ph = fuse(ph, bx)

for hx in hPosX:
    #リブ(縦)
    bx = box(wt, (hPosY - wt), (hDepth-wt), ((hx - (wt/2)), wt, wt))
    ph = fuse(ph, bx)
    #プローブ穴とスリットの壁
    cy = cylinder((hDia / 2) + wt, (hDepth-wt), (hx, hPosY, wt))
    ph = fuse(ph, cy)
    bx = box(hSlitb_w , (sizeY - hPosY - wt), (hDepth-wt), ((hx - (hSlitb_w/2)), hPosY, wt))
    ph = fuse(ph, bx)
    #プローブ穴
    cy = cylinder(hDia / 2, sizeZ, (hx, hPosY, 0))
    ph = cut(ph, cy)
    #スリット
    bx = box(hSlit_w, (sizeY - hPosY), sizeZ, ((hx - (hSlit_w/2)), hPosY, 0))
    ph = cut(ph, bx)

#外形に対して楕円柱を引き算する
r = sizeY-wt
mat = App.Matrix(); mat.scale(1, 1, (sizeY - hSlit_t) / r)
cy1 = cylinder(r, sizeX, (0, sizeY, sizeZ), (1, 0, 0), mat)
ph = cut(ph, cy1)

if ProgSave:
    showhide([ph], 'f')

#フィレット
edges = ph.Edges
##外形のエッジのうちフィレット対象を抽出
fil_edges = []
for ed in edges:
    sel = False
    for vx in ed.Vertexes:
        if (
         #リブの接続部
         ((wt-0.1) < vx.Z < (wt+0.1))
         #スリットの外側
         or (((sizeY-0.1) < vx.Y < (sizeY+0.1)) and ((hSlit_t-0.1) < vx.Z < (hSlit_t+0.1)))
        ):
            sel = True
            break
    if sel:
        fil_edges.append(ed)
ph = ph.makeFillet(filletR, fil_edges)

Part.show(ph, 'probeholder')
if ProgSave:
    save_image()
これを実行すると48枚の画像が生成されたので、ImageMagickでGIFアニメーションにしてみました(冒頭の画像)。
magick -delay 40 -loop 1 making*.png making.gif
また、生成過程のシェイプを非表示にして残してあるので、任意のシェイプを表示して確認することもできます。
参考文献