Azure IoT Hub に openssl で自作した X.509 証明書を使って接続できたのでメモです。
やりたいこと
対称キーではなく X.509 CA 署名した証明書で IoT Hub に接続したい
こんなチュートリアルもあります、自身の理解のため openssl ベースで作成してみます
https://github.com/Azure/azure-iot-sdk-c/blob/master/tools/CACertificates/CACertificateOverview.md
接続は mosquitto_pub を使った MQTT で。
https://mosquitto.org/
注意
自身で CA となり秘密鍵を使って署名する手順となります。
ポイント
-
ユーザ名には
[IoT Hub 名].azure-devices.net/[デバイス名]を指定する必要があります
https://docs.microsoft.com/ja-jp/azure/iot-hub/iot-hub-mqtt-support#using-the-mqtt-protocol-directly-as-a-device -
接続は MQTT v3.1.1 でする必要があります。mosquitto のバージョンが古い場合は明示的に
-V mqttv311とバージョン指定してください。
https://docs.microsoft.com/ja-jp/azure/iot-hub/iot-hub-mqtt-support -
デバイス証明書の Common Name(CN) にデバイス名にする必要があります (このリソースがなかなか見つからなかったので、出典知っている方がいたら教えてほしいです)
環境
WSL (Ubuntu) で実行しました。
- OpenSSL : 1.1.0g
- mosquitto_pub : 1.6.7
- Azure CLI : 2.0.69
- azure-cli-iot-ext : 0.7.1
手順
それでは気になる手順です。
準備
最新版の mosquitto のインストールはこちらの Qiita 記事を参考にしました。
https://qiita.com/n-yamanaka/items/73e4d3022186732b4e88
Azure CLI と、加えて IoT Hub 用の拡張機能もインストールします (ポータルで操作する場合は不要ですが、わかりやすさのために CLI で手順を紹介します)
https://docs.microsoft.com/ja-jp/cli/azure/install-azure-cli?view=azure-cli-latest
https://github.com/Azure/azure-iot-cli-extension/blob/dev/README.md
Azure CLI でログインして、IoT Hub を作成しましょう。
https://docs.microsoft.com/ja-jp/azure/iot-hub/iot-hub-create-using-cli#create-an-iot-hub
# mosquitto のインストール
sudo apt-add-repository ppa:mosquitto-dev/mosquitto-ppa
sudo apt-get install mosquitto mosquitto-clients

# Azure CLI と拡張機能のインストール
curl -L https://aka.ms/InstallAzureCli | bash
az extension add --name azure-cli-iot-ext

# Azure CLI でログイン
az login

# IoT Hub の作成
# リソースグループ名・IoT Hub 名は適宜指定してください
RgName=[リソースグループ名]
HubName=[IoT Hub 名]
az group create --name ${RgName} -l japaneast
az iot hub create -n ${HubName} -g ${RgName} --sku F1
CA 証明書の作成と IoT Hub への登録
# ルート証明書の作成
# subject は適宜修正してください
openssl genrsa -out rootCA.key 2048
openssl req -x509 -new -nodes -key rootCA.key -sha256 -days 1024 -out rootCA.pem  -subj "/C=JP/ST=Tokyo/O=TestOrg/OU=TestOu"

# ルート証明書のアップロード
# 証明書名は適宜指定してください
CertName=[証明書名]
az iot hub certificate create --hub-name ${HubName} --name ${CertName} --path ./rootCA.pem -g ${RgName}

# verification code の取得
etag=`az iot hub certificate show -n ${CertName} --hub-name ${HubName} -o tsv --query etag`
VeriCode=`az iot hub certificate generate-verification-code --etag ${etag} --name ${CertName} --hub-name ${HubName} -o tsv --query properties.verificationCode`

# verification code をもとに Verification Certificate (検証証明書) を作成する。
# Common Name を verification code にする。その他の subject は適宜修正してください
openssl genrsa -out verificationCert.key 2048
openssl req -new -key verificationCert.key -out verificationCert.csr -subj "/C=JP/ST=Tokyo/O=TestOrg/OU=TestOu/CN=${VeriCode}"
openssl x509 -req -in verificationCert.csr -CA rootCA.pem -CAkey rootCA.key -CAcreateserial -out verificationCert.pem -days 500 -sha256

# Verification Certificate (検証証明書) をアップロードする
etag=`az iot hub certificate show -n ${CertName} --hub-name ${HubName} -o tsv --query etag`
az iot hub certificate verify --etag ${etag} --name ${CertName} --path ./verificationCert.pem --hub-name ${HubName}

# 以下のコマンドで True となっていれば Verificate できています。
az iot hub certificate show -n ${CertName} --hub-name ${HubName} --query properties.isVerified
ポータルであれば、「証明書」から同等の設定ができます。
詳細は以下の URL を参考にしてください。
https://docs.microsoft.com/ja-jp/azure/iot-hub/iot-hub-security-x509-get-started#register-x509-ca-certificates-to-your-iot-hub
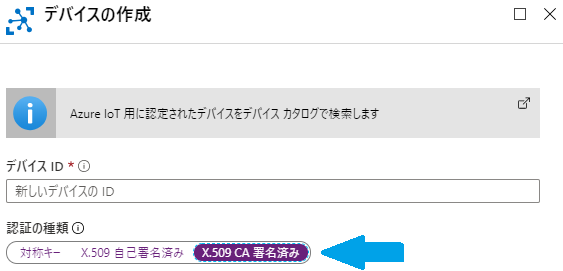
デバイスおよびデバイス証明書の作成
# デバイスの作成
# デバイス名は適宜指定してください
deviceId=[デバイス名]
az iot hub device-identity create --device-id ${deviceId} --hub-name ${HubName} --auth-method x509_ca

# デバイス証明書の作成
openssl genrsa -out deviceCert.key 2048
openssl req -new -key deviceCert.key -out deviceCert.csr -subj "/C=JP/ST=Tokyo/O=TestOrg/OU=TestOu/CN=${deviceId}"
openssl x509 -req -in deviceCert.csr -CA rootCA.pem -CAkey rootCA.key -CAcreateserial -out deviceCert.pem -days 500 -sha256
MQTT での接続
Azure 側の CA 証明書は Baltimore CyberTrust Root です。デフォルトで入っているクライアントも多いですが、ない場合はこちらからダウンロードします。
https://baltimore-cybertrust-root.chain-demos.digicert.com/info/index.html
# mosquitto で接続
mosquitto_pub -d -h ${HubName}.azure-devices.net -p 8883 --cafile /etc/ssl/certs/Baltimore_CyberTrust_Root.pem --cert ./deviceCert.pem --key ./deviceCert.key -i ${deviceId} -u "${HubName}.azure-devices.net/${deviceId}" -t "devices/${deviceId}/messages/events/" -m '{"message": "Hello IoT Hub!"}'
このようなメッセージが確認できれば接続できています。
$ mosquitto_pub -d -h ${HubName}.azure-devices.net -p 8883 --cafile /etc/ssl/certs/Baltimore_CyberTrust_Root.pem --cert ./deviceCert.pem --key ./deviceCert.key -i ${deviceId} -u "${HubName}.azure-devices.net/${deviceId}" -t "devices/${deviceId}/messages/events/" -m '{"message": "Hello IoT Hub!"}'
Client test sending CONNECT
Client test received CONNACK (0)
Client test sending PUBLISH (d0, q0, r0, m1, 'devices/test/messages/events/', ... (29 bytes))
Client test sending DISCONNECT
ポータルであればデバイスは「IoT デバイス」から作成できます。
メッセージの確認
メッセージの確認は Azure CLI では残念ながらできなさそうです。以下のようなツールを使って確認してみてください。
-
Windowsの場合: Device Explorer
-
Windows 以外の場合: IoT Hub Explorer