導入
現在、学習の一環として個人開発を進めています。
フロントエンド自体初心者なので、壁にぶち当たりながら備忘録を上げています。
今回は、ページ分割をする際に、Next.jsにおけるページング処理を調べたので、
備忘録として記録します。
Next.jsにおけるルーティング
Next.jsには、Page RouterとApp Routerという2つのルーティング方法があります。
Page Router
Next.js 13以前でルートを実装する際に使用されていたルーティング方法です。
まずはページ分割をできるようにすることが今回の目標なので、Page Routerの詳細説明は割愛します。
App Router
Next.js 13以降で、Reactの最新機能を使用するファイルシステムベースのルーターです。
実際、プロジェクト生成時に聞かれた以下の文で、
Next.js 13以降の推奨という理由で、App Routerを選択しました。
? Would you like to use App Router? (recommended) » Yes
App Routerを使用したルーティング
App Routerを使用したルーティングには様々な特徴があります。
初学者の僕がすべてを使いこなすには時間がかかりすぎるので、
まずは基本的・初歩的なものを抜粋して紹介します。
App Routerとは?
App Routerは、Reactの最新機能を活用したファイルシステムベースのルーティング機能です。
Next.jsの公式説明では次のように紹介されています。
The App Router is a file-system based router that uses React's latest features such as Server Components, Suspense, and Server Functions.
ここで紹介されている3つの主要機能は以下の通りです:
🧩 Server Components
サーバー側で実行・レンダリングされるReactコンポーネントです。
これにより、以下のような重たい処理をクライアントに任せずに済みます:
- APIリクエスト
- データベースアクセス
- 認証処理 など
結果として、クライアントの負荷軽減と表示速度の向上が期待できます。
⏳ Suspense
非同期処理の完了を待つための仕組みです。
これにより、以下のような処理が簡潔に実現できます:
- ローディングスピナーの表示
- データ取得中のプレースホルダ表示
Reactにおける非同期UIの構築を、より直感的に行えます。
⚙️ Server Functions
サーバー側でビジネスロジックを記述・実行できる機能です。
クライアントではなくサーバーにロジックを集中させることで:
- セキュリティ性の向上
- APIレスポンスの効率化
- メンテナンス性の向上
といった利点があります。
これらの機能によって、App Routerは「柔軟かつ高性能なアプリ開発」を可能にします。
また、App Routerの利点をより実感するには、旧来のPage Routerとの比較が非常に参考になります。
以下の記事ではApp RouterとPage Routerの違いについてわかりやすくまとめられており、
Page Routerについて知らなかった僕でも、理解しやすい内容でした。
フォルダ構成を編集
さっそくフォルダ構成を編集していきます。
現在の構成はこの様になっております。
app/
├── page.tsx
├── layout.tsx
├── globals.css
こちらをこのように変えて行きます。
app/
├── page.tsx                   # トップページ(既存のものを残す)
├── layout.tsx                 # 全体共通レイアウト
├── globals.css                # グローバルCSS
├── expense/
│   ├── dashboard/
│   │   └── page.tsx           # /expense/dashboard(収支一覧など)
│   └── additional/
│       └── page.tsx           # /expense/additional(支出追加画面など)
想定しているルーティングは
expense/dashboard : 支出一覧画面
expense/additional : 支出入力画面
といった感じです。
ルーティングには、動的ルーティングや論理グループなどがありますが、必要に応じて今後導入していきたいと思います。
ロジックの分割
支出入力、支出一覧の処理をそれぞれ管理画面から移動させます。
現行はlocalStorageに保存されるよう実装されているので、
別ページ間でのデータ管理は特に触らずに済みました。
支出入力画面(長いので畳みます)
"use client"

import type React from "react"

import { useState, useEffect } from "react"
import { Button } from "@/components/ui/button"
import { Card, CardContent, CardDescription, CardHeader, CardTitle } from "@/components/ui/card"
import { Input } from "@/components/ui/input"
import { Label } from "@/components/ui/label"
import { Select, SelectContent, SelectItem, SelectTrigger, SelectValue } from "@/components/ui/select"
import { Textarea } from "@/components/ui/textarea"
import { CalendarIcon, PlusIcon, Trash2Icon } from "lucide-react"

interface Expense {
  id: string
  date: string
  amount: number
  category: string
  memo: string
  createdAt: number
}

const categories = [
  { value: "food", label: "食費" },
  { value: "living", label: "生活費" },
  { value: "fixed", label: "固定費" },
  { value: "misc", label: "雑費" },
]

const categoryColors = {
  food: "bg-orange-100 text-orange-800",
  living: "bg-blue-100 text-blue-800",
  fixed: "bg-purple-100 text-purple-800",
  misc: "bg-gray-100 text-gray-800",
}

export default function ExpenseInputForm() {
  const [expenses, setExpenses] = useState<Expense[]>([])
  const [formData, setFormData] = useState({
    date: new Date().toISOString().split("T")[0],
    amount: "",
    category: "",
    memo: "",
  })

  // localStorageにデータを保存
  const saveToLocalStorage = (newExpenses: Expense[]) => {
    localStorage.setItem("expenses", JSON.stringify(newExpenses))
  }

  // 支出を追加
  const handleAddExpense = (e: React.FormEvent) => {
    e.preventDefault()
    if (!formData.amount || !formData.category) {
      alert("金額とカテゴリは必須です")
      return
    }
    const newExpense: Expense = {
      id: Date.now().toString(),
      date: formData.date,
      amount: Number.parseFloat(formData.amount),
      category: formData.category,
      memo: formData.memo,
      createdAt: Date.now(),
    }
    const updatedExpenses = [newExpense, ...expenses]
    setExpenses(updatedExpenses)
    saveToLocalStorage(updatedExpenses)

    // フォームをリセット(日付は今日のまま)
    setFormData({
      date: new Date().toISOString().split("T")[0],
      amount: "",
      category: "",
      memo: "",
    })
  }
  return (
    <div className="min-h-screen bg-gray-50 py-8">
      <div className="max-w-4xl mx-auto px-4 space-y-8">
        <div className="text-center">
          <h1 className="text-3xl font-bold text-gray-900">支出入力</h1>
          <p className="text-gray-600 mt-2">日々の支出を入力しましょう</p>
        </div>

        {/* 支出入力フォーム */}
        <Card>
          <CardHeader>
            <CardTitle className="flex items-center gap-2">
              <PlusIcon className="w-5 h-5" />
              支出を追加
            </CardTitle>
            <CardDescription>新しい支出を入力してください</CardDescription>
          </CardHeader>
          <CardContent>
            <form onSubmit={handleAddExpense} className="space-y-4">
              <div className="grid grid-cols-1 md:grid-cols-2 gap-4">
                <div className="space-y-2">
                  <Label htmlFor="date" className="flex items-center gap-2">
                    <CalendarIcon className="w-4 h-4" />
                    日付
                  </Label>
                  <Input
                    id="date"
                    type="date"
                    value={formData.date}
                    onChange={(e) => setFormData({ ...formData, date: e.target.value })}
                    required
                  />
                </div>
                <div className="space-y-2">
                  <Label htmlFor="amount">金額 *</Label>
                  <Input
                    id="amount"
                    type="number"
                    placeholder="1000"
                    value={formData.amount}
                    onChange={(e) => setFormData({ ...formData, amount: e.target.value })}
                    min="0"
                    step="1"
                    required
                  />
                </div>
              </div>

              <div className="space-y-2">
                <Label htmlFor="category">カテゴリ *</Label>
                <Select
                  value={formData.category}
                  onValueChange={(value) => setFormData({ ...formData, category: value })}
                  required
                >
                  <SelectTrigger>
                    <SelectValue placeholder="カテゴリを選択してください" />
                  </SelectTrigger>
                  <SelectContent>
                    {categories.map((category) => (
                      <SelectItem key={category.value} value={category.value}>
                        {category.label}
                      </SelectItem>
                    ))}
                  </SelectContent>
                </Select>
              </div>

              <div className="space-y-2">
                <Label htmlFor="memo">メモ(任意)</Label>
                <Textarea
                  id="memo"
                  placeholder="支出の詳細やメモを入力..."
                  value={formData.memo}
                  onChange={(e) => setFormData({ ...formData, memo: e.target.value })}
                  rows={3}
                />
              </div>

              <Button type="submit" className="w-full">
                <PlusIcon className="w-4 h-4 mr-2" />
                支出を追加
              </Button>
            </form>
          </CardContent>
        </Card>
      </div>
    </div>
  )
}
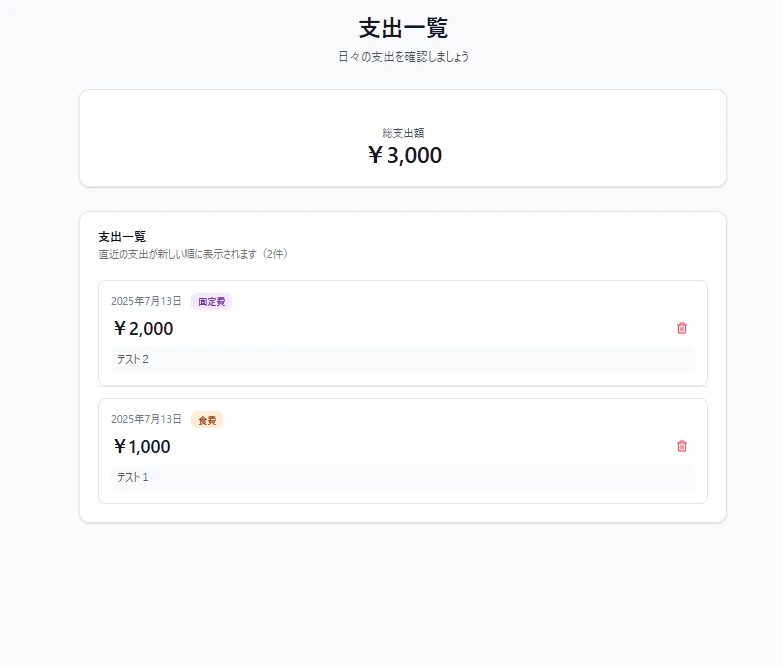
支出一覧画面(長いので畳みます)
"use client"

import type React from "react"

import { useState, useEffect } from "react"
import { Button } from "@/components/ui/button"
import { Card, CardContent, CardDescription, CardHeader, CardTitle } from "@/components/ui/card"
import { Separator } from "@/components/ui/separator"
import { Badge } from "@/components/ui/badge"
import { Trash2Icon } from "lucide-react"

interface Expense {
  id: string
  date: string
  amount: number
  category: string
  memo: string
  createdAt: number
}

const categories = [
  { value: "food", label: "食費" },
  { value: "living", label: "生活費" },
  { value: "fixed", label: "固定費" },
  { value: "misc", label: "雑費" },
]

const categoryColors = {
  food: "bg-orange-100 text-orange-800",
  living: "bg-blue-100 text-blue-800",
  fixed: "bg-purple-100 text-purple-800",
  misc: "bg-gray-100 text-gray-800",
}

export default function ExpenseDashboard() {
  const [expenses, setExpenses] = useState<Expense[]>([])
  const [formData, setFormData] = useState({
    date: new Date().toISOString().split("T")[0],
    amount: "",
    category: "",
    memo: "",
  })
  // localStorageからデータを読み込み
  useEffect(() => {
    const savedExpenses = localStorage.getItem("expenses")
    if (savedExpenses) {
      setExpenses(JSON.parse(savedExpenses))
    }
  }, [])

  // localStorageにデータを保存
  const saveToLocalStorage = (newExpenses: Expense[]) => {
    localStorage.setItem("expenses", JSON.stringify(newExpenses))
  }
  // 支出を削除
  const handleDeleteExpense = (id: string) => {
    const updatedExpenses = expenses.filter((expense) => expense.id !== id)
    setExpenses(updatedExpenses)
    saveToLocalStorage(updatedExpenses)
  }
    // 金額をフォーマット
  const formatAmount = (amount: number) => {
    return new Intl.NumberFormat("ja-JP", {
      style: "currency",
      currency: "JPY",
    }).format(amount)
  }
  // カテゴリ名を取得
  const getCategoryLabel = (value: string) => {
    return categories.find((cat) => cat.value === value)?.label || value
  }
  // 日付をフォーマット
  const formatDate = (dateString: string) => {
    const date = new Date(dateString)
    return date.toLocaleDateString("ja-JP", {
      year: "numeric",
      month: "short",
      day: "numeric",
    })
  }


  return (
    <div className="min-h-screen bg-gray-50 py-8">
      <div className="max-w-4xl mx-auto px-4 space-y-8">
        <div className="text-center">
          <h1 className="text-3xl font-bold text-gray-900">支出管理</h1>
          <p className="text-gray-600 mt-2">日々の支出を記録・管理しましょう</p>
        </div>

        {/* 合計金額表示 */}
        {expenses.length > 0 && (
          <Card>
            <CardContent className="pt-6">
              <div className="text-center">
                <p className="text-sm text-gray-600">総支出額</p>
                <p className="text-3xl font-bold text-gray-900">
                  {formatAmount(expenses.reduce((total, expense) => total + expense.amount, 0))}
                </p>
              </div>
            </CardContent>
          </Card>
        )}

        {/* 支出一覧 */}
        <Card>
          <CardHeader>
            <CardTitle>支出一覧</CardTitle>
            <CardDescription>直近の支出が新しい順に表示されます({expenses.length}件)</CardDescription>
          </CardHeader>
          <CardContent>
            {expenses.length === 0 ? (
              <div className="text-center py-8 text-gray-500">
                <p>まだ支出が登録されていません</p>
                <p className="text-sm">上のフォームから支出を追加してください</p>
              </div>
            ) : (
              <div className="space-y-4">
                {expenses.map((expense, index) => (
                  <div key={expense.id}>
                    <div className="flex items-center justify-between p-4 bg-white rounded-lg border hover:shadow-sm transition-shadow">
                      <div className="flex-1 space-y-2">
                        <div className="flex items-center gap-3">
                          <span className="text-sm text-gray-500">{formatDate(expense.date)}</span>
                          <Badge className={categoryColors[expense.category as keyof typeof categoryColors]}>
                            {getCategoryLabel(expense.category)}
                          </Badge>
                        </div>
                        <div className="flex items-center justify-between">
                          <span className="text-2xl font-bold text-gray-900">{formatAmount(expense.amount)}</span>
                          <Button
                            variant="ghost"
                            size="sm"
                            onClick={() => handleDeleteExpense(expense.id)}
                            className="text-red-500 hover:text-red-700 hover:bg-red-50"
                          >
                            <Trash2Icon className="w-4 h-4" />
                          </Button>
                        </div>
                        {expense.memo && <p className="text-sm text-gray-600 bg-gray-50 p-2 rounded">{expense.memo}</p>}
                      </div>
                    </div>
                    {index < expenses.length - 1 && <Separator />}
                  </div>
                ))}
              </div>
            )}
          </CardContent>
        </Card>
      </div>
    </div>
  )
}
動作確認
改修前
元の画面がこの状態でした。
http://localhost:3000/にアクセス(支出管理画面)

改修後
分割後はこのようになりました。
http://localhost:3000/expense/additionalにアクセス(支出入力画面)

http://localhost:3000/expense/dashboardにアクセス(支出一覧画面)
まとめ
app配下のフォルダ・ファイル構成がそのままルーティングに設定されるのでシンプルでやりやすかったです。
分割時にコンポーネントの内容を知る必要があったので、少しReact、Next,jsへの理解が進みました。