はじめに
本記事のゴール
iOSアプリのGitLab CI/CD環境を整えたい!
ということで、第一弾はコードレビュー編です。
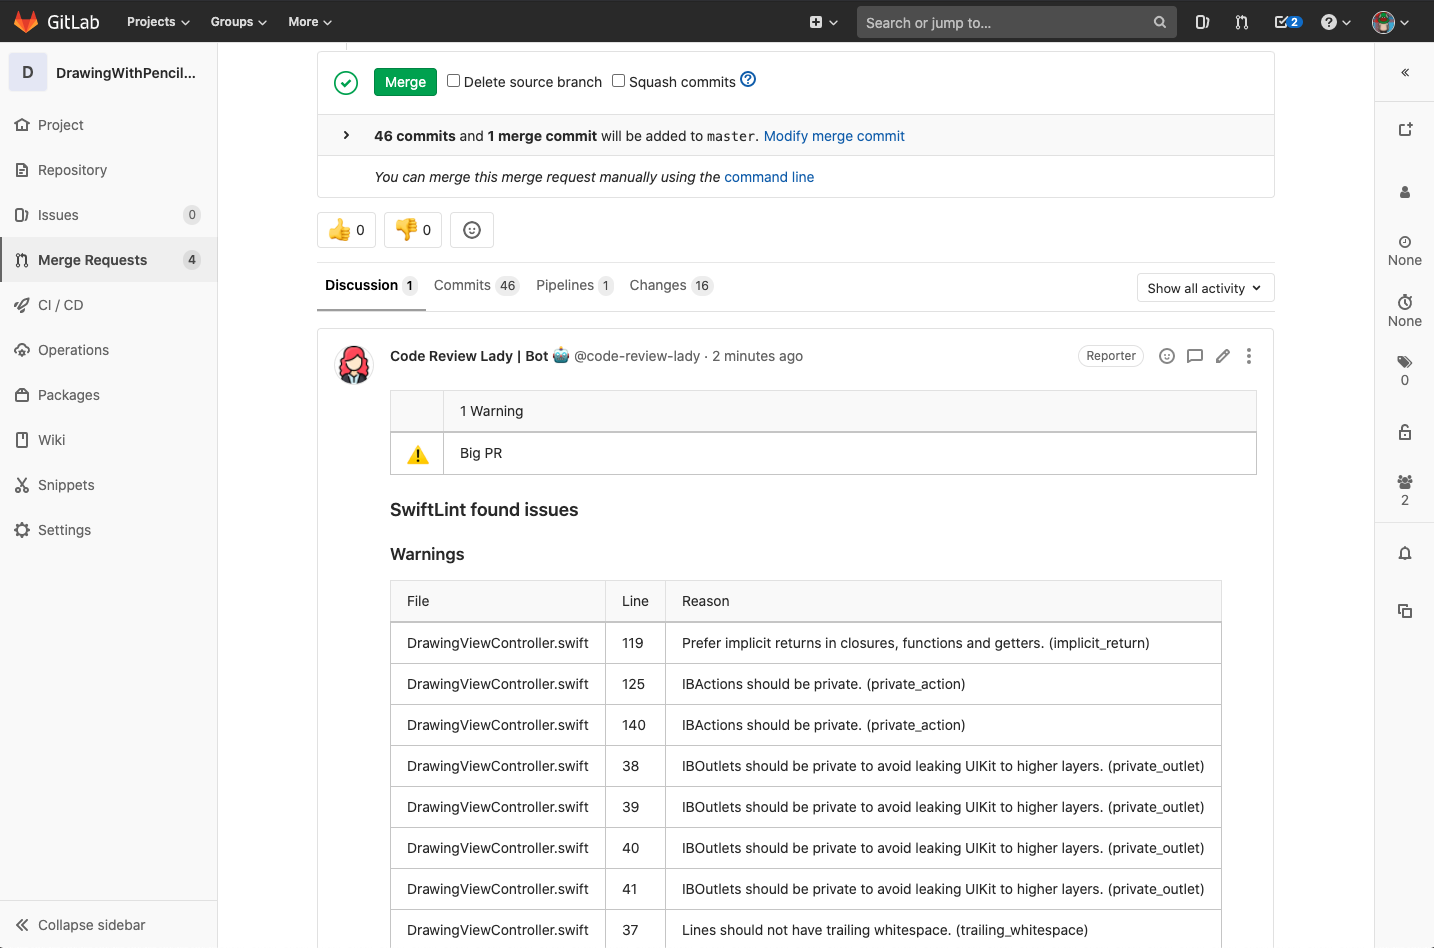
以下のキャプチャのようにMerge Request作成時に自動でSwiftLintを実行+実行結果をコメントに残すことで、コードレビューを円滑にし品質向上に繋げることを目的としています。

環境
- macOS(ビルド用):macOS Catalina 10.15.4
- Xcode:11.4.1
- Swift:5.2.2
- SwiftLint:0.30.1
- Danger:8.0.0
- Danger Gitlab:8.0.0
- Danger Swiftlint:0.24.2
- Fastlane:2.148.1
- GitLab CE(セルフホスティング):12.4.0
- GitLab CI:11.1.0
SwiftLint とは?
SwiftLint は、Swift用の静的解析ツールです。
コードレビュー時に静的解析ツールを挟むことで、品質向上に繋げるのが目的です。
詳しくは公式ドキュメントを読んで下さい。
https://realm.github.io/SwiftLint/
Fastlane とは?
Fastlaneは、モバイルアプリ開発で必要な様々な作業(テスト/ビルド/リリース等)の自動化ツールです。
.gitlab-ci.ymlにCIプロセスを記述するのも有りですが、CI環境に依存しない+リリースプロセスまで考えると、iOSアプリ開発ではFastlaneを使う方が良いと思います。
また、Fastlane標準でSwiftLintに対応しているのですが、MRコメントにLint結果を残すまではできないので、少し歯がゆさが残ります。
これを解決するために、次のDangerを使用します。
詳しくは公式ドキュメントを読んで下さい。
https://fastlane.tools/
Danger とは?
Dangerは、コードレビューの自動化ツールです。
FastlaneだけでもCIプロセス中にSwiftLintを実行することは出来るのですが、Lint結果を確認するために一々ジョブの中身のログだったりアーティファクトを確認しないとダメなので面倒です。(※やりようによってはGitLab PagesでLint結果を公開することもできますが、ここでは割愛)
ですので、Lint結果をMRコメントに残す目的で使用します。
詳しくは公式ドキュメントを読んで下さい。
https://danger.systems/swift/
1. SwiftLint を導入する
1-1. SwiftLint のインストール
チームで共有しやすいようにCocoapodsでインストールします
target 'MyApp' do
  use_frameworks!

+  pod 'SwiftLint'
end
$ pod install
※Homebrewでもインストールできるので、必要に応じて公式ドキュメントを確認して下さい
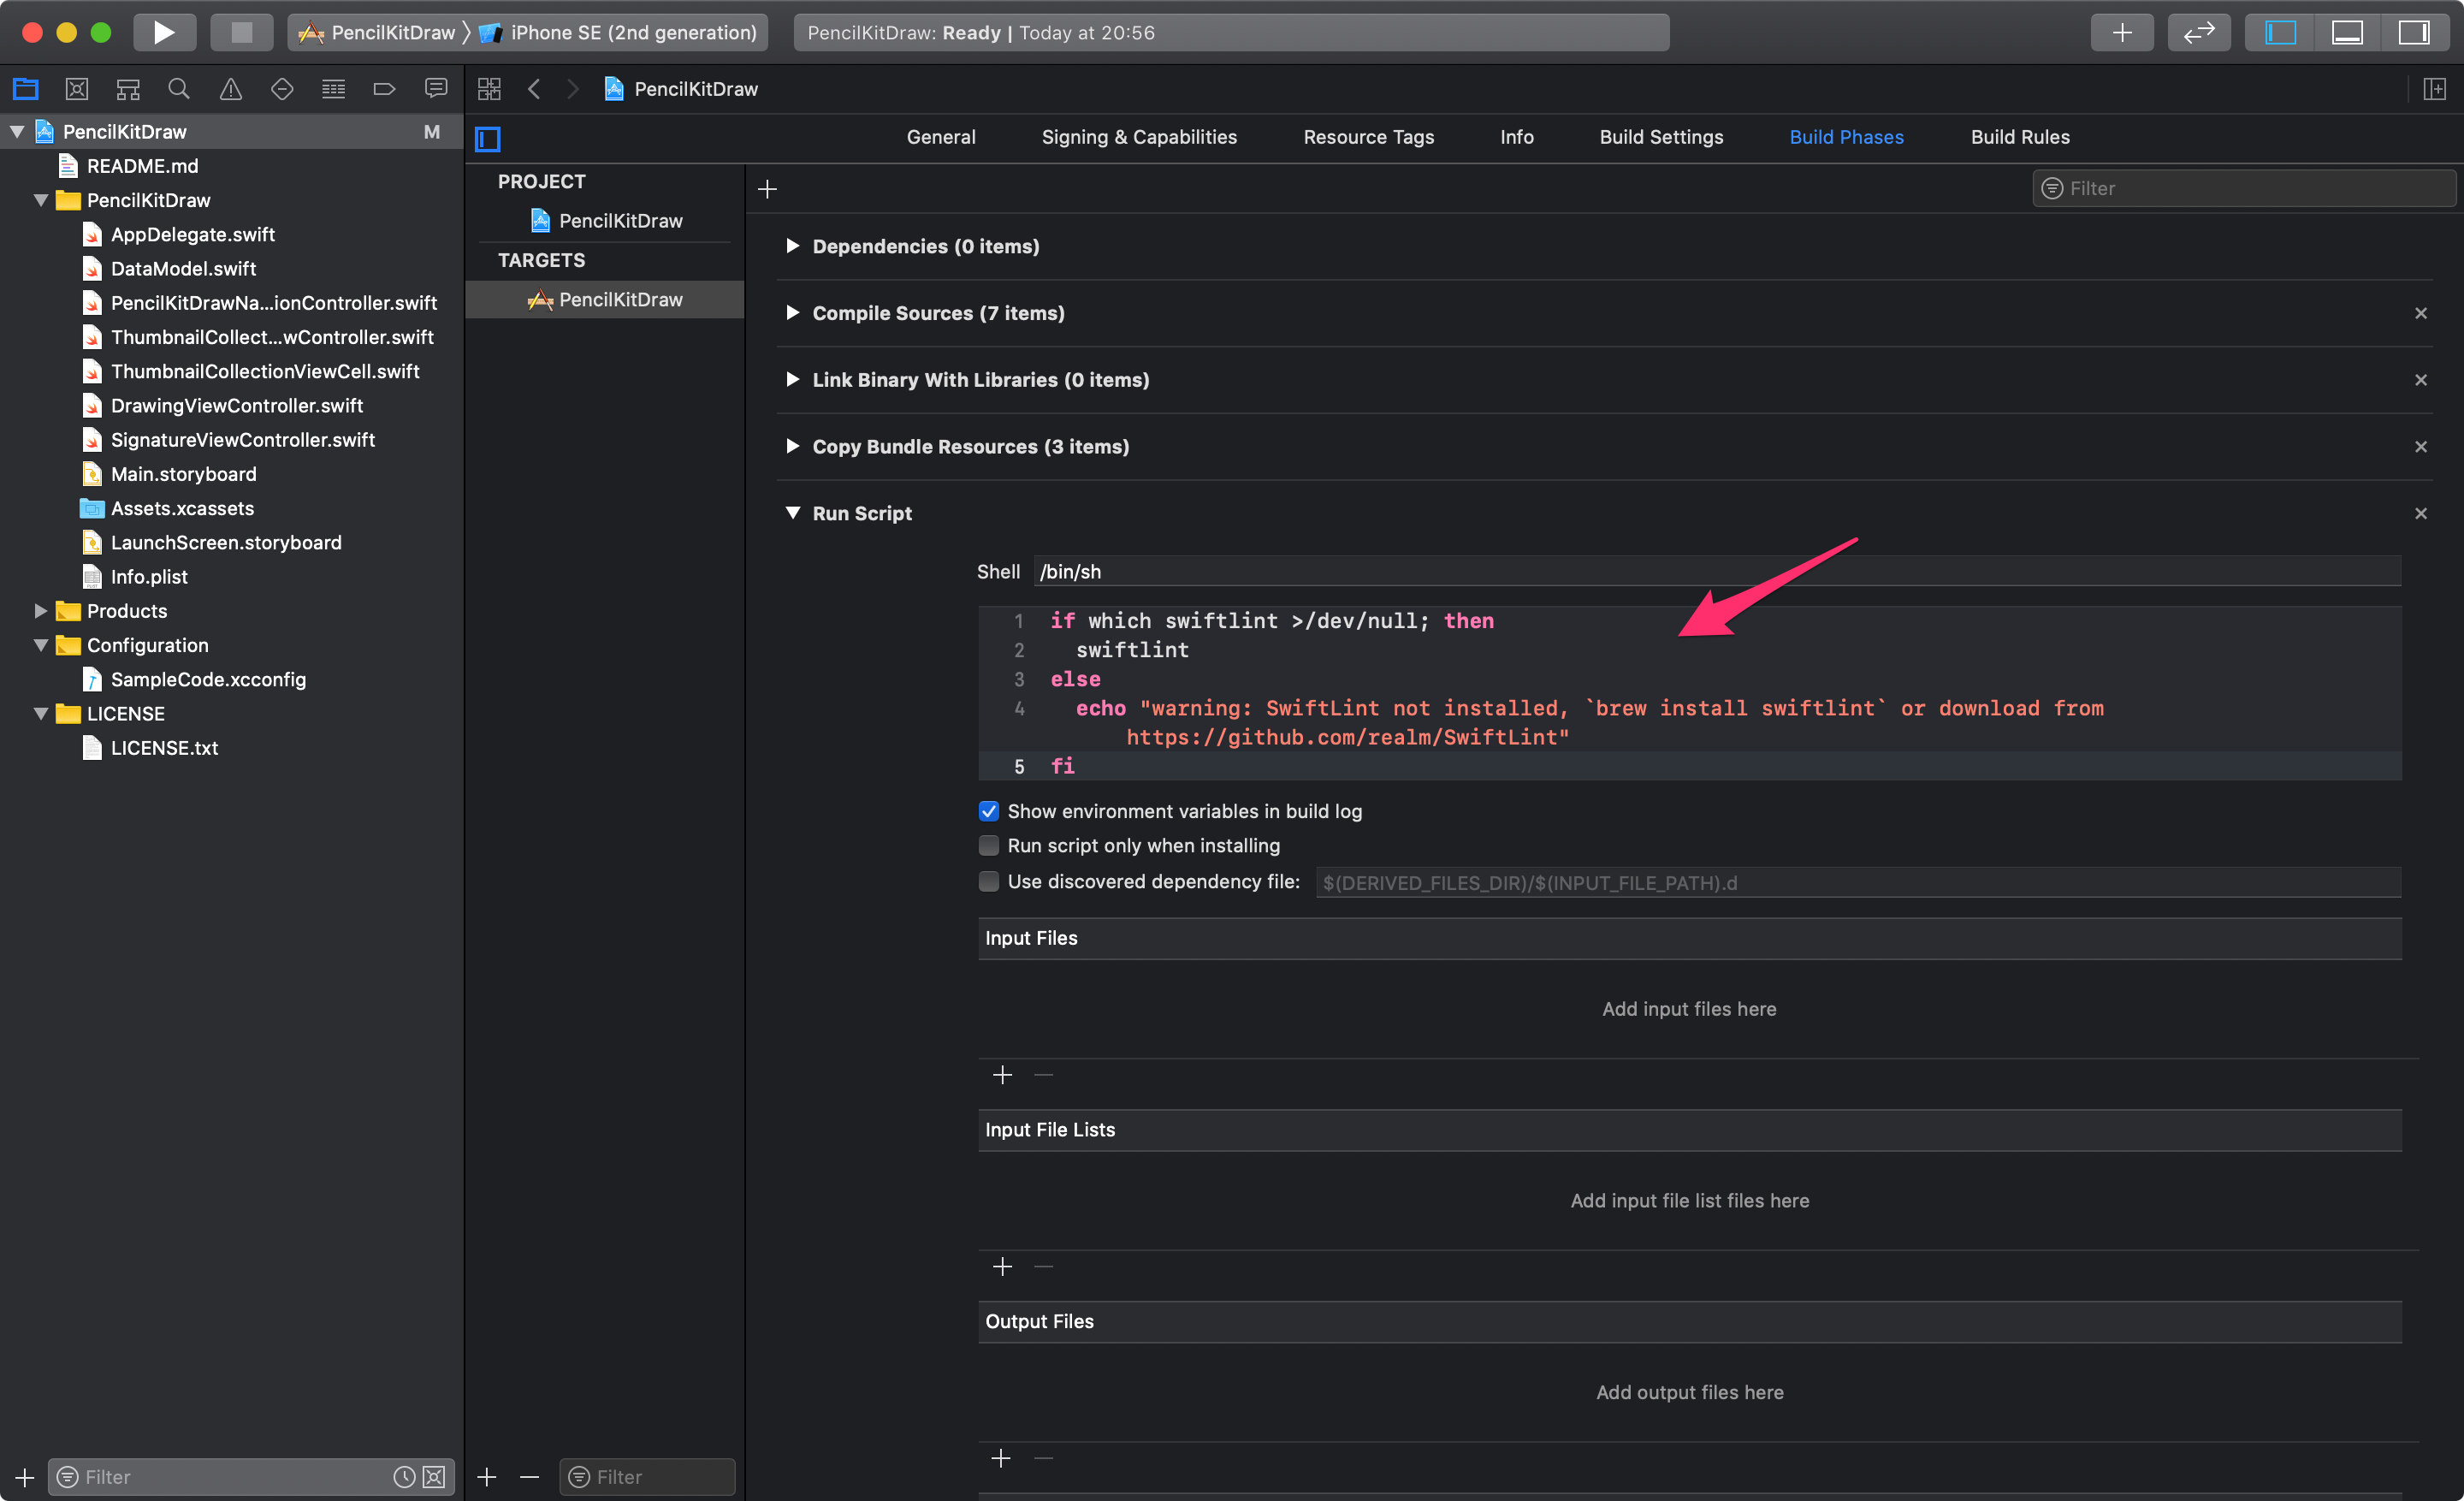
1-2. Xcode での SwiftLint 実行スクリプトの設定
Xcodeでのビルド実行時に、WarningsとErrorsメッセージを表示するために、実行スクリプトの設定をします
- Xcode でプロジェクトを開く
- [Project Navigator] でプロジェクトを選択する
- [Targets] からターゲットを選択する
- [Build Phase]タブ -> [+]ボタン -> [New Run Script Phase] を選択する
- 追加された『Run Script』項目にスクリプトを書く

if which ${PODS_ROOT}/SwiftLint/swiftlint >/dev/null; then
  ${PODS_ROOT}/SwiftLint/swiftlint
else
  echo "warning: SwiftLint not installed, download from https://github.com/realm/SwiftLint"
fi
1-3. 静的解析の実行
ビルド実行(⌘+B)で静的解析を実行する
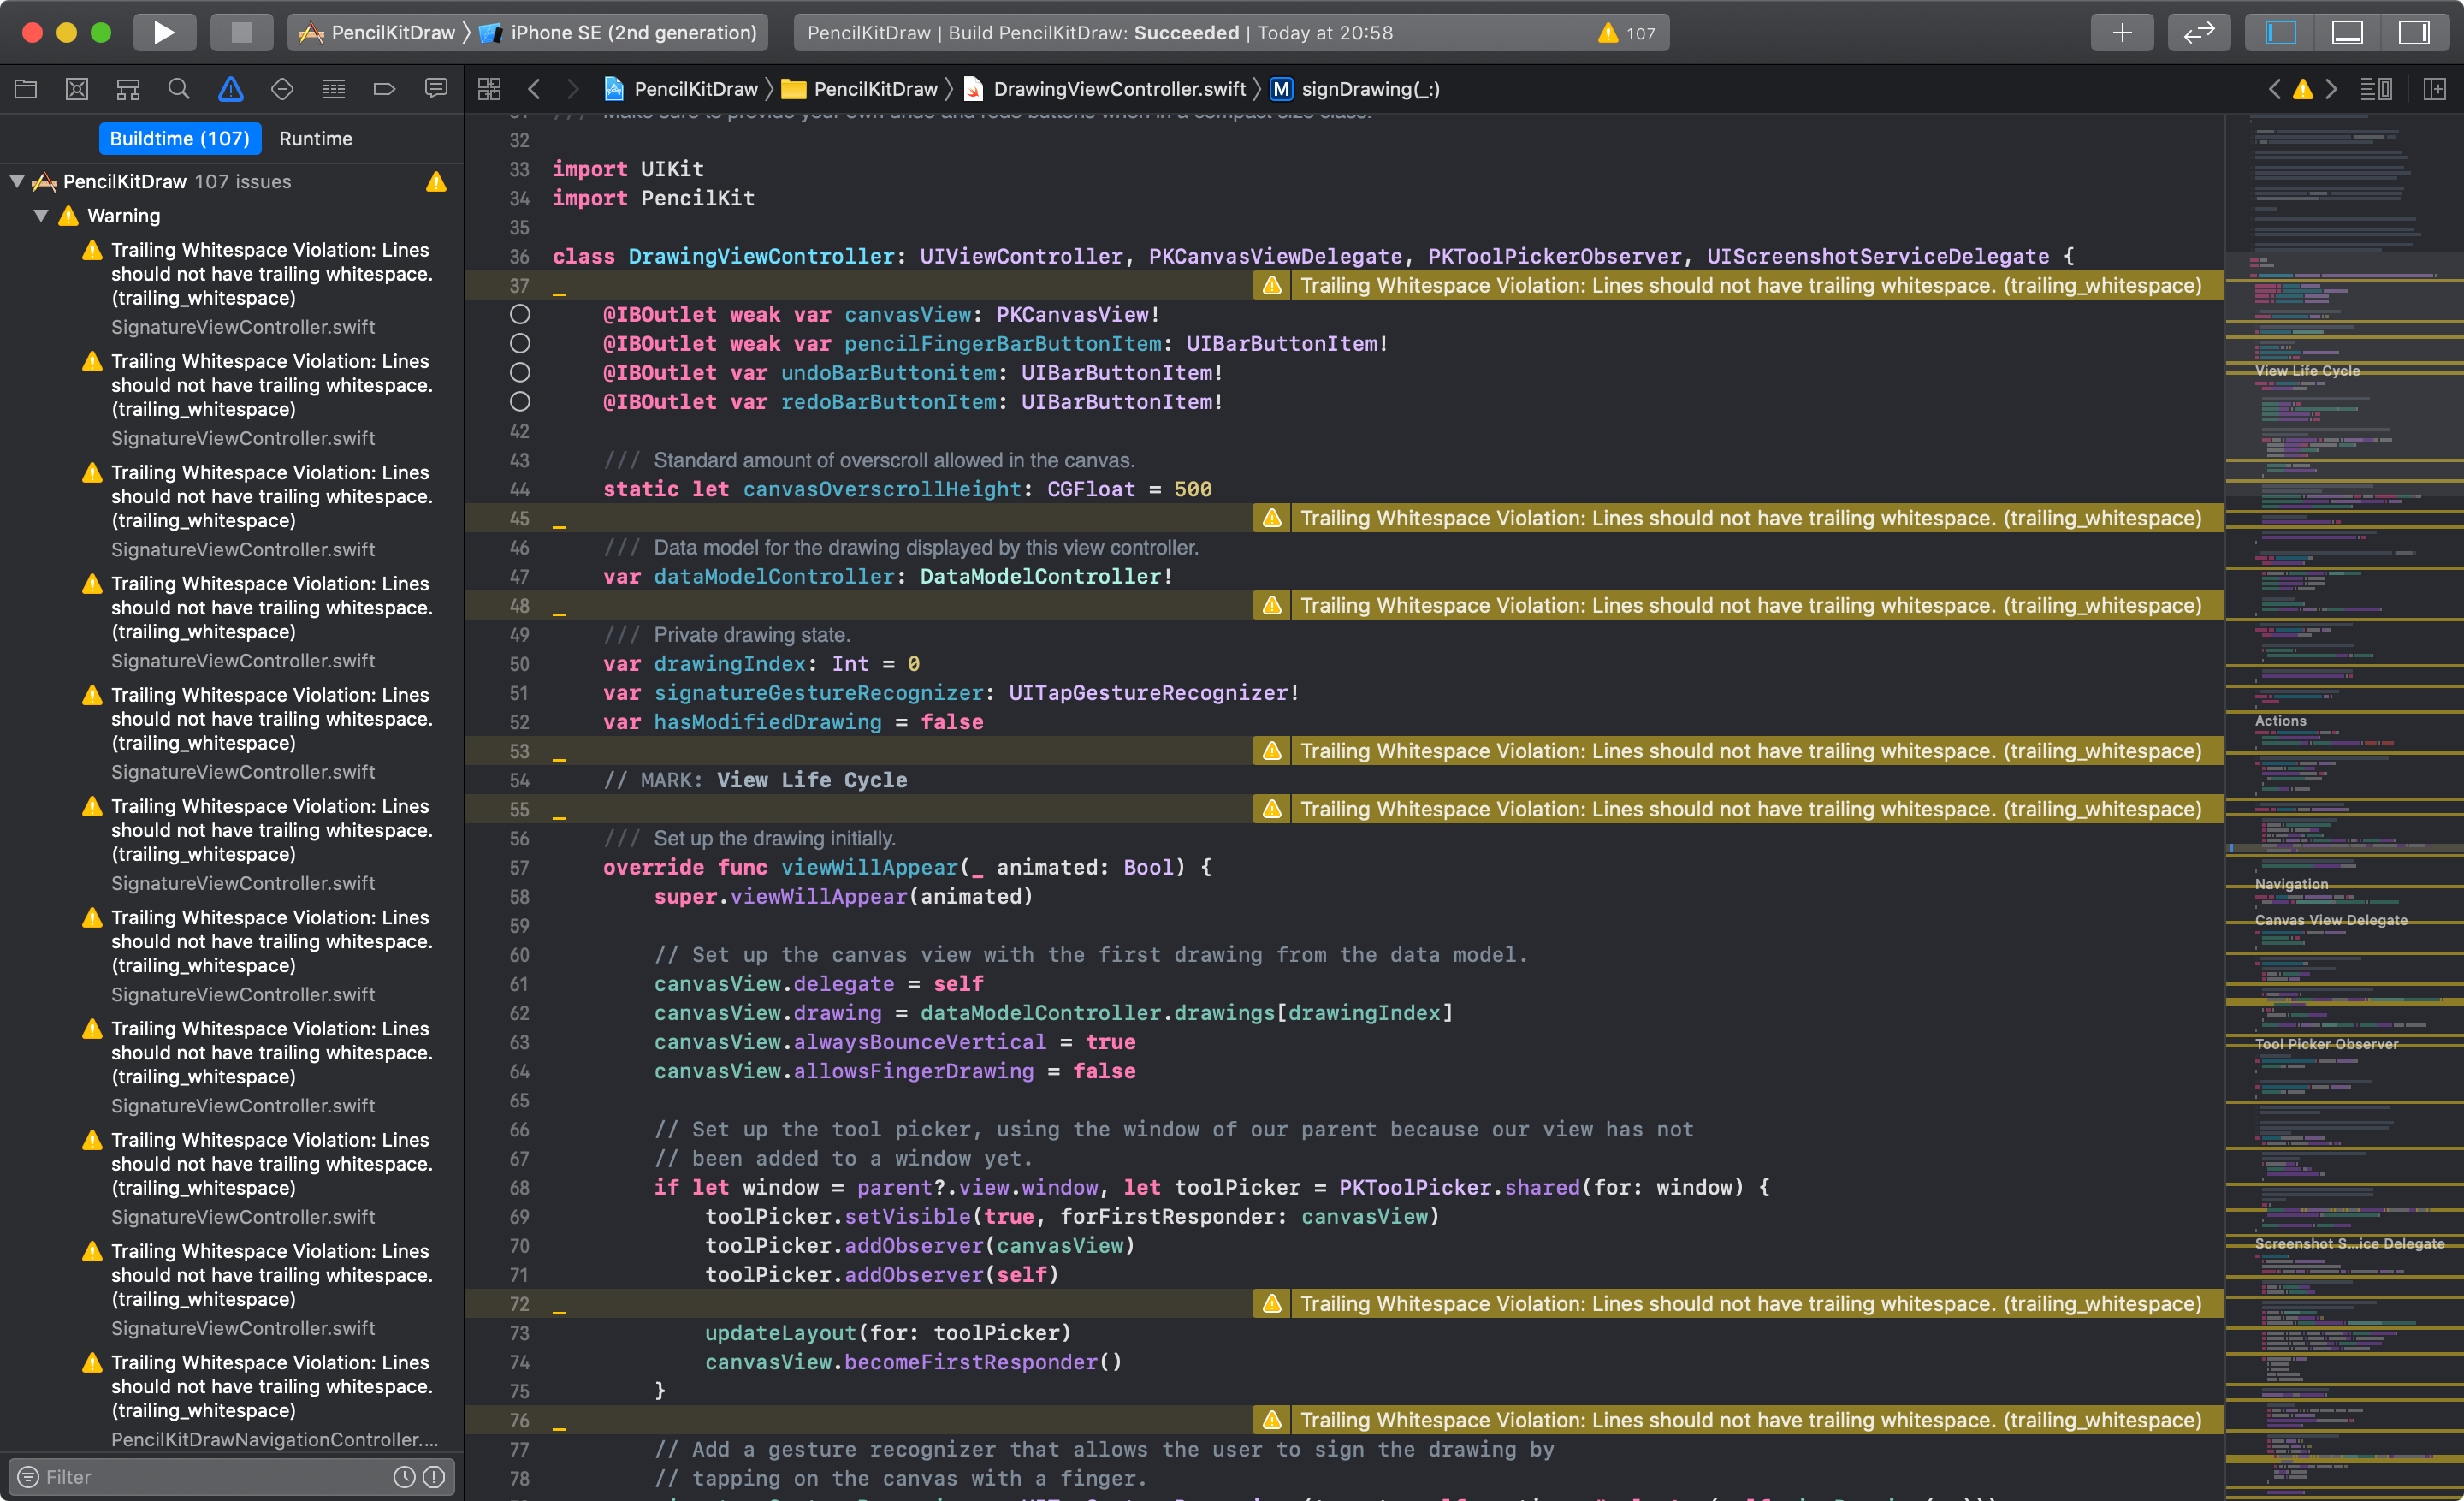
1-4. ルールの詳細設定
プロジェクトのルートディレクトリに .swiftlint.yml を作成し、その中にルールの詳細を記述します
$ touch .swiftlint.yml
ファイルの中身は Swiftの静的解析ツール「SwiftLint」のセットアップ方法 > ルールの詳細設定
を参考にさせて頂きました
ここまでで、ローカルではSwiftLintが実行できるようになりました ![]()
GitLab CIで実行するための設定に続きます ![]()
2. Fastlane と Danger を導入する
2-1. Fastlane と Danger のGemインストール
bundle initでGemfileを作成してインストールします
$ bundle init
source "https://rubygems.org"

gem "fastlane"
gem "cocoapods"

gem "danger"
gem "danger-gitlab"
gem "danger-swiftlint"
$ bundle install --path vendor/bundle
2-2. Fastlane のセットアップ
fastlane initを実行して「4.マニュアルセットアップ」でセットアップする
$ bundle exec fastlane init
[✔] 🚀
[23:15:49]: Sending anonymous analytics information
[23:15:49]: Learn more at https://docs.fastlane.tools/#metrics
[23:15:49]: No personal or sensitive data is sent.
[23:15:49]: You can disable this by adding `opt_out_usage` at the top of your Fastfile
[✔] Looking for iOS and Android projects in current directory...
[23:15:49]: Created new folder './fastlane'.
[23:15:49]: Detected an iOS/macOS project in the current directory: 'PencilKitDraw.xcodeproj'
[23:15:49]: -----------------------------
[23:15:49]: --- Welcome to fastlane 🚀 ---
[23:15:49]: -----------------------------
[23:15:49]: fastlane can help you with all kinds of automation for your mobile app
[23:15:49]: We recommend automating one task first, and then gradually automating more over time
[23:15:49]: What would you like to use fastlane for?
1. 📸 Automate screenshots
2. 👩✈️ Automate beta distribution to TestFlight
3. 🚀 Automate App Store distribution
4. 🛠 Manual setup - manually setup your project to automate your tasks
? 4
Fastfileの設定
実行後、ルートディレクトリにfastlaneフォルダが作成されているので、FastfileにSwiftLint実行用のレーンを作成します
※Fastlaneでは、アクションと呼ばれる機能を組み合わせをレーンと呼びます
前述のとおり、Fastlane標準でSwiftLintをサポートしていますが、MR上でLint結果の確認が大変なので、こちらは使用しません。
https://docs.fastlane.tools/actions/swiftlint/
default_platform(:ios)

platform :ios do
  desc "Does a static analysis of the project. Configure the options in .swiftlint.yml"
  lane :lint do
    # Runs pod install for the project
    # https://docs.fastlane.tools/actions/cocoapods/
    cocoapods

    # Runs danger for the project
    # https://docs.fastlane.tools/actions/danger/
    danger
  end
end
dangerアクションがSwiftLintの実行を内包しているので、記述はこれだけで大丈夫です
2-3. Danger のセットアップ
danger initを実行してセットアップ(チュートリアルは全てEnterで飛ばしてOK)
$ bundle exec danger init
Dangerfileの設定
実行後、ルートディレクトリにDangerfileが作成されているので、以下の設定を記述します
# Make it more obvious that a MR is a work in progress and shouldn't be merged yet
warn("MR is classed as Work in Progress") if gitlab.mr_title.include? "WIP"

# Warn when there is a big MR
warn("Big MR") if git.lines_of_code > 500

# Swiftlint
swiftlint.config_file = '.swiftlint.yml'
# swiftlint.lint_files inline_mode: true
swiftlint.lint_files fail_on_error: true
swiftlint.lint_files inline_mode: trueはLint結果をMRにインラインでコメントする設定です。
Warningが多いと逆にコメントが追えなくなるので、コメントアウトしています。
Dangerプラグイン
danger-gitlab
danger-swiftlint
FastlaneとDangerの設定が完了です ![]()
最後にGitlab CI/CD環境に組み込んでいきます ![]()
3. GitLab CI/CD 環境を構築する
3-1. .gitlab-ci.yml ファイルの作成
$ touch .gitlab-ci.yml
stages:
  - build

variables:
  LC_ALL: "en_US.UTF-8"
  LANG: "en_US.UTF-8"
  GIT_STRATEGY: clone

before_script:
  - export CI_MERGE_REQUEST_ID=$(curl -s "https://${DANGER_GITLAB_HOST}/api/v4/projects/${CI_PROJECT_ID}/merge_requests?private_token=${OAUTH_TOKEN}&state=opened" | jq -r ".[]|select(.sha == \"$CI_COMMIT_SHA\")|.iid")
  - bundle install

lint:
  stage: build
  script:
    - fastlane lint
  tags:
    - ios
  only:
    - merge_requests
3-2. GitLab CI Runner のセットアップ(ビルド用maxOS)
残念ながら、GitLab CI/CD環境でiOSアプリをビルドするにはmacOSでビルドすることが唯一の現実的な方法です。(2020.05.26時点)
なので、今回は自宅で眠っていたMacbook ProにGitLab CI Runnerしました。
$ sudo curl --output /usr/local/bin/gitlab-runner https://gitlab-runner-downloads.s3.amazonaws.com/latest/binaries/gitlab-runner-darwin-amd64
$ sudo chmod +x /usr/local/bin/gitlab-runner
$ cd ~
$ gitlab-runner install
$ gitlab-runner start
※gitlab-runnerコマンドは絶対にsudoを付けないようにして下さい
$ gitlab-runner status
Runtime platform                                    arch=amd64 os=darwin pid=18242 revision=c127439c version=13.0.0
gitlab-runner: Service is running!
無事起動していることを確認
3-3. GitLab CI Runner の登録(ビルド用maxOS)
続いて、CI Runnerを登録します。
GitLabプロジェクト管理画面のSettings > CI/CD > Specific Runners > Set up a specific Runner manuallyからURLとトークンを取得します。
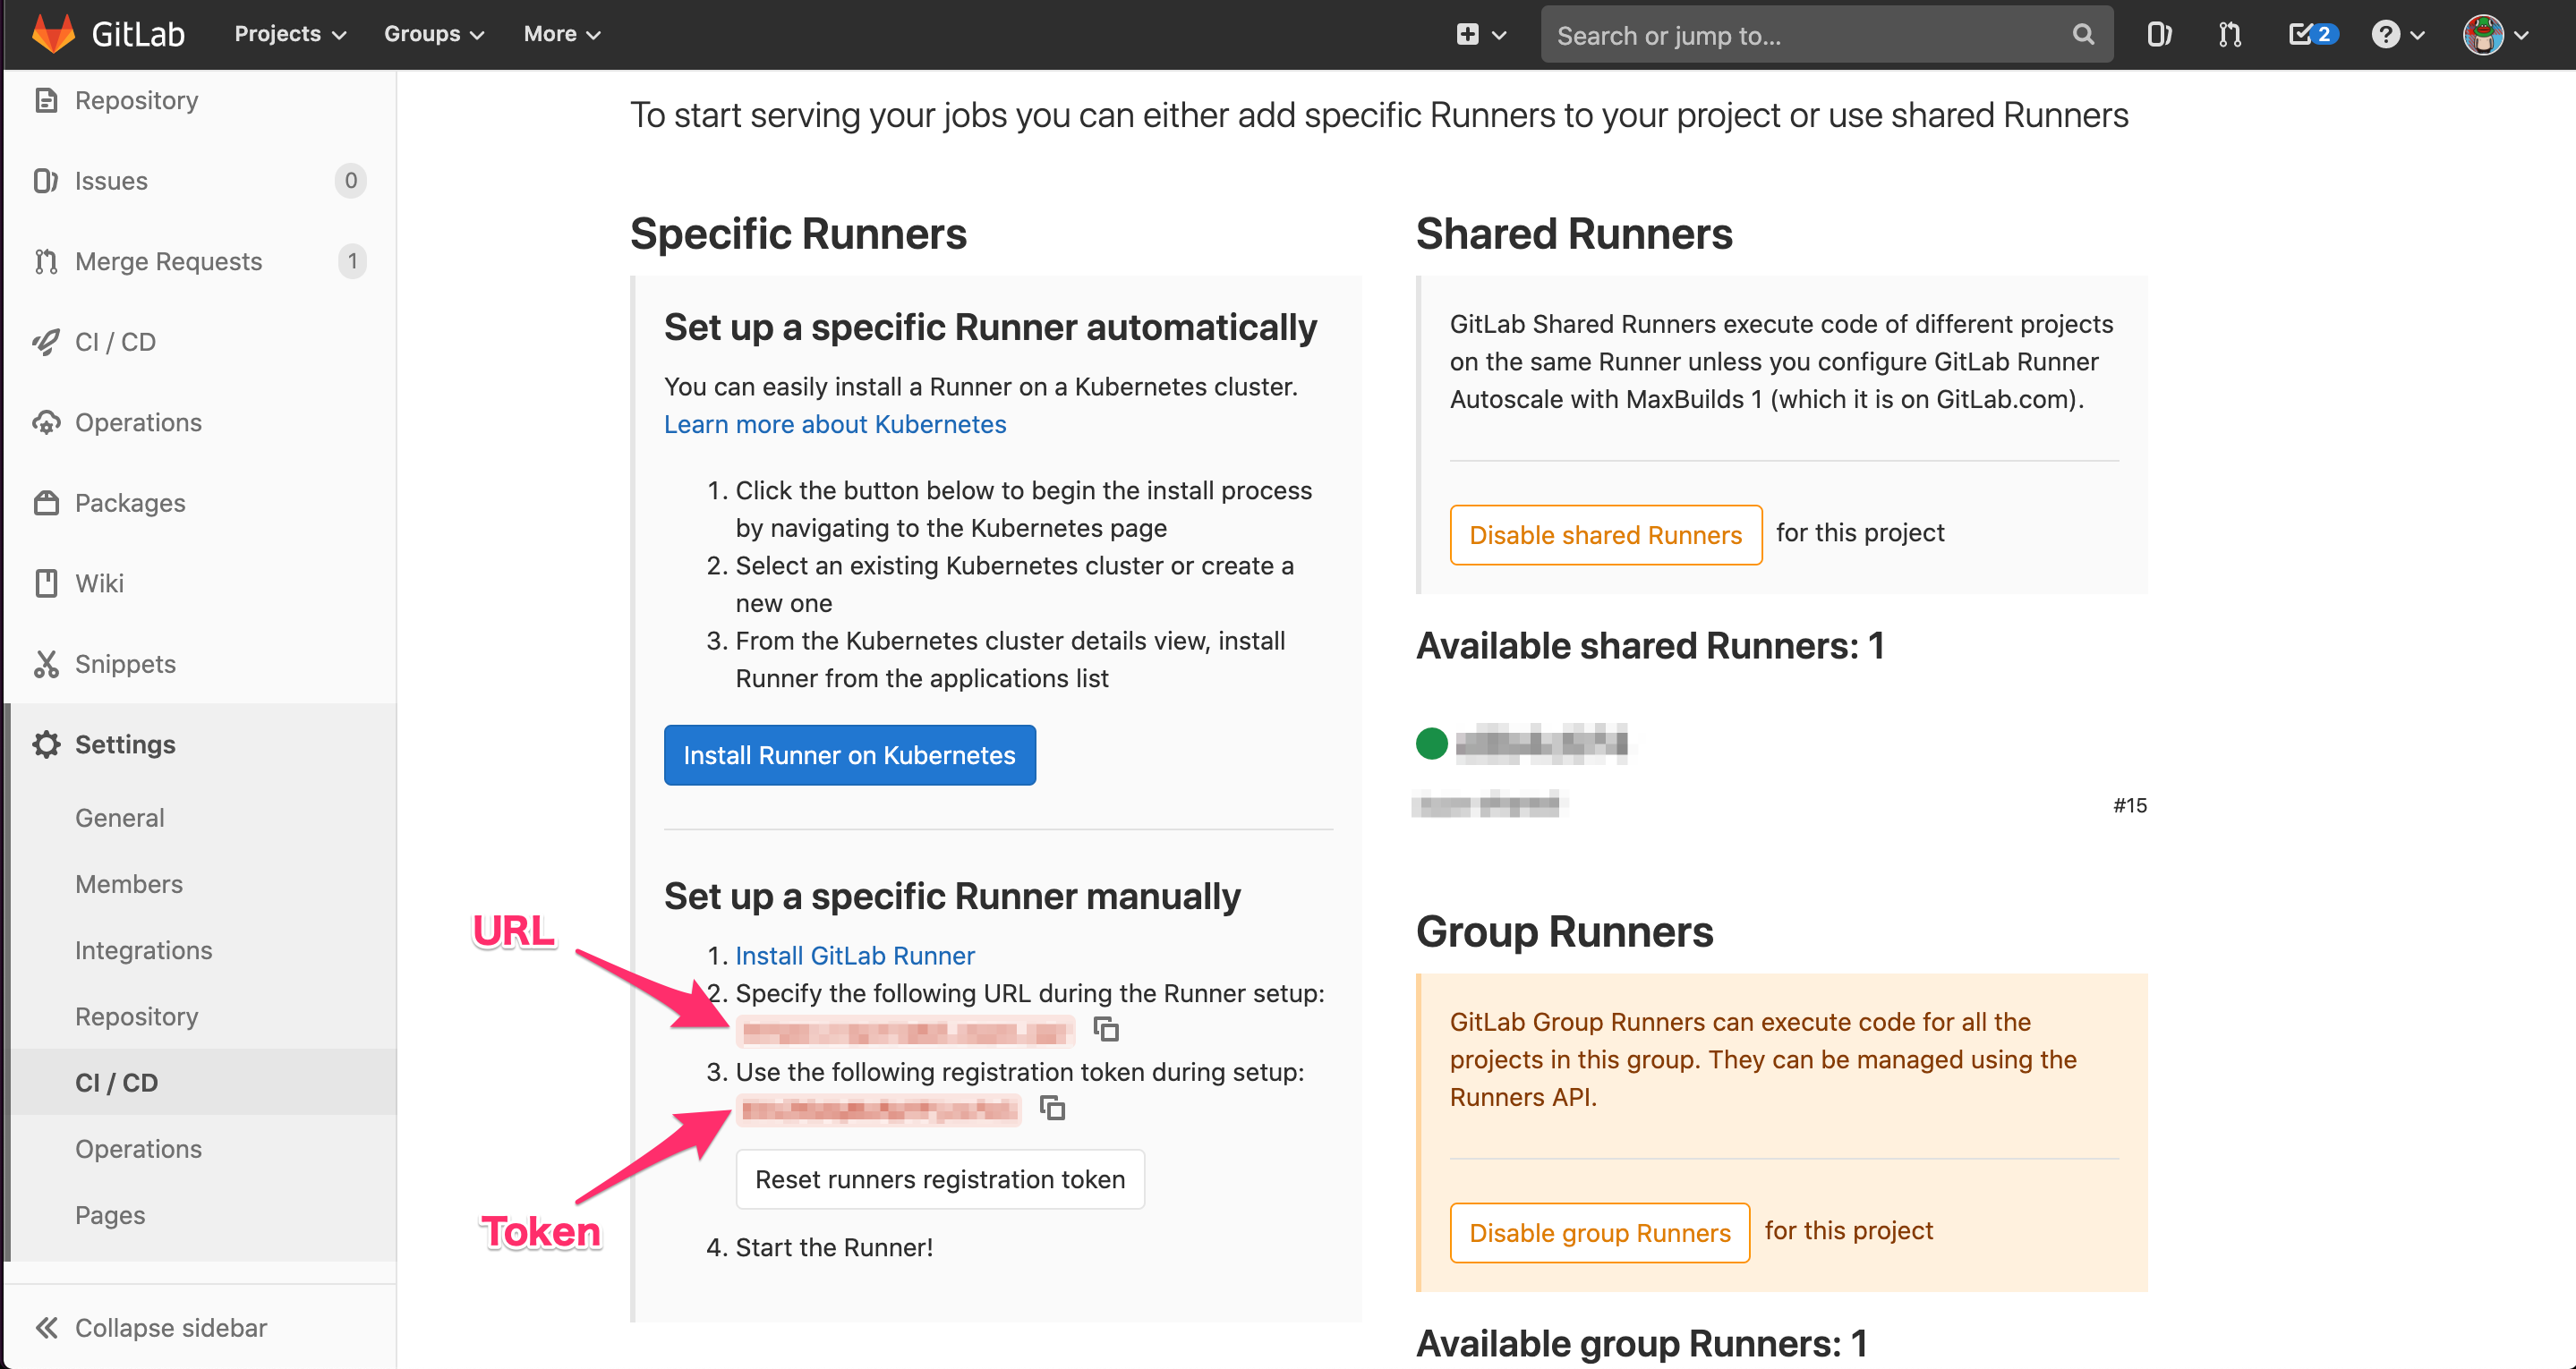
そして、ビルド用MacbookにGitLab CI Runnerをシェル実行として登録します。
$ gitlab-runner register
Runtime platform                                    arch=amd64 os=darwin pid=3501 revision=c127439c version=13.0.0
Running in system-mode.

Please enter the gitlab-ci coordinator URL (e.g. https://gitlab.com/):
-> Enter URL

Please enter the gitlab-ci token for this runner:
-> Enter Token

Please enter the gitlab-ci description for this runner:
-> Enter Description

Please enter the gitlab-ci tags for this runner (comma separated):
-> Enter Tag (e.g. ios)

Registering runner... succeeded                     runner=Rk3cH_Lx

Please enter the executor: ssh, docker+machine, kubernetes, virtualbox, docker-ssh+machine, custom, docker, docker-ssh, parallels, shell:
-> shell

Runner registered successfully. Feel free to start it, but if it's running already the config should be automatically reloaded!
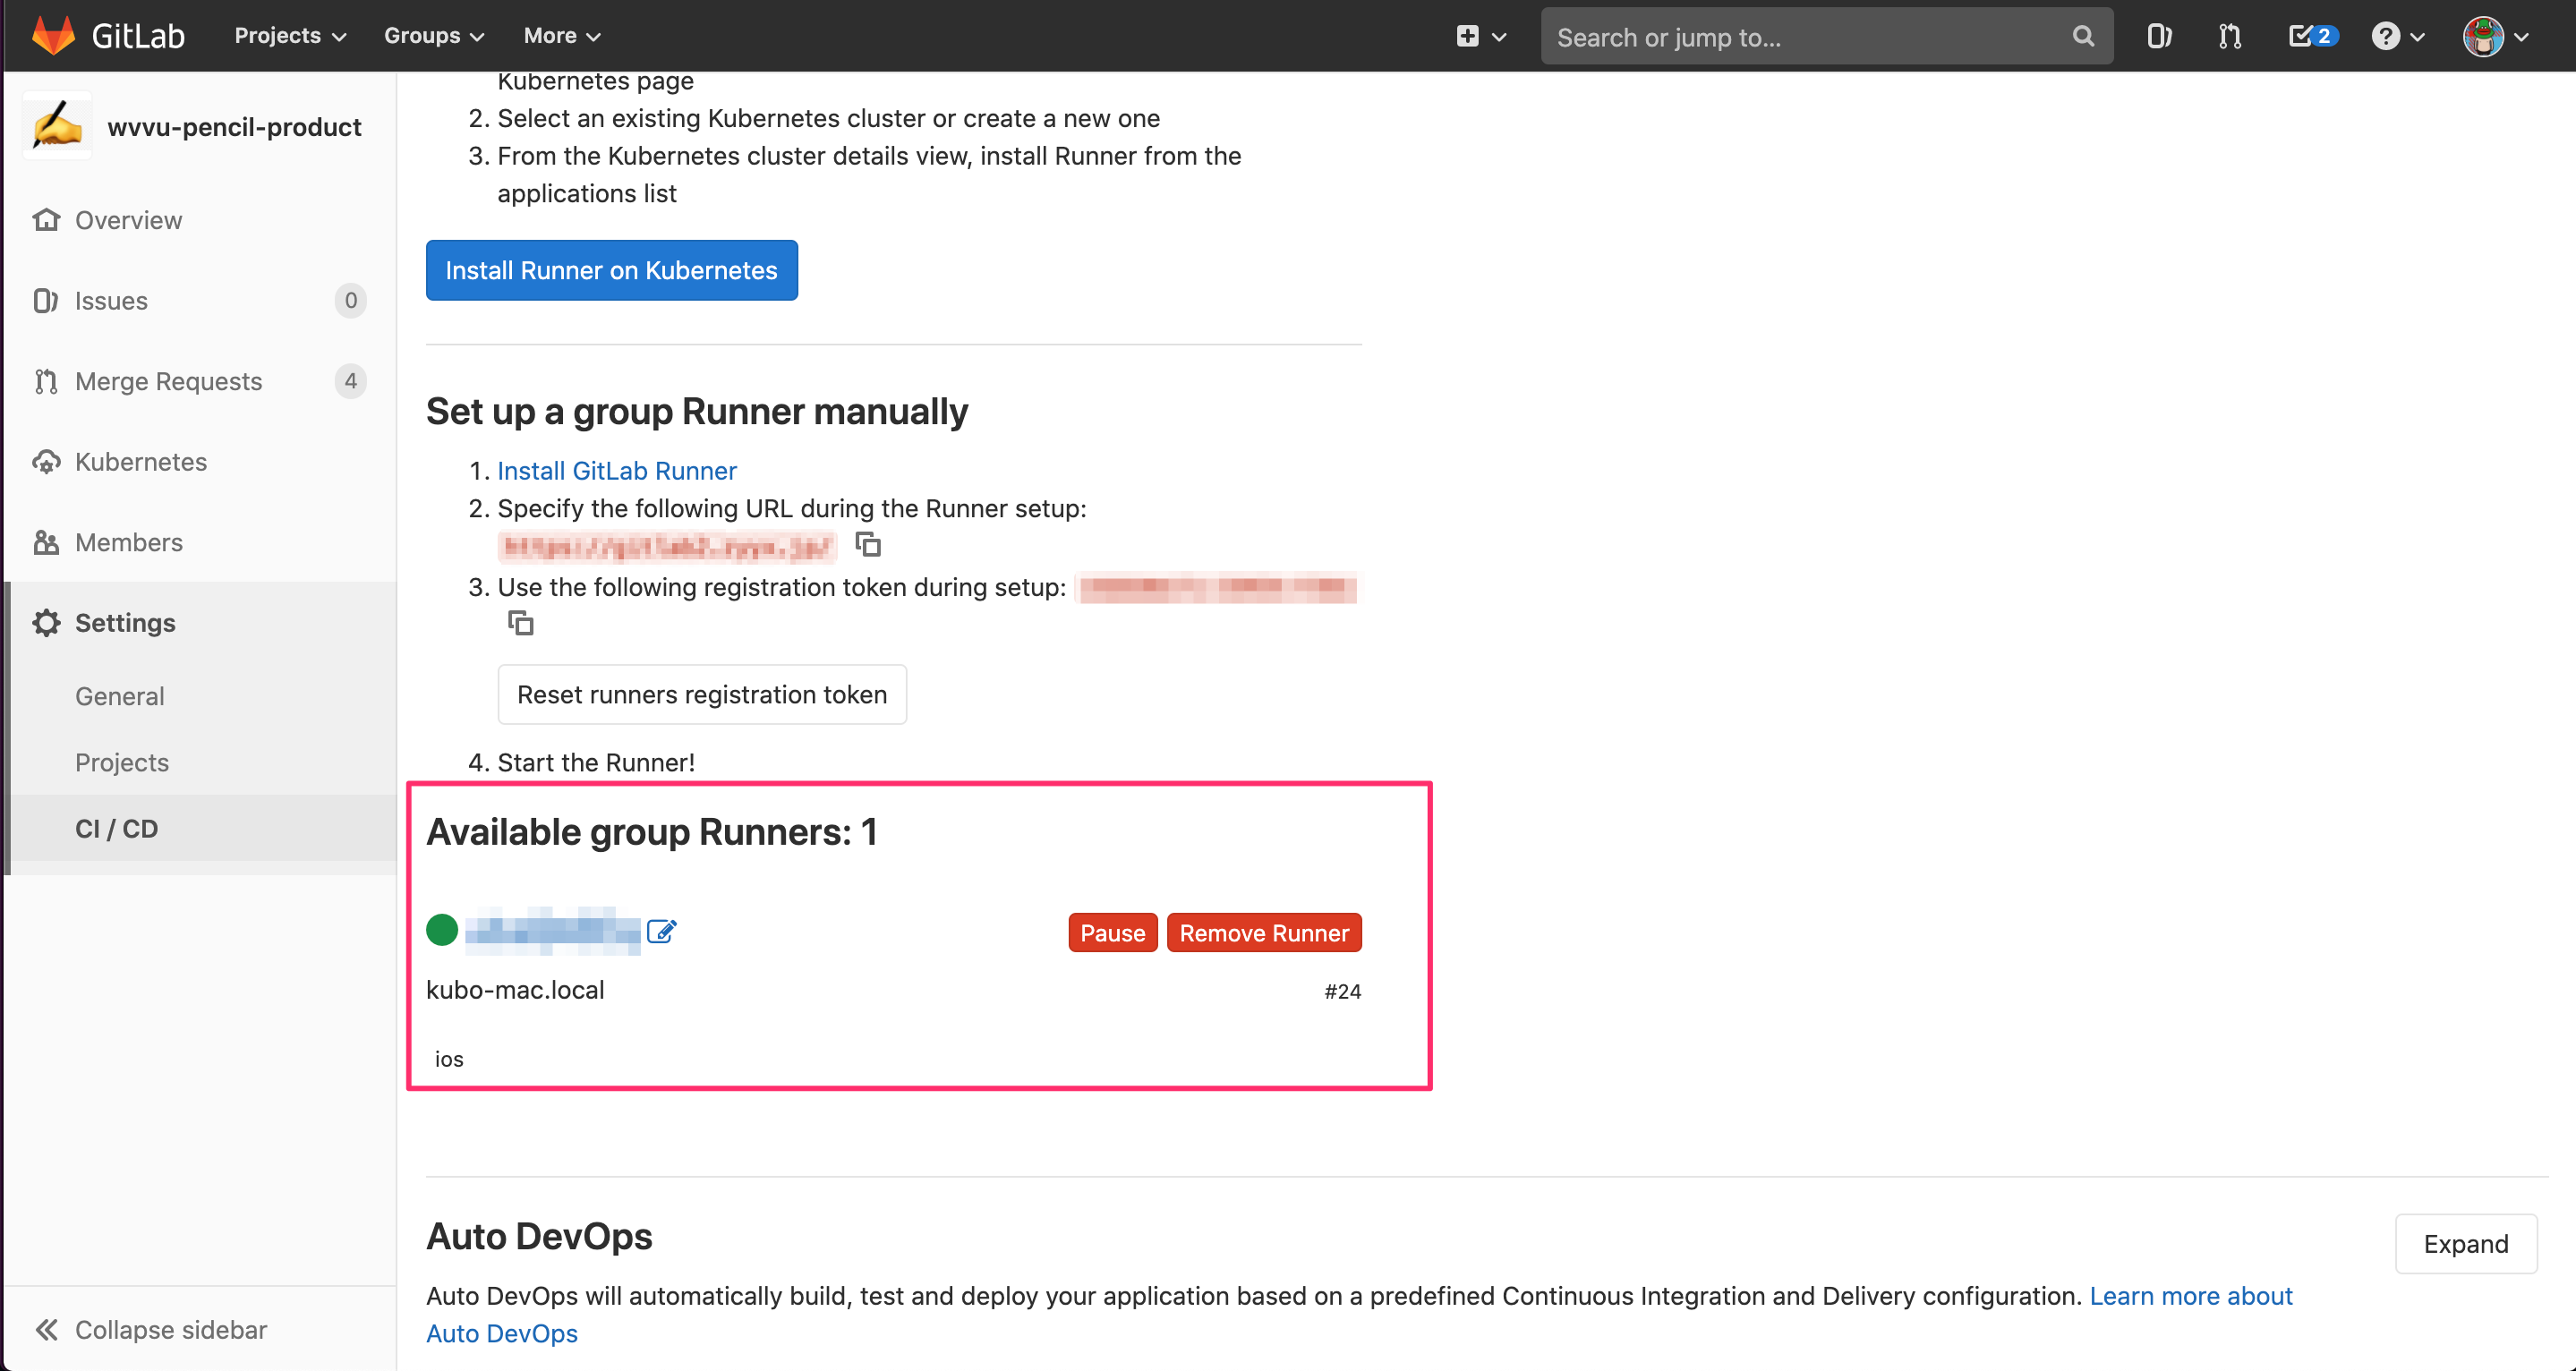
GitLabプロジェクト管理画面から正常にCI Runnerが登録できていることを確認
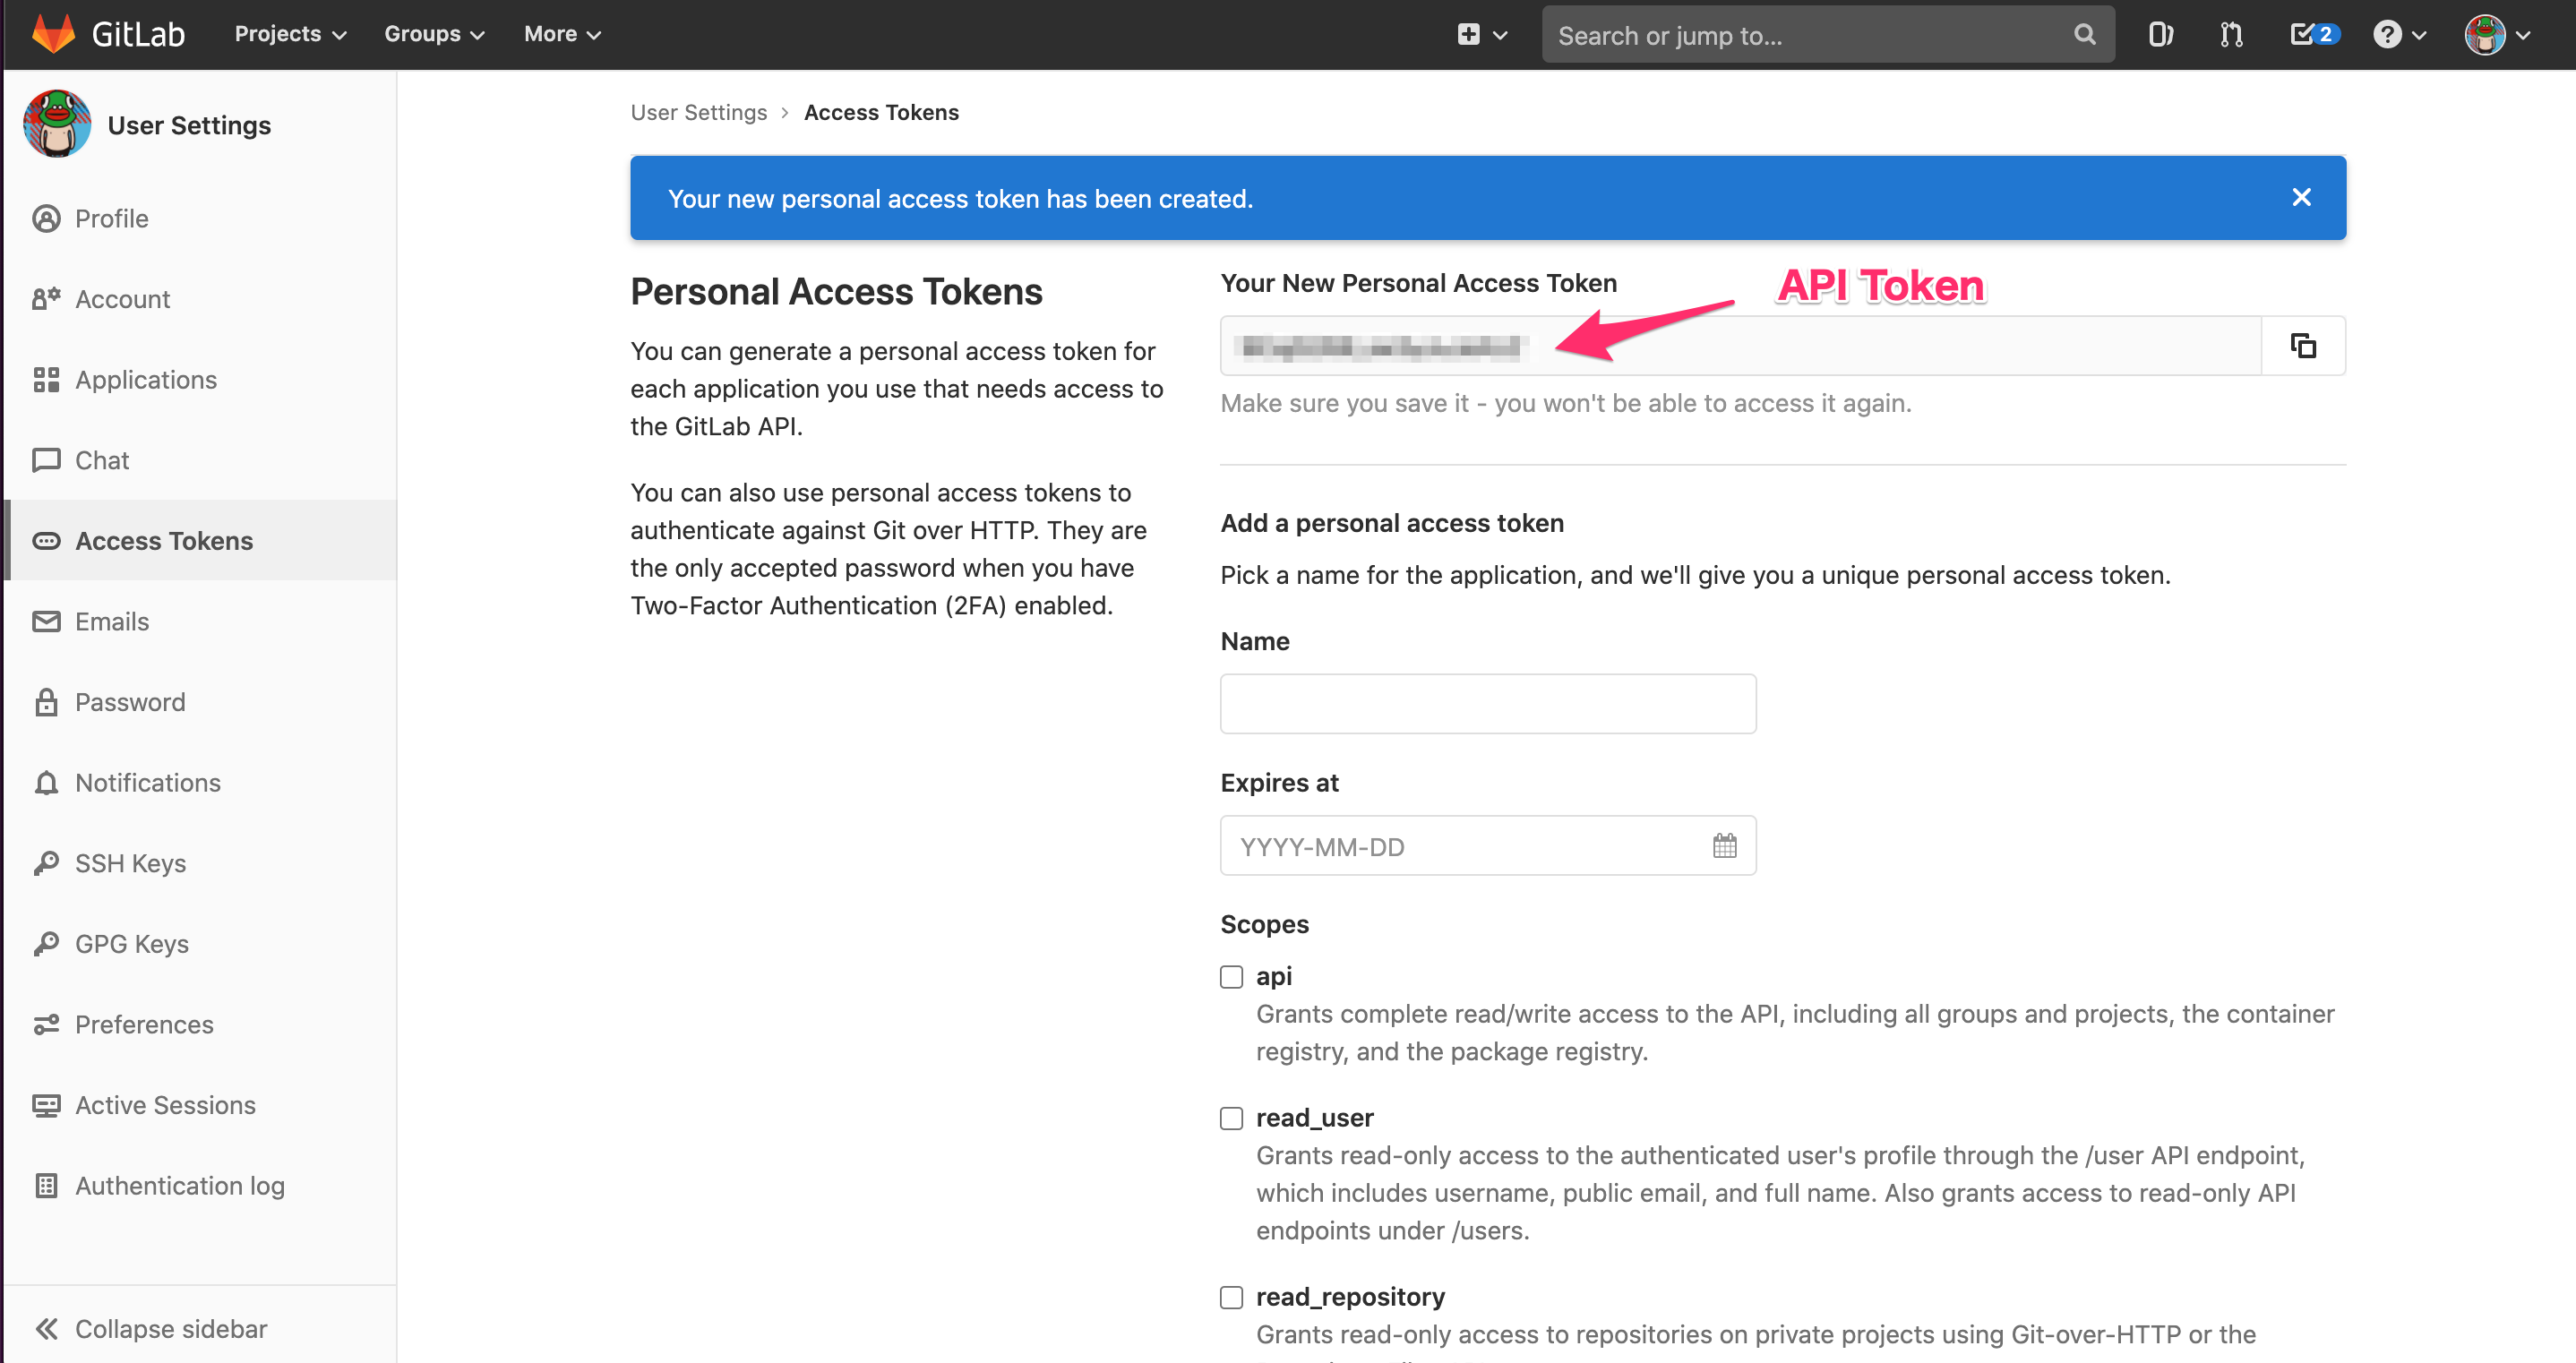
3-4. Danger用のGitLab APIトークン生成
DangerはGitLab APIを使用してMRコメントを投稿するので、GitLab APIトークンを生成します
GitLabプロフィール管理画面のUser Settings > Access Tokens > Personal Access TokensにScopes > api にチェックを入れてトークンを生成する(NameとExpires atは任意)
3-5. Danger用の環境変数の登録
GitLabプロジェクト管理画面のSettings > CI/CD > Variablesに以下の環境変数を設定します
| Key | Value | Masked |
|---|---|---|
| DANGER_GITLAB_API_BASE_URL | e.g. https://gitlab.com/api/v4 | |
| DANGER_GITLAB_API_TOKEN | 3-4で生成したAPIトークン | on |
| DANGER_GITLAB_HOST | e.g. gitlab.com |

以上で全ての設定が完了です ![]()
![]()
MRを作成して、SwiftLintの実行結果がMRコメントに追加されていることを確認してみましょう!
ハマったポイント
- GitLab CEを社内サーバーにオレオレ証明書で立てていた影響でハマる
- CI Runnerが有効にならない
- DangerでGitLab API実行エラー
- 解決策 Danger用の環境変数の追加
| Key | Value |
|---|---|
| SSL_CERT_FILE | e.g. /etc/gitlab/certs/gitlab.hogehoge.com.crt |