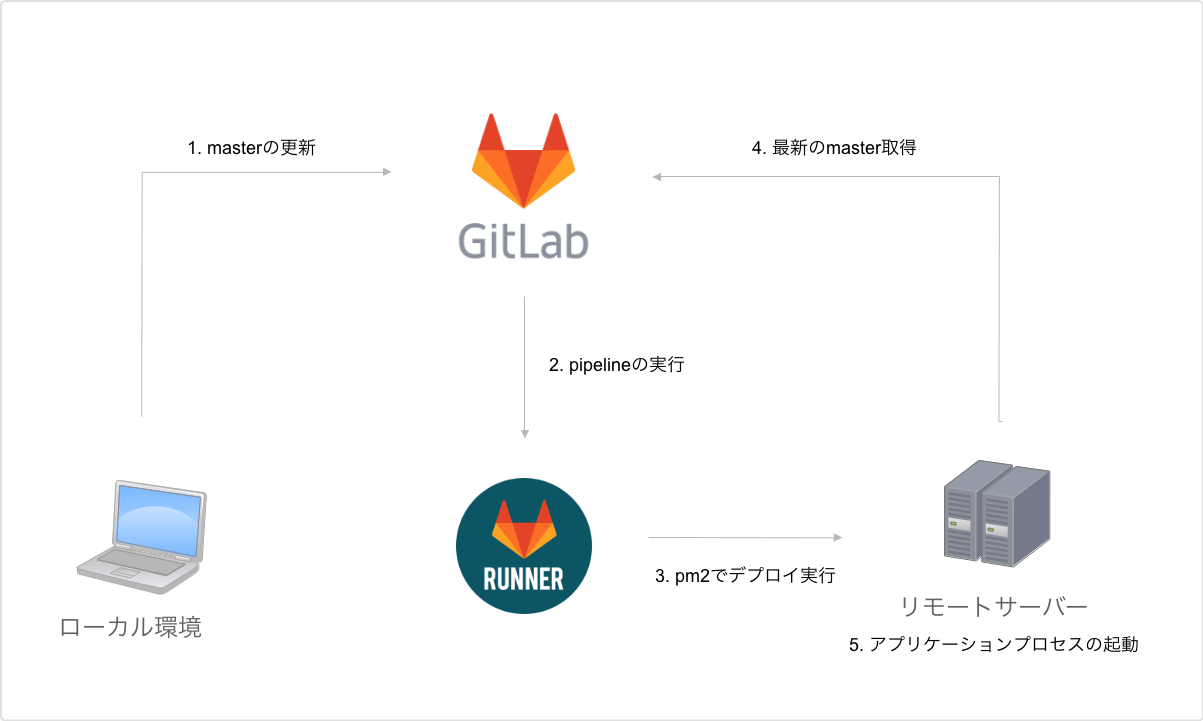
概要
最近はHerokuで動かすことが多く、GitLab CIの設定も簡単なので、デプロイ自動化をモリモリ進めています。
そんな中、Node.jsアプリを自前サーバーで動かす必要が出てきて、Herokuと同じように簡単にデプロイしたいなー、と思い色々調べて自動デプロイできるようにしました!
ref.
Easy Deploy with SSH | PM2
PM2 Deployment via Gitlab CI
Step.1 PM2でローカルからデプロイ
pm2 は、Node.js用のプロセスマネージャーです。
他にも forever などがありますが、デプロイ機能が無いので、こちらを使います。
ref. PM2 Runtime - The Most Advanced Production Process Manager for Node.js
まずは、ローカルからSSH経由でリモートサーバーにデプロイできるように設定します。
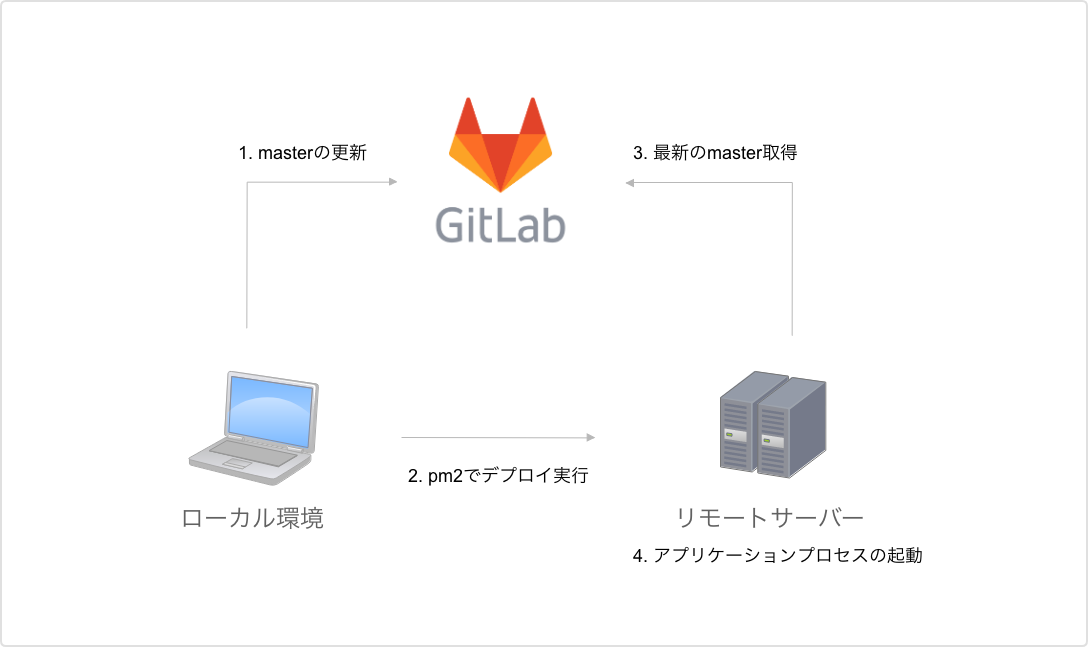
Step.1-1 SSHセットアップ
GitLab・リモートサーバーどちらもパスワードなしでSSH接続できる状態であれば、以下の設定は不要です。
SSHキーペアの生成
鍵ファイル名は任意(今回は pm2_rsa とした)
$ cd ~/.ssh
$ ssh-keygen -t rsa -f pm2_rsa
Generating public/private rsa key pair.
Enter passphrase (empty for no passphrase):  ←パスワードは空
Enter same passphrase again:  ←パスワードは空
公開鍵の登録
GitLab
~/.ssh/pm2_rsa.pubを、GitLabの[プロフィール画面 > SSH Keys]に登録する。
リモートサーバー
$ ssh-copy-id -i pm2_rsa ${user}@${target_host}
${user}@${target_host}は、デプロイ先となるリモートサーバーのユーザーとホスト名
Step.1-2 インストール
※ローカル、リモートサーバーどちらにもインストールする
$ npm install pm2 -g
Step.1-3 デプロイ設定ファイルの準備(ローカル)
ファイル作成
※プロジェクトルートで実行する
$ pm2 ecosystem
ファイル修正
module.exports = {
  apps : [{
    name: 'API', // 任意のアプリ名に変更
    script: 'app.js', // 起動対象のファイル名に変更(ex. index.js)

    // Options reference: https://pm2.io/doc/en/runtime/reference/ecosystem-file/
    args: 'one two',
    instances: 1,
    autorestart: true,
    watch: false,
    max_memory_restart: '1G',
    env: {
      NODE_ENV: 'development'
    },
    env_production: {
      NODE_ENV: 'production'
    }
  }],

  deploy : {
    production : {
      user : 'node', // デプロイサーバーにSSHログインするユーザー名
      host : '212.83.163.1', // デプロイサーバーのホスト名
      ref  : 'origin/master',
      repo : 'git@github.com:repo.git', // デプロイ対象のGitリポジトリ
      path : '/var/www/development', // デプロイサーバーのデプロイ対象ディレクトリパス
      'post-deploy' : 'npm install && pm2 startOrRestart ecosystem.config.js --env production'
    }
  }
};
セットアップ
$ pm2 deploy production setup
Step.1-4 リモートサーバーへのデプロイ(ローカル)
$ pm2 deploy production
デプロイできない場合
リモートリポジトリからの git clone でエラーとなっている可能性が高いです。
SSH clone errors を参考に、パスワードなしで git clone できるようにする必要があります。
Step.1-5 デプロイできていることの確認(リモートサーバー)
プロセスの確認
$ pm2 list
┌──────────┬────┬─────────┬──────┬───────┬────────┬─────────┬────────┬─────┬───────────┬──────┬──────────┐
│ App name │ id │ version │ mode │ pid   │ status │ restart │ uptime │ cpu │ mem       │ user │ watching │
├──────────┼────┼─────────┼──────┼───────┼────────┼─────────┼────────┼─────┼───────────┼──────┼──────────┤
│   API    │ 0  │ 1.0.0   │ fork │ 10844 │ online │ 383     │ 0s     │ 0%  │ 61.8 MB   │ root │ disabled │
└──────────┴────┴─────────┴──────┴───────┴────────┴─────────┴────────┴─────┴───────────┴──────┴──────────┘
 Use `pm2 show <id|name>` to get more details about an app
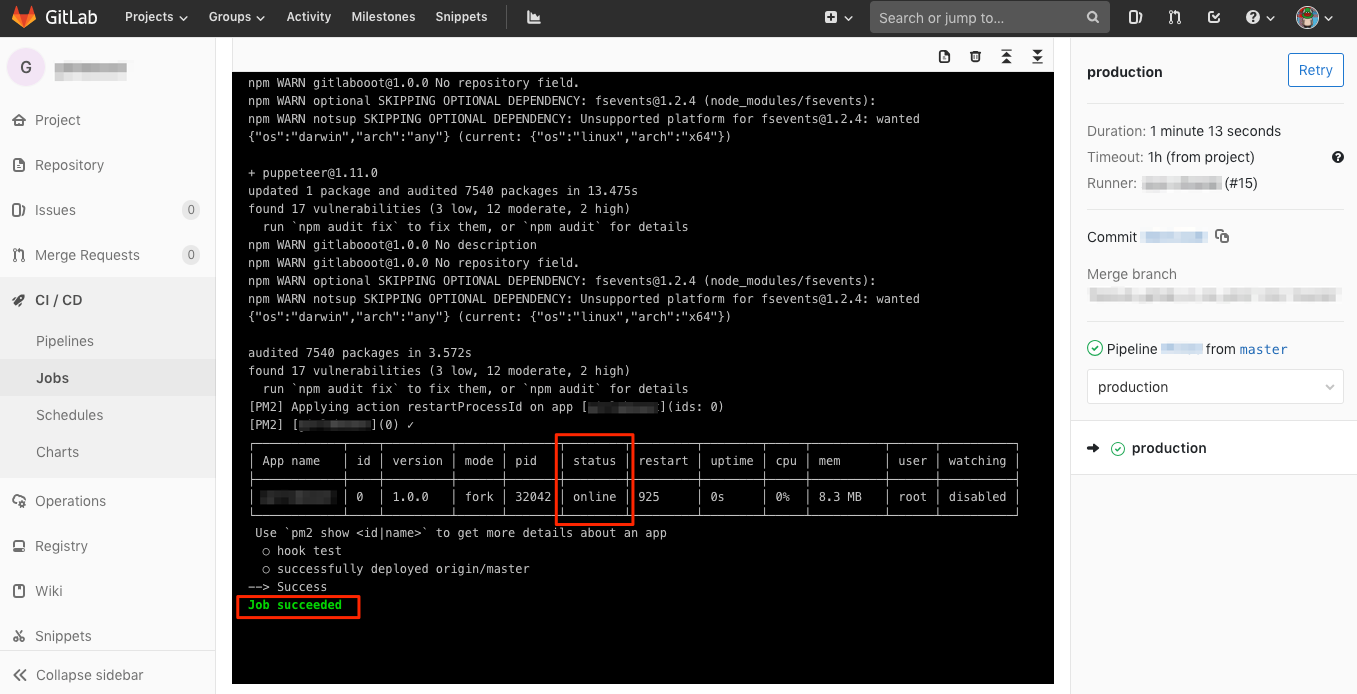
対象Appの status が online であれば、OK!
Step.2 GitLab CIでデプロイ
GitLab CIを利用して、masterブランチに変更が加わったタイミングで、リモートサーバーに自動デプロイします。
Step.2-1 .gitlab-ci.yml を定義
image: node:alpine

stages:
  - production

production:
  type: deploy
  stage: production
  before_script:
    # Install ssh-agent if not already installed, it is required by Docker.
    # (change apt-get to yum if you use a CentOS-based image)
    - 'which ssh-agent || ( apk add --update openssh )'

    # Add bash
    - apk add --update bash

    # Add git
    - apk add --update git

    # Run ssh-agent (inside the build environment)
    - eval $(ssh-agent -s)

    # Add the SSH key stored in SSH_PRIVATE_KEY variable to the agent store
    - echo "$SSH_PRIVATE_KEY" | ssh-add -

    # For Docker builds disable host key checking. Be aware that by adding that
    # you are suspectible to man-in-the-middle attacks.
    # WARNING: Use this only with the Docker executor, if you use it with shell
    # you will overwrite your user's SSH config.
    - mkdir -p ~/.ssh
    - '[[ -f /.dockerenv ]] && echo -e "Host *\n\tStrictHostKeyChecking no\n\n" > ~/.ssh/config'
    # In order to properly check the server's host key, assuming you created the
    # SSH_SERVER_HOSTKEYS variable previously, uncomment the following two lines
    # instead.
    # - mkdir -p ~/.ssh
    # - '[[ -f /.dockerenv ]] && echo "$SSH_SERVER_HOSTKEYS" > ~/.ssh/known_hosts'
  script:
    - npm i -g pm2
    - pm2 deploy production
  only:
    - master
Step.2-2 GitLabにSSHログイン用の秘密鍵登録
Step.1-1で作成した秘密鍵をSSH_PRIVATE_KEYの変数名でGitLab CIの環境変数に登録する
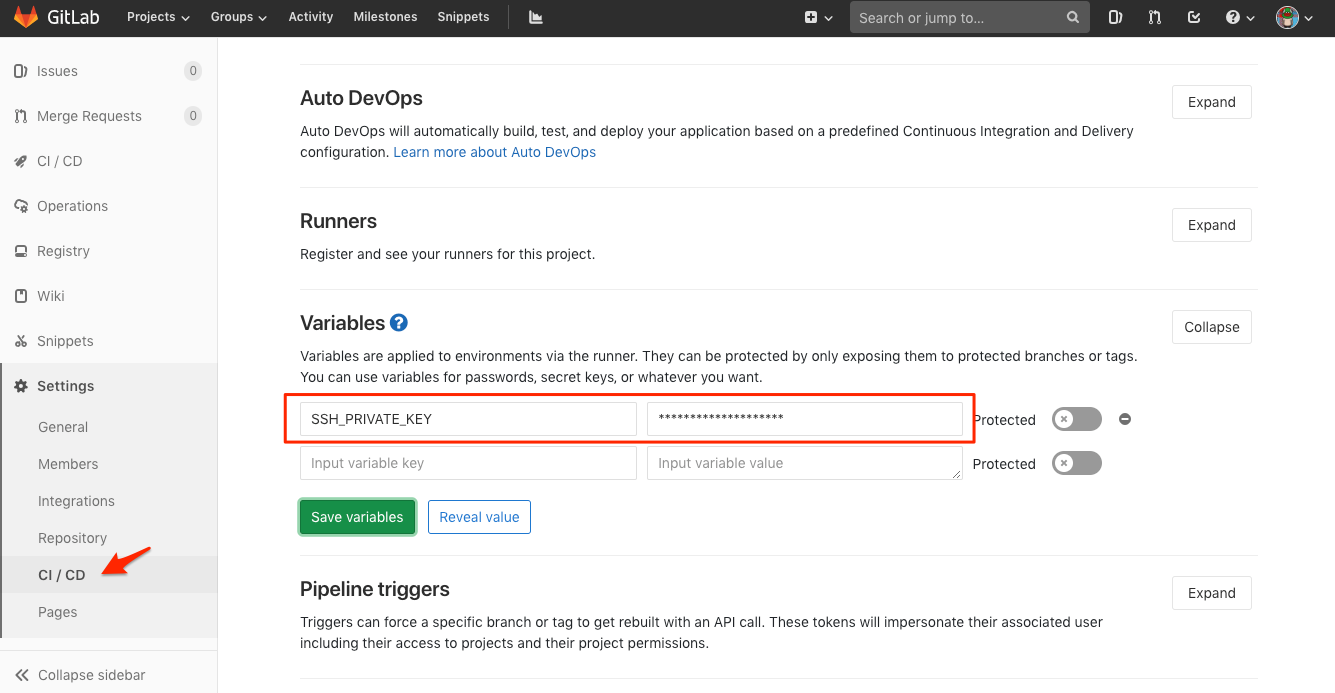
Step.2-3 デプロイの確認
masterにマージされたら、Pipelineが実行されて、デプロイできている
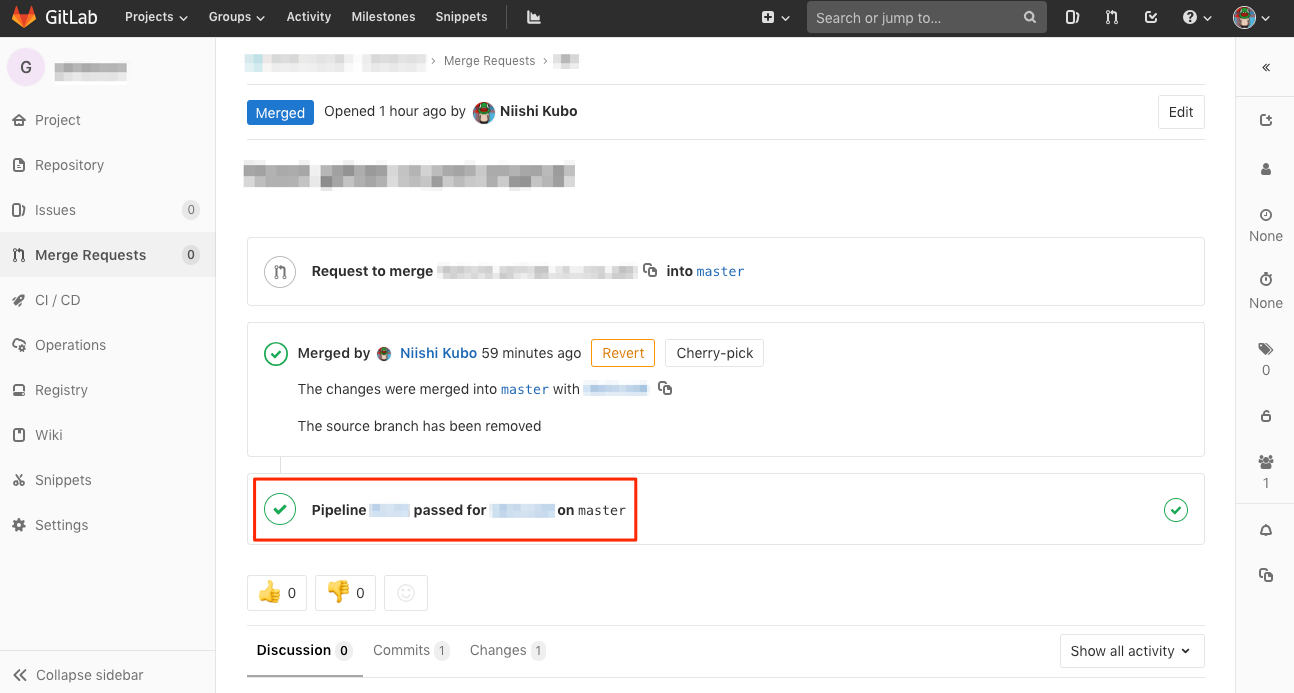
以上で、Node.jsアプリをGitLab CIで自動デプロイできるようになりました。
さいごに
個人ブログにオリジナル(日本語&英語)をUPしています。
この記事が良いと感じた方は、そちらにもリアクション頂けると嬉しいです![]()
https://blog.n11sh1.com
