Nuxt.js+SkyWayを使うとビデオチャットがらくーに作れつつ、jQueryな実装と比べてコードが読みやすいと思います。

SkyWayのサンプル実装をNuxt.jsにリプレイスしてみた感じです。
開発環境など
- Node.js v11.0.0
- Nuxt.js v2.3.4
- SkyWay JS SDK v1.1.18
Nuxt.jsでWebページの雛形を作成
Create Nuxt Appで作成します。
$ npx create-nuxt-app nuxt-skyway
npx: 402個のパッケージを28.845秒でインストールしました。
> Generating Nuxt.js project in /Users/n0bisuke/dotstudio/playground/nuxt-skyway/nuxt-skyway
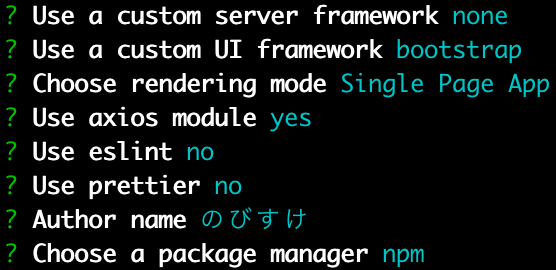
? Project name nuxt-skyway
? Project description My cat's meow Nuxt.js project
? Use a custom server framework none
? Use a custom UI framework bootstrap
? Choose rendering mode Single Page App
? Use axios module yes
? Use eslint no
? Use prettier no
? Author name のびすけ
? Choose a package manager npm
RTAみたいですけど、Use eslint no,Use prettier noはここ(スピード勝負)においては大事な気がする。
ちゃんとやるときはyesにしましょう。
$ cd nuxt-skyway
以下でサーバーを起動します。
$ npm run dev
localhost:3000にアクセスすると雛形が作成されていることがわかります。

SkyWayでアプリケーションを作成
https://webrtc.ecl.ntt.com/ にアクセスして登録します。
無料で使える、コミュニティエディションって方を選びます。

キャプチャのテキストミスですlocahost->localhost
ここのアプリケーション作成で利用可能ドメインを指定します。
とりあえずlocalhostで試したいのと、GitHub Pagesにあげようかなと思っているのでn0bisuke.github.ioを指定しました。
SkyWayのJavaScript SDKを導入
JavaScript SDKのページを参考にします。
とりあえずインストールから。
$ npm install skyway-js
pages/index.vueを編集します。
・
・
省略
・

<script>
import Logo from '~/components/Logo.vue'
import Peer from 'skyway-js'; //←追記
これでSkyWayの利用準備はOKです。
JSコード
APIキーは自分が取得したものにしましょう。
- pages/index.vue
index.vue
<script>
import Logo from '~/components/Logo.vue'
import Peer from 'skyway-js';

export default {
  components: {
    Logo
  },

  data () {
    return {
      APIKey: 'SkyWayのAPIキー',
      selectedAudio: '',
      selectedVideo: '',
      audios: [],
      videos: [],
      localStream: null,
      peerId: '',
      calltoid: ''
    }
  },

  methods: {
    onChange: function () {
      if(this.selectedAudio != '' && this.selectedVideo != ''){
        this.connectLocalCamera();
      }
    },

    connectLocalCamera: async function(){
      const constraints = {
        audio: this.selectedAudio ? { deviceId: { exact: this.selectedAudio } } : false,
        video: this.selectedVideo ? { deviceId: { exact: this.selectedVideo } } : false
      }

      const stream = await navigator.mediaDevices.getUserMedia(constraints);
      document.getElementById('my-video').srcObject = stream;
      this.localStream = stream;
    },

    makeCall: function () {
      console.log('makeCall');
      const call = this.peer.call(this.calltoid, this.localStream);
      this.connect(call);
    },

    connect: function (call) {
      call.on('stream', stream => {
        const el = document.getElementById('their-video');
        el.srcObject = stream;
        el.play();
      });
    }
  },

  mounted: function () {
    this.peer = new Peer({
      key:   this.APIKey,
      debug: 3,
    });

    this.peer.on('open', () => {
      this.peerId = this.peer.id
    });

    this.peer.on('call', call => {
      call.answer(this.localStream);
      this.connect(call);
    });

    //デバイスへのアクセス
    navigator.mediaDevices.enumerateDevices()
    .then((deviceInfos) => {
      for (let i = 0; i !== deviceInfos.length; ++i) {
        const deviceInfo = deviceInfos[i]
        if (deviceInfo.kind === 'audioinput') {
          this.audios.push({
            text: deviceInfo.label ||
            `Microphone ${this.audios.length + 1}`,
            value: deviceInfo.deviceId
          })
        } else if (deviceInfo.kind === 'videoinput') {
          this.videos.push({
            text: deviceInfo.label ||
            `Camera  ${this.videos.length - 1}`,
            value: deviceInfo.deviceId
          })
        }
      }
    })

  }
}
</script>
テンプレート
- これもpages/index.vueを更新します。
index.vue
<template>
  <section class="container">
    <div>
      <logo/>
      <video id="their-video" width="200" autoplay playsinline></video>
      <video id="my-video" muted="true" width="200" autoplay playsinline></video>

      <div class="main">
        <h2>Nuxt.js + SkyWayのビデオチャット</h2>
        マイク:
        <select v-model="selectedAudio" @change="onChange">
          <option disabled value="">Please select one</option>
          <option v-for="(audio, key, index) in audios" v-bind:key="index" :value="audio.value">
            {{ audio.text }}
          </option>
        </select>

        カメラ:
        <select v-model="selectedVideo" @change="onChange">
          <option disabled value="">Please select one</option>
          <option v-for="(video, key, index) in videos" v-bind:key="index" :value="video.value">
            {{ video.text }}
          </option>
        </select>

        <div>
          <p>Your id: <span id="my-id">{{peerId}}</span></p>
          <p>他のブラウザでこのIDをコールしましょう。</p>
          <h3>コールする</h3>
          <input v-model="calltoid" placeholder="call id">
          <button @click="makeCall" class="button--green">Call</button>
        </div>
      </div>

    </div>
  </section>
</template>
試す方法
- 二つのブラウザで、作成したサイトにアクセスしてみる。
- 片方のブラウザに表示されているIDを、別のブラウザのコールの箇所にいれてCallボタンを押す。
- 繋がる
まとめ
SkyWayのサンプルというかWebRTCの実装サンプルはけっこうjQueryで書かれているものが多くてそこのリプレイスは参考実装になるんじゃないかなぁというモチベもありました。
けっこうコードスッキリかけますね。
ではでは!