目的
- redisは3台以上あればredisだけで冗長化構成が組めますが諸事情により2ノードで構成したい場合の参考になれば幸いです。
- pacemakerの2系の記事が少ないなあと思って書きました。
- 絶賛本番運用中の構成です。
構成
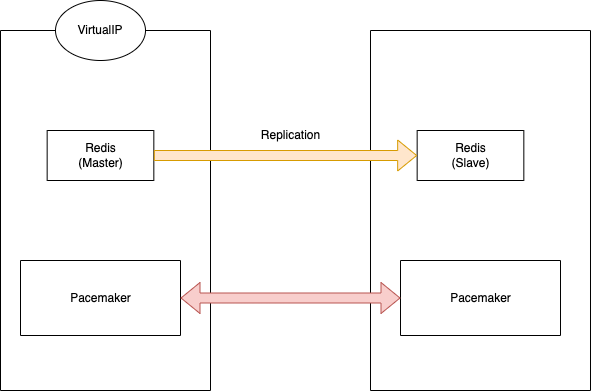
- 2ノードで書き込み用のノード(Master)と参照用のノード(Slave)を準備する。レプリケーションさせる。
- 書き込み用の仮想IPを設けて障害検知時にノードの役割を交代させつつ、仮想IPを移動させる。アプリケーションから見たら常に仮想IPだけ見ていれば良い状態にする。
- とてもシンプルな図ですが以下のような構成を想定。
pacemakerの準備
- まずはpacemakerのインストールと準備です。
インストール
-
pcs,pacemaker,fence-agents-allをインストールする。 - pcsはpacemakerのクライアント。
## 多分HighAvailabilityでイケると思う。
dnf install pcs pacemaker fence-agents-all --enablerepo=HighAvailability

## リポジトリがhaで定義されてる場合もある。
dnf install pcs pacemaker fence-agents-all --enablerepo=ha
設定
- 事前チェックでfirewalldが稼働してるかチェックしておきます。
## 事前の確認
[root@redis1 ~]# systemctl status firewalld

● firewalld.service - firewalld - dynamic firewall daemon
   Loaded: loaded (/usr/lib/systemd/system/firewalld.service; disabled; vendor >
   Active: inactive (dead)
     Docs: man:firewalld(1)

## firewalld起動
[root@redis1 ~]# systemctl start firewalld.service

## 自動起動の設定
[root@redis1 ~]# systemctl enable firewalld

Created symlink /etc/systemd/system/dbus-org.fedoraproject.FirewallD1.service → /usr/lib/systemd/system/firewalld.service.
Created symlink /etc/systemd/system/multi-user.target.wants/firewalld.service → /usr/lib/systemd/system/firewalld.service.
- 対象マシンそれぞれで実行すること。
firewall-cmd --permanent --add-service=high-availability
firewall-cmd --add-service=high-availability
FirewallD is not runningって出たらfirewalld起動してください。
pcsdサービスの起動を行う。
- pacemakerのdeamonです。
- ノードそれぞれで実行すること。
systemctl start pcsd.service
systemctl enable pcsd.service
pacemakerの実行ユーザーのパスワードを設定する。
- pacemakerの実行ユーザーとなるhaclusterユーザーのパスワードを設定します。
-
dnf(yum)でインストールした場合には自動でユーザー作成されているのでcat /etc/passwd等で確認しておく。
passwd hacluster
クラスターでの認証
- 設定したhaclusterユーザーを認証して相互に通信可能にします。
## クラスタサーバの認証設定 [片系(reids1)で実施]

[root@redis1 ~]# pcs host auth reids_test1 addr=192.168.111.45 redis_test2 addr=192.168.111.46
Username: hacluster
Password:
reids_test1: Authorized
reids_test2: Authorized
クラスターの作成
- クラスターにノードを追加します。ノード追加時にIPアドレスが必要になるのでIPアドレスを確認しておきましょう。
[root@redis1 ~]# pcs cluster setup redis-cluster redis1 addr=192.168.111.45 redis2 addr=192.168.111.46

Destroying cluster on hosts: 'redis1', 'redis2'...
redis1: Successfully destroyed cluster
redis2: Successfully destroyed cluster
Requesting remove 'pcsd settings' from 'redis1', 'redis2'
redis1: successful removal of the file 'pcsd settings'
mp-cache02: successful removal of the file 'pcsd settings'
Sending 'corosync authkey', 'pacemaker authkey' to 'redis1', 'redis2'
redis1: successful distribution of the file 'corosync authkey'
redis1: successful distribution of the file 'pacemaker authkey'
redis2: successful distribution of the file 'corosync authkey'
redis2: successful distribution of the file 'pacemaker authkey'
Sending 'corosync.conf' to 'redis1', 'redis2'
redis1: successful distribution of the file 'corosync.conf'
redis2: successful distribution of the file 'corosync.conf'
Cluster has been successfully set up.
クラスターの起動
- クラスターを起動します。
- クラスター全体を起動する場合には
--allオプションを付けると全ノードでクラスター起動します。
[root@redis1 ~]# pcs cluster start
Starting Cluster...
-
pcs configコマンドで確認すると以下のような出力が得られる(以下2ノードの場合)
[root@redis1 ~]# pcs config
Cluster Name: redis_cluster
Corosync Nodes:
 reids1 redis2
Pacemaker Nodes:
 redis1 reids2

Resources:

Stonith Devices:
Fencing Levels:

Location Constraints:
Ordering Constraints:
Colocation Constraints:
Ticket Constraints:

Alerts:
 No alerts defined

Resources Defaults:
  No defaults set
Operations Defaults:
  No defaults set

Cluster Properties:
 cluster-infrastructure: corosync
 cluster-name: redis_test_cluster
 dc-version: 2.1.0-8.el8-7c3f660707
 have-watchdog: false

Tags:
 No tags defined

Quorum:
  Options:
STONITH
- ノード間で疎通取れなかった時の挙動などを決めるのに使います。
- Masterが正常だったら、フェイルオーバー時にクラスターから外れたノードは手動での調査と復旧を行う想定なので今回はstonithを無効化しておきます。
無効化しておく
pcs property set stonith-enabled=false
corosyncの設定確認
- 一応見ておきます。
-
/etc/corosync/corosync.confを確認
[root@redis1 ~]# cat /etc/corosync/corosync.conf
totem {
    version: 2
    cluster_name: redis_test_cluster
    transport: knet
    crypto_cipher: aes256
    crypto_hash: sha256
}

nodelist {
    node {
        ring0_addr: 192.168.111.45
        name: redis1
        nodeid: 1
    }

    node {
        ring0_addr: 192.168.111.46
        name: redis2
        nodeid: 2
    }
}

quorum {
    provider: corosync_votequorum
    two_node: 1
}

logging {
    to_logfile: yes
    logfile: /var/log/cluster/corosync.log
    to_syslog: yes
    timestamp: on
}
pacemakerへのリソースの追加
- pacemakerがインストールされたノードでpacemakerが制御する単位をリソースと呼びます。
- pacemakerに何をどういう手順で管理させるのかを教える作業です。
- 仮想IPとredisのリソースを追加していきます。
仮想IPの追加
事前準備
- nicの確認を
ip aで確認しておく。
[n-kashimoto@redis1 ~]$ sudo ip a
1: lo: <LOOPBACK,UP,LOWER_UP> mtu 65536 qdisc noqueue state UNKNOWN group default qlen 1000
    link/loopback 00:00:00:00:00:00 brd 00:00:00:00:00:00
    inet 127.0.0.1/8 scope host lo
       valid_lft forever preferred_lft forever
    inet6 ::1/128 scope host
       valid_lft forever preferred_lft forever
2: eno8303: <BROADCAST,MULTICAST,SLAVE,UP,LOWER_UP> mtu 1500 qdisc mq master nm-bond state UP group default qlen 1000
    link/ether d0:8e:79:ca:60:99 brd ff:ff:ff:ff:ff:ff permaddr d0:8e:79:ca:60:98
3: eno8403: <BROADCAST,MULTICAST,SLAVE,UP,LOWER_UP> mtu 1500 qdisc mq master nm-bond state UP group default qlen 1000
    link/ether d0:8e:79:ca:60:99 brd ff:ff:ff:ff:ff:ff
4: nm-bond: <BROADCAST,MULTICAST,MASTER,UP,LOWER_UP> mtu 1500 qdisc noqueue state UP group default qlen 1000
    link/ether d0:8e:79:ca:60:99 brd ff:ff:ff:ff:ff:ff
    inet 192.168.111.45/24 brd 192.168.111.255 scope global noprefixroute nm-bond
       valid_lft forever preferred_lft forever
設定
- nicに対して仮想IPを割り当てます。
[root@redis1 ~]# pcs resource create VirtualIP ocf:heartbeat:IPaddr2 ip=192.168.111.44 cidr_netmask=24 nic=nm-bond op monitor interval=10s
- 確認
pcs resource configで確認します。
[root@redis1 ~]# pcs resource config
 Resource: VirtualIP (class=ocf provider=heartbeat type=IPaddr2)
  Attributes: cidr_netmask=24 ip=192.168.111.44 nic=m-bond
  Operations: monitor interval=10s (VirtualIP-monitor-interval-10s)
              start interval=0s timeout=20s (VirtualIP-start-interval-0s)
              stop interval=0s timeout=20s (VirtualIP-stop-interval-0s)
redisリソースの追加
- redisのインストールは割愛します。
- 起動・終了はpacemakerが制御するのでsystemdでdisableにしておくこと
設定
- リソースエージェントは
ocf:heartbeat:redisを使います。
pcs resource create redis-clone ocf:heartbeat:redis op start timeout=300s op monitor interval=5s op monitor role=Master interval=3s op monitor role=Slave interval=15s promotable
制約を入れる。
- 仮想IPのリソースが異なるリソースのredis-cloneと連動して動くように設定する。仮想IPがredisのmasterのノードにいないとreadonlyのslaveにつながってしまう。
- redis-cloneの昇格が終わる前に仮想IPが動くと意図しないトランザクションが流れるので困る。
# 念の為なんかあったら削除しておく
[root@redis1 ~]# pcs constraint colocation remove VirtualIP redis-clone
# ここから追加
[root@redis1 ~]# pcs constraint colocation add redis-clone with VirtualIP INFINITY
# 確認
[root@redis1 ~]# pcs constraint
Location Constraints:
Ordering Constraints:
  start VirtualIP then start redis-clone (kind:Mandatory)
Colocation Constraints:
  redis-clone with VirtualIP (score:INFINITY)
Ticket Constraints:
- ちゃんとMasterと同じノードに移動するように変更する。
pcs constraint colocation add VirtualIP with master redis-clone INFINITY
- 確認すると
with-rsc-role:Masterと出力されているのが分かりますね。
[root@redis1 ~]# pcs constraint
Location Constraints:
Ordering Constraints:
Colocation Constraints:
  VirtualIP with redis-clone (score:INFINITY) (rsc-role:Started) (with-rsc-role:Master)
Ticket Constraints:
再起動
- 滅多に
--allは使わないのでクラスター全体を再起動する時ぐらい使う
pcs cluster stop --all
pcs cluster start --all
この後はredis-benchmarkなりredis-cliなりでVirtualIPに対してテストを行ったりして挙動を確認してみてください。