tl;dr
Intel E810-CQDA2 NICを使ってトラフィックジェネレータTRexを動かすまでの構築メモです。
動作環境
- Ubuntu Server 20.04 LTS
- TRex 3.0.2
- Intel E810-CQDA2
TRexインストール
2023年5月時点で最新版の3.0.2をインストールします。
sudo su -

mkdir -p /opt/trex && \
cd /opt/trex && \
wget --no-check-certificate --no-cache https://trex-tgn.cisco.com/trex/release/v3.02.tar.gz && \
tar -xzvf v3.02.tar.gz && \
ln -s /opt/trex/v3.02 /root/trex
設定ファイル作成
今回の環境ではIntel E810-CQDA2 * 2枚で、4ポート分のIPアドレスの設定をしています。
cd /root/trex
./dpdk_setup_ports.py -i
By default, IP based configuration file will be created. Do you want to use MAC based config? (y/N)n
#一覧表示されたPCIデバイスから使用したいものをすべて選ぶ
Enter list of interfaces separated by space (for example: 1 3) : 4 5 8 9

# 各ポートのアドレスとデフォルトゲートウェイアドレスを入力する
For interface 4, assuming loopback to its dual interface 5.
Putting IP 1.1.1.1, default gw 2.2.2.2 Change it?(y/N).y
Please enter IP address for interface 4: 172.16.105.2
Please enter default gateway for interface 4: 172.16.105.1
For interface 5, assuming loopback to its dual interface 4.
Putting IP 2.2.2.2, default gw 1.1.1.1 Change it?(y/N).y
Please enter IP address for interface 5: 172.16.205.2
Please enter default gateway for interface 5: 172.16.205.1
For interface 8, assuming loopback to its dual interface 9.
Putting IP 3.3.3.3, default gw 4.4.4.4 Change it?(y/N).y
Please enter IP address for interface 8: 172.16.105.6
Please enter default gateway for interface 8: 172.16.105.5
For interface 9, assuming loopback to its dual interface 8.
Putting IP 4.4.4.4, default gw 3.3.3.3 Change it?(y/N).y
Please enter IP address for interface 9: 172.16.205.6
Please enter default gateway for interface 9: 172.16.205.5

Print preview of generated config? (Y/n)y
~~~
Save the config to file? (Y/n)y
Default filename is /etc/trex_cfg.yaml
Press ENTER to confirm or enter new file:
TRex起動
エラーログが表示され起動に失敗してしまいました。
/opt/trex/v3.02# ./t-rex-64 -i
Starting Scapy server..... Scapy server is started
The ports are bound/configured.
Starting  TRex v3.02 please wait  ...
 set driver name net_ice
 driver capability  : TCP_UDP_OFFLOAD  TSO  SLRO
 set dpdk queues mode to DROP_QUE_FILTER
 Number of ports found: 2
zmq publisher at: tcp://*:4500
ice_program_hw_rx_queue(): currently package doesn't support RXDID (22)
ice_rx_queue_start(): fail to program RX queue 0
ice_dev_start(): fail to start Rx queue 0
デバイスドライバのバージョンの確認
今回の環境ではデバイスドライバ0.8.1、ファームウェアは4.00を使っています。
root@tam5upfhw1-load5:~/trex# ethtool -i ens1f0
driver: ice
version: 0.8.1-k
firmware-version: 4.00 0x800139bc 0.0.0
expansion-rom-version:
bus-info: 0000:4b:00.0
supports-statistics: yes
supports-test: yes
supports-eeprom-access: yes
supports-register-dump: yes
supports-priv-flags: yes
上記のバージョンがサポートされているのかを確認します。TRex公式サイトには情報が無かったため、代わりにDPDKの公式ページを参考にします。E810ではICEというドライバを使用しているため以下のページになります。
https://doc.dpdk.org/guides/nics/ice.html
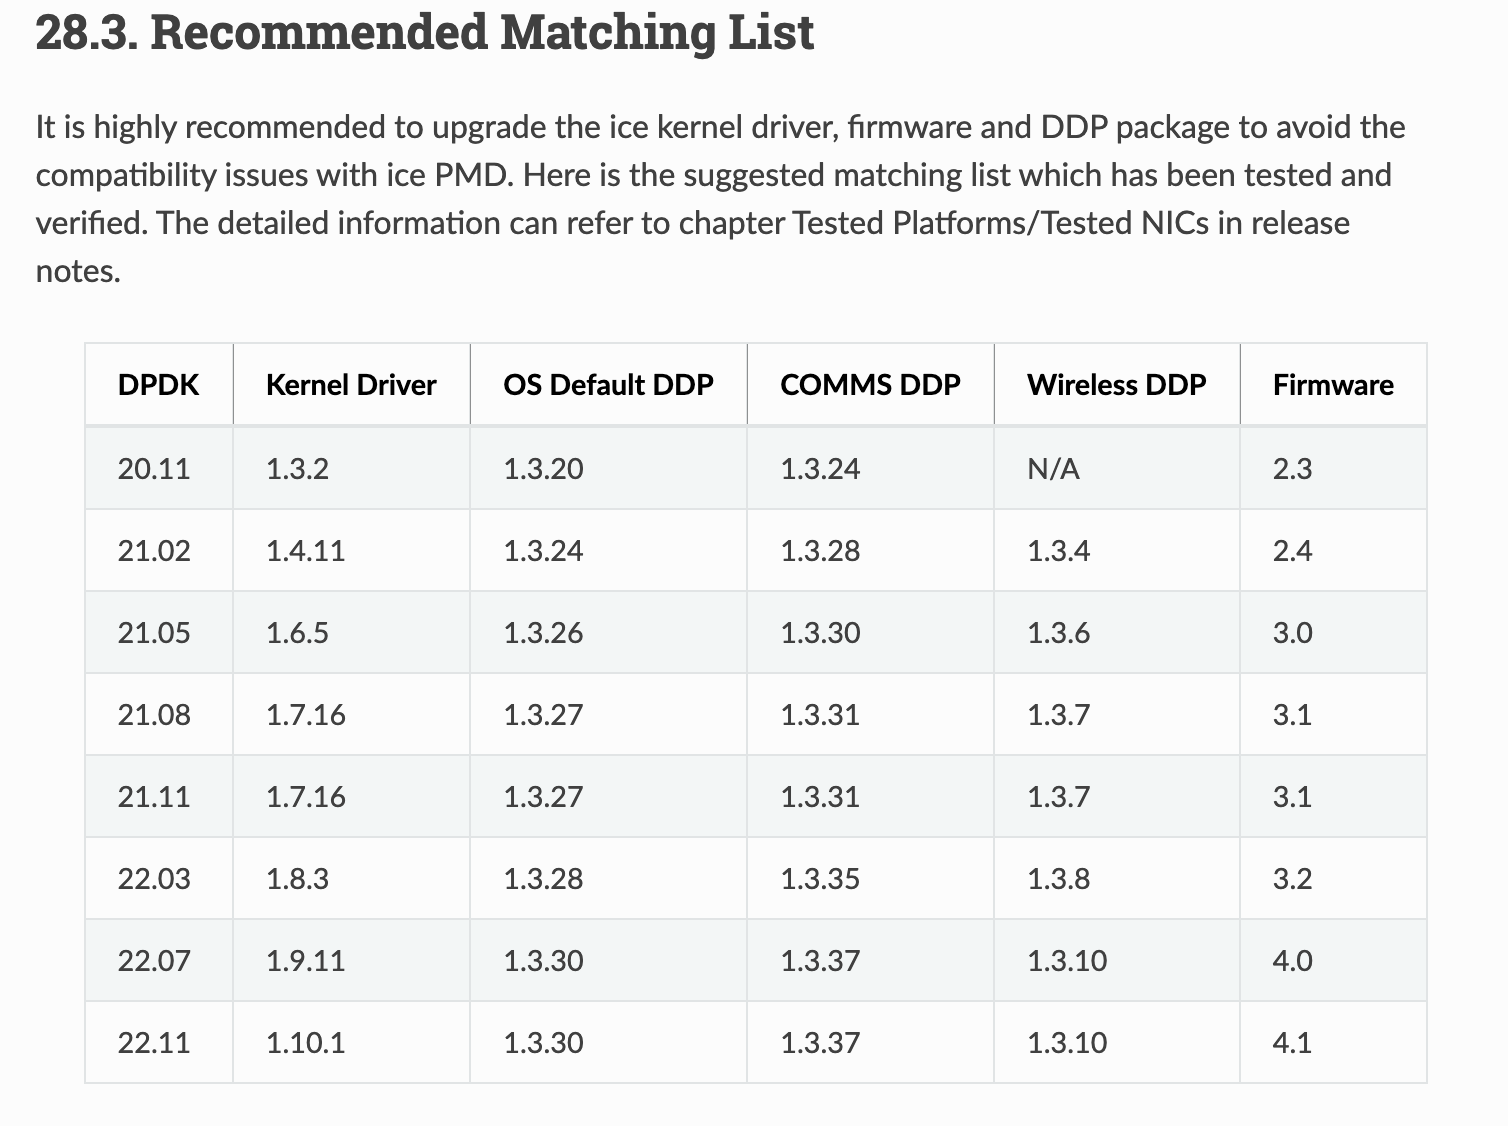
上図はページの抜粋ですが、この表示によるとファームウェアはサポートされているようすが、Kernel driverが古いためアップグレードする必要があります。また、Kernel driver(デバイスドライバ)、DDP(OS Default, COMMS, Wireless)、Firmwareのバージョンを合せておくことが推奨されています。
Dynamic Device Personalization(DDP)とは
Intel Ethernet800シリーズでは、パケット処理パイプラインをプログラマブルにすることができ、これにより、NICでパケットの識別、分類、配信が可能になります。この機能をDynamic Device Personalization (DDP)と呼び、通常CPUで行う処理をオフロードできるため性能向上が見込まれます。
DDPを利用するにはDDPパッケージと呼ばれる構成情報を含んだファイルをロードする必要があり、ロードするパッケージによりサポートされるプロトコルも変わってきます。デフォルトDDPはデバイスドライバと同梱されますが、Comms DDPは別途インストールが必要になります。
対応方針
ファームウェアのバージョンは変更せずに以下のようにアップグレードすることにしました。
- デバイスドライバ(Kernel Driver) 1.9.11
- Default DDP 1.3.30
- COMMPS DDP 1.3.37
提供されているファームウェアがサーバベンダによりカスタマイズされているため、Intel純正のファームウェア更新ツールが使えませんでした(更新可能なPCIデバイスが無いと表示される)。そのため、今回の対応ではファームウェアのバージョンは変更しないことにしました。
必要なツールのインストール
apt update
apt install make gcc unzip
デバイスドライバのインストール
バージョン1.9.11のデバイスドライバをIntel公式サイトからダウンロードし、インストールします。
cd root
wget https://downloadmirror.intel.com/738725/ice-1.9.11.tar.gz
tar xf ice-1.9.11.tar.gz
cd ice-1.9.11/src

make install

rmmod ice
modprobe ice
更新後のバージョンを確認します。
ethtool -i ens1f0
driver: ice
version: 1.9.11
firmware-version: 4.00 0x800139bc 21.5.9
expansion-rom-version:
bus-info: 0000:4b:00.0
supports-statistics: yes
supports-test: yes
supports-eeprom-access: yes
supports-register-dump: yes
supports-priv-flags: yes
Comms DDPインストール
Comms DDPパッケージもIntel公式サイトからダウンロードし、インストールします。
Comms DDPではGTP、PPPoE、IPsec、L2TPv3、PFCP、MPLSがサポートされています。
インストール完了後には、一度再起動する必要があります。
cd root
mkdir ddp
cd ddp
wget https://downloadmirror.intel.com/738733/800%20Series%20DDP%20Comms%20Package%201.3.37.0.zip
unzip '800 series comms binary package 1.3.37.0.zip'
unzip ice_comms-1.3.37.0.zip

# 対象のNICを確認
lspci | grep QSFP

# PCIデバイスのシリアルを取得(必要なPCIデバイス数分実施する)
lspci -vv -s 4b:00.0 | grep -i Serial | awk '{print $7}' | sed s/-//g
40a6b7ffff973440
# 取得したシリアルでpkgをrenameする
cp ice_comms-1.3.37.0.pkg /lib/firmware/updates/intel/ice/ddp/ice-40a6b7ffff973440.pkg

rmmod ice
modprobe ice
reboot
DDPパッケージのバージョン確認
DDPが正常にインストール出来ていると、kern.logで確認することが出来ます。
tail -f /var/log/kern.log  | grep DDP
[ 4806.012146] ice 0000:4b:00.0: DDP package already present on device: ICE OS Default Package version 1.3.30.0
[ 4806.714140] ice 0000:4b:00.0: DDP package already present on device: ICE COMMS Package version 1.3.37.0
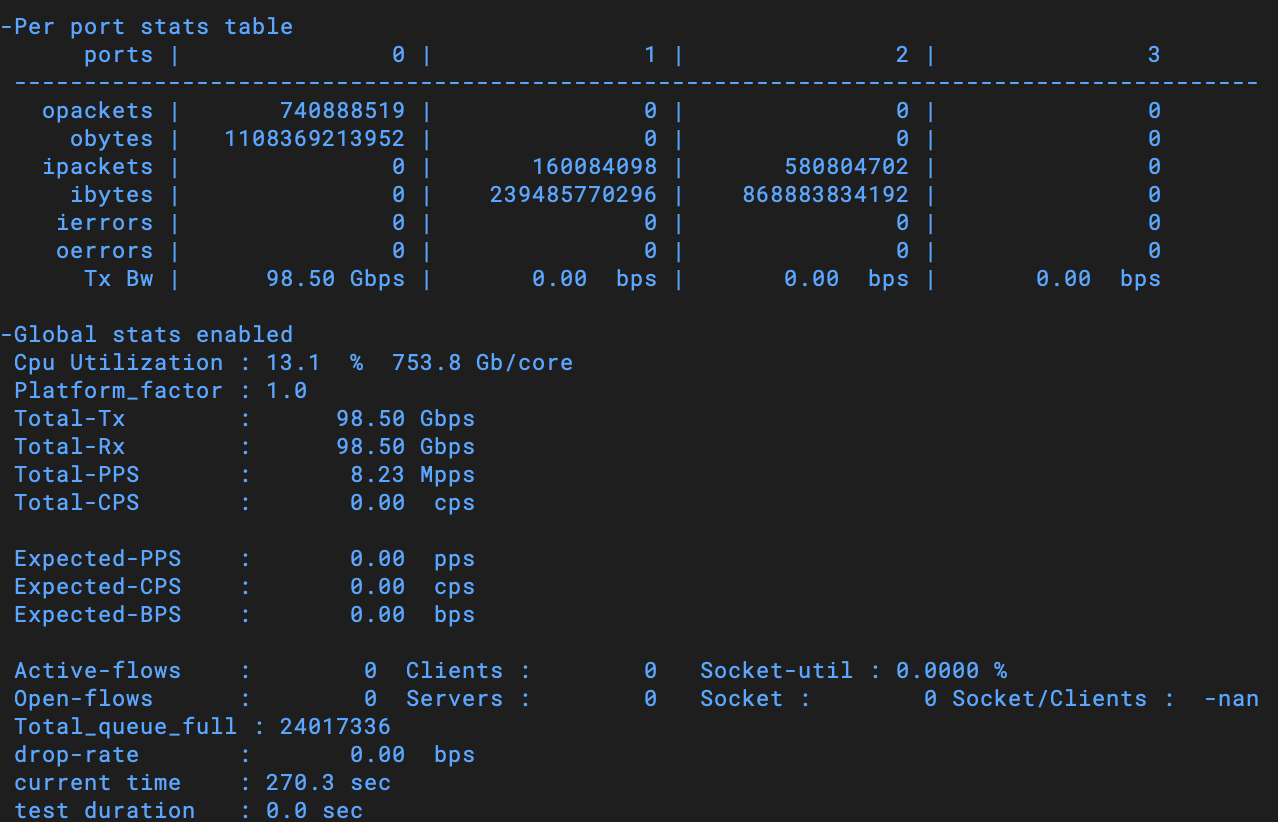
再度TRexを起動
ここまで実施すると、TRexを無事に起動することができます。
/opt/trex/v3.02# ./t-rex-64 -i
ポート0から印加すると、おおよそ100Gbpsのトラフィックが送信できていることが分かります。
おわりに
E810 NICでTRexを起動するまでの手順をまとめました。TRexを起動するにはデバイスドライバーとDDPパッケージ、ファームウェアのバージョンを意識する必要がありました。
参考URL
https://trex-tgn.cisco.com/trex/doc/release_notes.html
https://doc.dpdk.org/guides/nics/ice.html
https://cdrdv2.intel.com/v1/dl/getContent/617015
https://cdrdv2.intel.com/v1/dl/getContent/618651