Pythonを使って、Splunkの実行結果を処理する方法を紹介します。
Splunkの実行結果を受け取る
Python上でSplunkの実行結果を受け取るには以下のメソッドを使用します。
splunk.Intersplunk.getOrganizedResults(input_str = None)
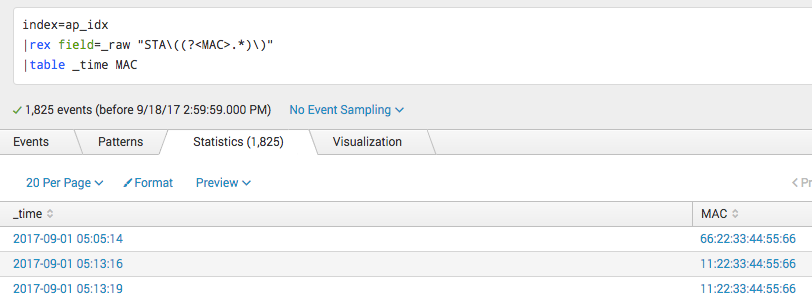
このメソッドは実行直前のサーチ文の結果を辞書のリスト形式にして返します。例えば、下図の実行結果であれば、

メソッドが返す形は以下になります。フィールド名が辞書のキーになるというわけです。
[{'_time':'2017-09-01 05:05:14', 'MAC':'66:22:33:44:55:66'}
 {'_time':'2017-09-01 05:13:16', 'MAC':'11:22:33:44:55:66'}
 {'_time':'2017-09-01 05:13:19', 'MAC':'11:22:33:44:55:66'}]
Pythonでの処理結果をSplunkに渡す(表示させる)、ファイルに書き出す
上とは反対に、PythonからSplunkにデータを渡すには以下のメソッドを使用します。
splunk.Intersplunk.outputResults(results, messages = None, fields = None, mvdelim = '\n', outputfile = sys.stdout)
必要な引数の"results"は、"getOrganizedResults"が返す"results"と同じく辞書のリストです。また、引数"outputfile"にファイルオブジェクトを指定することで、ファイルへの書き出しも可能です。
使用例
使用例として、Splunkから受け取った結果の"MAC"フィールドが"11:22:33:44:55:66"であれば、"decision"フィールドに"known"を、違う場合は"unknown"をセットし、その結果をCSVファイルに保存、Splunkに表示させるカスタムサーチコマンドを作成します。
なお、SplunkでのPythonを用いたカスタムサーチコマンドの作り方は以下で紹介していますので、ご存じない方は参照いただければと思います。
カスタムサーチコマンドの作り方(Splunk)
ログのサンプルとして、以下の無線LAN APのログを使用します。
(STAの後ろにMACアドレスが記載されています。)
2017/09/01 09:13:51  LAN  WLAN(STA_DEAUTH): STA(11:22:33:44:55:66) is deauthed!
2017/09/01 09:13:34  LAN  WLAN(RSN_CONNECT): STA(11:22:33:44:55:66) is associated!
2017/09/01 09:04:29  LAN  WLAN(STA_DEAUTH): STA(11:22:33:44:55:66) is deauthed!
2017/09/01 09:04:23  LAN  WLAN(RSN_CONNECT): STA(11:22:33:44:55:66) is associated!
2017/09/01 08:34:09  LAN  WLAN(STA_DEAUTH): STA(11:22:33:44:55:66) is deauthed!
2017/09/01 08:34:01  LAN  WLAN(RSN_CONNECT): STA(11:22:33:44:55:66) is associated!
2017/09/01 08:03:48  LAN  WLAN(STA_DEAUTH): STA(11:22:33:44:55:66) is deauthed!
2017/09/01 08:03:42  LAN  WLAN(RSN_CONNECT): STA(11:22:33:44:55:66) is associated!
2017/09/01 07:36:51  LAN  WLAN(STA_DEAUTH): STA(33:22:33:44:55:66) is deauthed!
2017/09/01 07:36:35  LAN  WLAN(RSN_CONNECT): STA(33:22:33:44:55:66) is associated!
2017/09/01 07:34:18  LAN  WLAN(STA_DEAUTH): STA(11:22:33:44:55:66) is deauthed!
2017/09/01 07:34:10  LAN  WLAN(RSN_CONNECT): STA(11:22:33:44:55:66) is associated!
Pythonのコードはこのようになります。
import splunk.Intersplunk

# Splunkのサーチの結果を受け取る
results, dummyresults, settings = splunk.Intersplunk.getOrganizedResults()

# MACアドレスを見て判定する
for result in results:
    if result['MAC'] == '11:22:33:44:55:66':
        result['decision'] = 'known'
    else:
        result['decision'] = 'unknown'

# 処理結果をCSVファイルで保存する
splunk.Intersplunk.outputResults(results, outputfile = open("result.csv","w"))

# 処理結果をSplunk上で表示する
splunk.Intersplunk.outputResults(results)
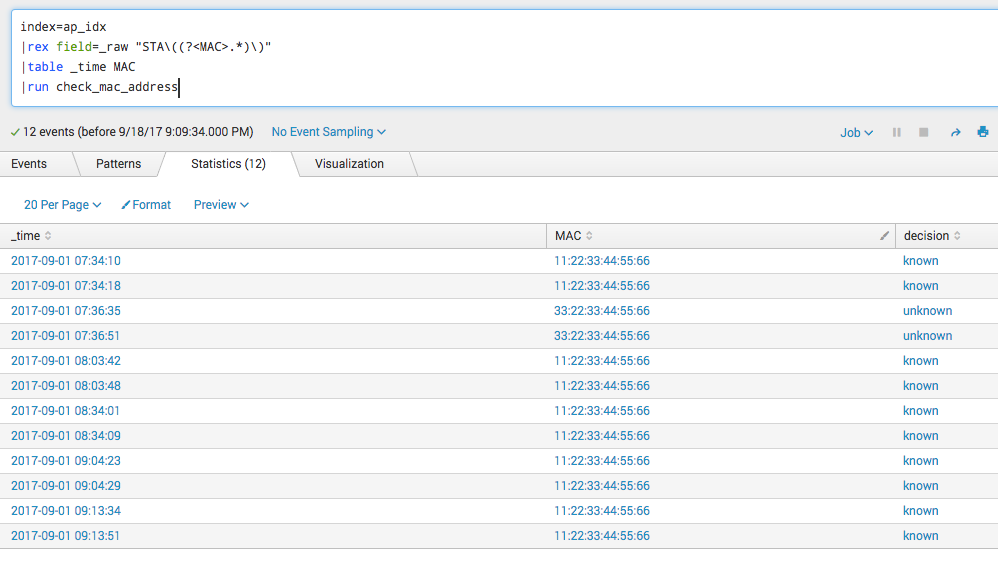
以下のサーチ文で、Splunkの処理結果を作成したカスタムサーチに渡します。
index=ap_idx
|rex field=_raw "STA\((?<MAC>.*)\)"
|table _time MAC
|run check_mac_address
下図のようにSplunk上に表示、また、スクリプトと同じディレクトリに"result.csv"という名前で結果が保存されます。
