こちらは、Selenium/Appium Advent Calendar 2014の5日目の記事となります。
前日は hiroshitoda-prospire さんの「Seleniumを動かすための環境の構成管理について」でした。
こんにちは。テストエンジニアをやっておりますmyhrと申します。
今日はChromeでフルサイズのスクリーンショットを撮るためのパッチについてご紹介します。
既に他の記事でも紹介されているかと思いますが、今回は初心者向けに細かく説明したいと思います。
背景
背景については去年の hiroshitoda-prospire さんの記事「Selenium WebDriver でスクリーンショットを取得するときのtips」を参考にさせていただきました。
同じくFirefoxとChromeでスクリーンショットを撮ってみました。
- 縦に長いページの場合
- 横に長いページの場合
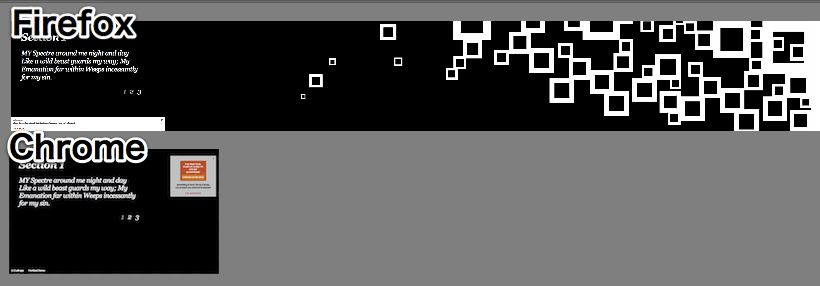
Firefoxはページの最後までちゃんと撮れていますが、Chromeはブラウザーの画面にみえる範囲しか写っていません。
そのためFirefoxと違い、スクリーンショットを撮る度にわざわざ操作中のブラウザーを手前に持ってきていることがわかります。
RemoteWebDriver Modes
The remote webdriver comes in two flavours:
- Client mode: where the language bindings connect to the remote instance. This is the way that the FirefoxDriver, OperaDriver and the RemoteWebDriver client normally work.
- Server mode: where the language bindings are responsible for setting up the server, which the driver running in the browser can connect to. The ChromeDriver works in this way.
ChromeDriverだけ挙動が違う原因はおそらくこの辺りが関係しているかと思いますが詳しい方教えていただけると幸いです。
動作環境
| env | version |
|---|---|
| Python | 3.4.2 |
| Pillow ※ | 2.4.0 |
| selenium | 2.44.0 |
| ChromeDriver | 2.9.248307 |
| Chrome | 39.0.2171.71 (64-bit) |
※ 画像処理ライブラリ。インストール:pip instsall Pillow
|
やり方
やり方はシンプルです。強引且つ泥臭い方法でやります。
###変数の設定
| var | description | var | description |
|---|---|---|---|
| view_width ※ | ブラウザーの横サイズ | stitched_image | スクリーンショットになる画像 |
| view_height ※ | ブラウザーの縦サイズ | tmp_image | スクリーンショットの一部になる画像 |
| total_width ※ | ページの横サイズ | row_count | 縦にスクロールした回数 |
| total_height ※ | ページの縦サイズ | col_count | 横にスクロールした回数 |
| scroll_width | スクロールした横サイズの計 | new_width | ページの残りの横サイズ |
| scroll_height | スクロールした縦サイズの計 | new_height | ページの残りの縦サイズ |
| ※ 固定値 |
- 次のようにページ全体のサイズがブラウザーの縦横ともに大きいと想定します。
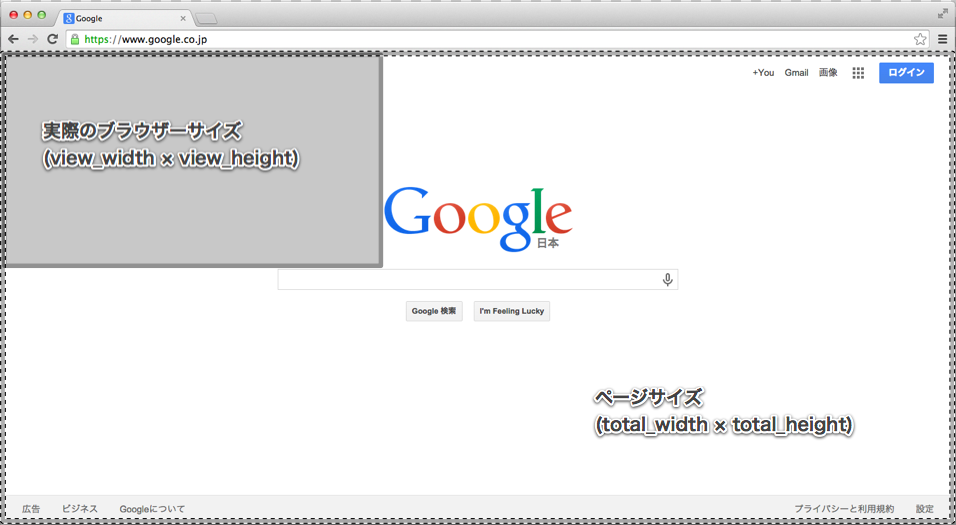
この時、scroll_width, scroll_height, row_count, col_count = 0に初期化します。
- ページの右端に当たるまでスクリーンショットを撮って画面の横幅の分スクロールするのを繰り返していきます。
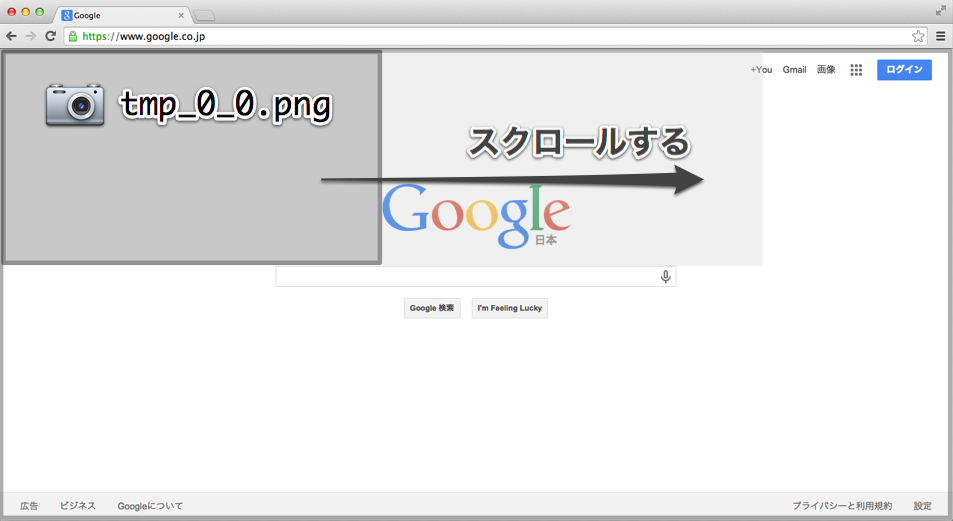
横にスクロールする度にcol_countを増やします。
必須うではないですがtmp_imageのファイル名はtmp_{row_count}_{col_count}.pngとかにすると後でファイルだけ見た時にわかりやすいです。
tmp_imageをstitched_imageにscroll_widthとscroll_heightの位置に貼り付けます。
- スクロールサイズがページの残りサイズを超えたら残りの分だけ切り出してtmp_imageに保存しstitched_imageに貼り付けます。
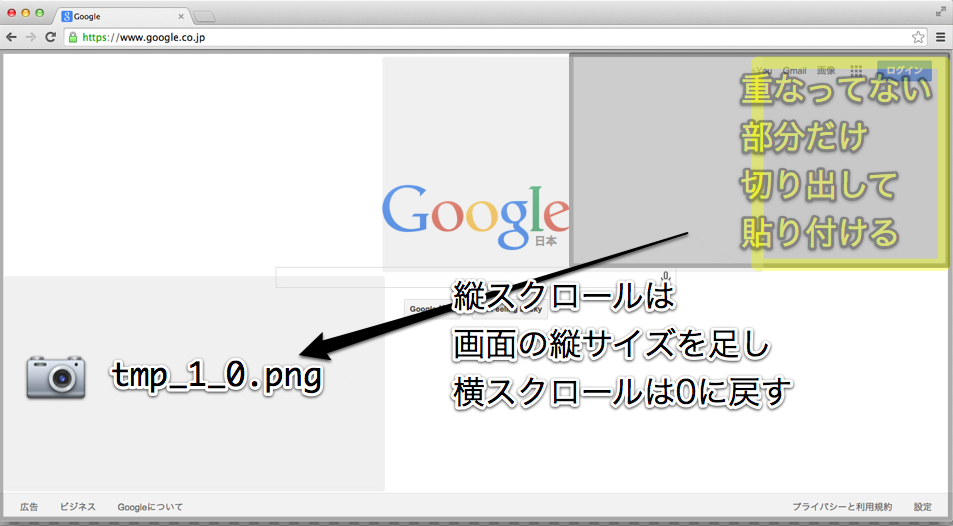
そして画面の高さ分縦にスクロールし、横スクロールは左側に戻します。scroll_height+=view_height; row_count++; scroll_width, col_count=0
- 上記のプロセスをページの右下に到達するまで繰り返します。(縦のスクロールMAXの時も横スクロールと同じやり方で切り取ってペーストする)
最後にstitched_imageを指定のfilename(引数で渡される)に保存し、Trueを返します。
コード
https://gist.github.com/yui3880/a63ced61806d8517c4a3
from PIL import Image
import time

def save_screenshot(self, filename, fullsize=False):
	filepath = '/'.join(filename.split('/')[:-1])
	if fullsize:
		# ページの左上までスクロール
		self.execute_script("window.scrollTo(0, 0);")

		# ページサイズ取得
		total_height = self.execute_script("return document.body.scrollHeight")
		total_width = self.execute_script("return document.body.scrollWidth")

		# 画面サイズ取得
		view_width = self.execute_script("return window.innerWidth")
		view_height = self.execute_script("return window.innerHeight")

		# 画像処理用
		stitched_image = Image.new("RGB", (total_width, total_height))

		# スクロール操作用
		scroll_width = 0
		scroll_height = 0

		row_count = 0
		# 縦スクロールの処理§
		while scroll_height < total_height:
			# 横スクロール初期化
			col_count = 0
			scroll_width = 0
			self.execute_script("window.scrollTo(%d, %d)" % (scroll_width, scroll_height))
			# 横スクロールの処理
			while scroll_width < total_width:
				if col_count > 0:
					# 画面サイズ分横スクロール
					self.execute_script("window.scrollBy("+str(view_width)+",0)")

				tmpname = filepath + '/tmp_%d_%d.png' % (row_count, col_count)
				self.get_screenshot_as_file(tmpname)
				time.sleep(3)

				# 右端か下端に到達したら画像を切り取ってstitched_imageに貼り付ける
				if scroll_width + view_width >= total_width or scroll_height + view_height >= total_height:
					new_width = view_width
					new_height= view_height
					if scroll_width + view_width >= total_width:
						new_width = total_width - scroll_width
					if scroll_height + view_height >= total_height:
						new_height = total_height - scroll_height
					tmp_image = Image.open(tmpname)
					tmp_image.crop((view_width - new_width, view_height - new_height, view_width, view_height)).save(tmpname)
					stitched_image.paste(Image.open(tmpname), (scroll_width, scroll_height))
					scroll_width += new_width

				# 普通に貼り付ける
				else:
					stitched_image.paste(Image.open(tmpname), (scroll_width, scroll_height))
					scroll_width += view_width
					col_count += 1

			scroll_height += view_height
			time.sleep(3)


		# 指定のfilenameにstitched_image格納
		stitched_image.save(filename)
		return True

	# fullsize=Falseの場合は通常のスクリーンショットを取得
	else:
		self.get_screenshot_as_file(filename)
どこに当てる?
###ラッパーとか使っていない場合
直接言語バインディングの方に当てちゃいましょう。
- pythonの場合:
{$PYTHONPATH}/site-packages/webdriver/chrome/webdriver.py
  ...
  from selenium.common.exceptions import WebDriverException
  from .service import Service
  from .options import Options
+ from PIL import Image
+ import time

  class WebDriver(RemoteWebDriver):
  ...
+     def save_screenshot(self, filename, fullsize=False):
+         # ページのサイズを取得
+         total_width = self.execute_script("return document.body.scrollWidth")
+         total_height = self.execute_script("return document.body.scrollHeight")
  ...
- メリット:入れておけばChromeのスクリーンショットに関しては全てこのやり方で撮ってくれる、呼び出し方も従来通り
- デメリット:seleniumのバージョン変える都度パッチを当てる必要がある。環境によって動かない場合がある。
###ラッパーとか社内ライブラリとか使っている場合
お使いのスクリーンショットのメソッドの中にselfをwebdriverとかに変えて入れてください。
バトンタッチ
次は nkns165 さんです。よろしくお願いします。