1.はじめに
Elixirを使って、RaspberryPiのハードウェア制御の練習をしてみました。
今回は、Elixir Circuits.I2Cから、GROVEの温度・湿度センサAHT20を制御してみます。
2.ハードウェア
(1)センサ
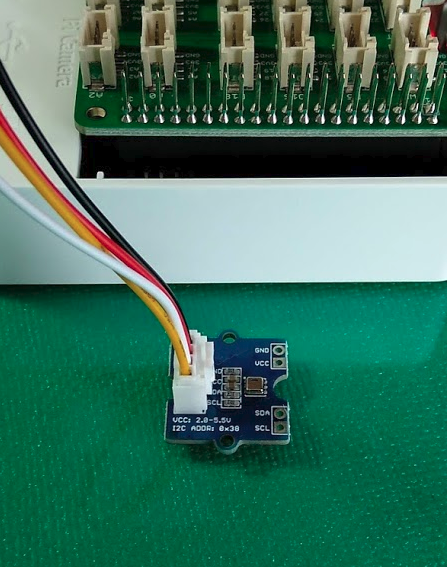
Guangzhou Aosong Electronics社のI2C接続温度センサAHT20を使用します。
- 購入:Seeedさん
Grove Base HAT経由でRaspberryPiに接続したら、i2cdetectを実行して通信できるか確認します。
- AHT20のアドレス:
0x38 - Grove Base HATのアドレス:
0x04(Grove Base HATを使用している場合に表示)
コマンドライン
 $ i2cdetect -y 1
     0  1  2  3  4  5  6  7  8  9  a  b  c  d  e  f
00:          -- 04 -- -- -- -- -- -- -- -- -- -- --
10: -- -- -- -- -- -- -- -- -- -- -- -- -- -- -- --
20: -- -- -- -- -- -- -- -- -- -- -- -- -- -- -- --
30: -- -- -- -- -- -- -- -- 38 -- -- -- -- -- -- --
40: -- -- -- -- -- -- -- -- -- -- -- -- -- -- -- --
50: -- -- -- -- -- -- -- -- -- -- -- -- -- -- -- --
60: -- -- -- -- -- -- -- -- -- -- -- -- -- -- -- --
70: -- -- -- -- -- -- -- --
3.ソフトウェア
(1)下準備
プロジェクトを作ります。
コマンドライン
$ cd gitwork
$ mix new i2ctehu
* creating README.md
* creating .formatter.exs
* creating .gitignore
* creating mix.exs
* creating lib
* creating lib/i2ctehu.ex
* creating test
* creating test/test_helper.exs
* creating test/i2ctehu_test.exs

Your Mix project was created successfully.
You can use "mix" to compile it, test it, and more:

    cd i2ctehu
    mix test

Run "mix help" for more commands.
mix.exsを編集します。
mix.exs
defmodule I2ctemp.MixProject do
  use Mix.Project

  def project do
    [
      app: :i2ctemp,
      version: "0.1.0",
      elixir: "~> 1.10",
      start_permanent: Mix.env() == :prod,
      deps: deps()
    ]
  end

  # Run "mix help compile.app" to learn about applications.
  def application do
    [
      extra_applications: [:logger]
    ]
  end

  # Run "mix help deps" to learn about dependencies.
  defp deps do
    [
      #ここの先頭のコメントアウトを外す↓
      {:dep_from_hexpm, "~> 0.3.0"},
      # {:dep_from_git, git: "https://github.com/elixir-lang/my_dep.git", tag: "0.1.0"}
      #ここを追加↓
      {:circuits_i2c, "~> 0.3", override: true}
    ]
  end
end
mix deps.getを実行します。
コマンドライン
$ mix deps.get
Resolving Hex dependencies...
Dependency resolution completed:
New:
  circuits_i2c 0.3.6
  dep_from_hexpm 0.3.0
  elixir_make 0.6.1
* Getting dep_from_hexpm (Hex package)
* Getting circuits_i2c (Hex package)
* Getting elixir_make (Hex package)
$
(2)コード
i2ctehu.ex
defmodule I2ctehu do
  @moduledoc """
  Documentation for `I2ctehu`.
  """

  alias Circuits.I2C
  require Logger
  use Bitwise

  @doc """
  温度の取得

  ## Examples
      iex> I2ctehu.get()
  """
  def get() do

    # I2Cアドレス
    address = 0x38
    # I2Cを開く
    {:ok, ref} = I2C.open("i2c-1")

    # 初期化する
    I2C.write(ref, address, <<0xBE, 0x08, 0x00>>)
    Process.sleep(100)

    # 現在温度・湿度を読み出す
    I2C.write(ref, address, <<0xAC, 0x33, 0x00>>)
    Process.sleep(100)
    {:ok, rawdata} = I2C.read(ref, address, 7)

    #バイト分割
    #0:state, 1:humi1, 2:humi2, 3:humi3/temp1, 4:temp2, 5:temp3, 6:crc
    <<_, h1, h2, ht3, t4, t5, _>> = rawdata

    # 湿度に変換(データシートに換算方法あり)
    rawhumi = (h1) <<< 12 ||| (h2) <<< 4 ||| (ht3) >>> 4
    humi = rawhumi / 1_048_576.0 * 100.0

    # 温度に変換(データシートに換算方法あり)
    rawtemp = ((ht3) &&& 0x0F) <<< 16 ||| (t4) <<< 8 ||| (t5)
    temp = rawtemp / 1_048_576.0 * 200.0 - 50.0

    # 表示
    Logger.info(" rawdata: #{inspect rawdata}")
    Logger.info(" temp(raw): #{rawhumi} , humi(raw): #{rawtemp}")
    Logger.info(" temp(degree Celsius): #{Float.round(temp,1)} , humi(%): #{Float.round(humi,1)}")
  end
end
コードの中でビットの演算がありますので、Bitwiseをuseで呼び出してください。
(3)実行結果
temp(degree Celsius):のところに摂氏温度が、humi(%):のところに湿度が、それぞれ表示されます。
(RAW...は取得した生の数値を表示しています)
コマンドライン
 $ iex -S mix
Erlang/OTP 22 [erts-10.5.4] [source] [smp:4:4] [ds:4:4:10] [async-threads:1] [hipe]

Remember to keep good posture and stay hydrated!
Interactive Elixir (1.10.3) - press Ctrl+C to exit (type h() ENTER for help)
iex(1)> I2ctehu.get

10:46:17.743 [info]   rawdata: <<28, 129, 226, 229, 130, 109, 98>>
10:46:17.750 [info]   temp(raw): 532014 , humi(raw): 361069
10:46:17.759 [info]   temp(degree Celsius): 18.9 , humi(%): 50.7
:ok
iex(2)>
4.おわりに
Elixir Circuits.I2Cを使って、簡単に温度・湿度センサを制御する例を紹介しました。
