初めまして!
高知県でiOS, WatchOSのアプリ開発をしているRyoichiです
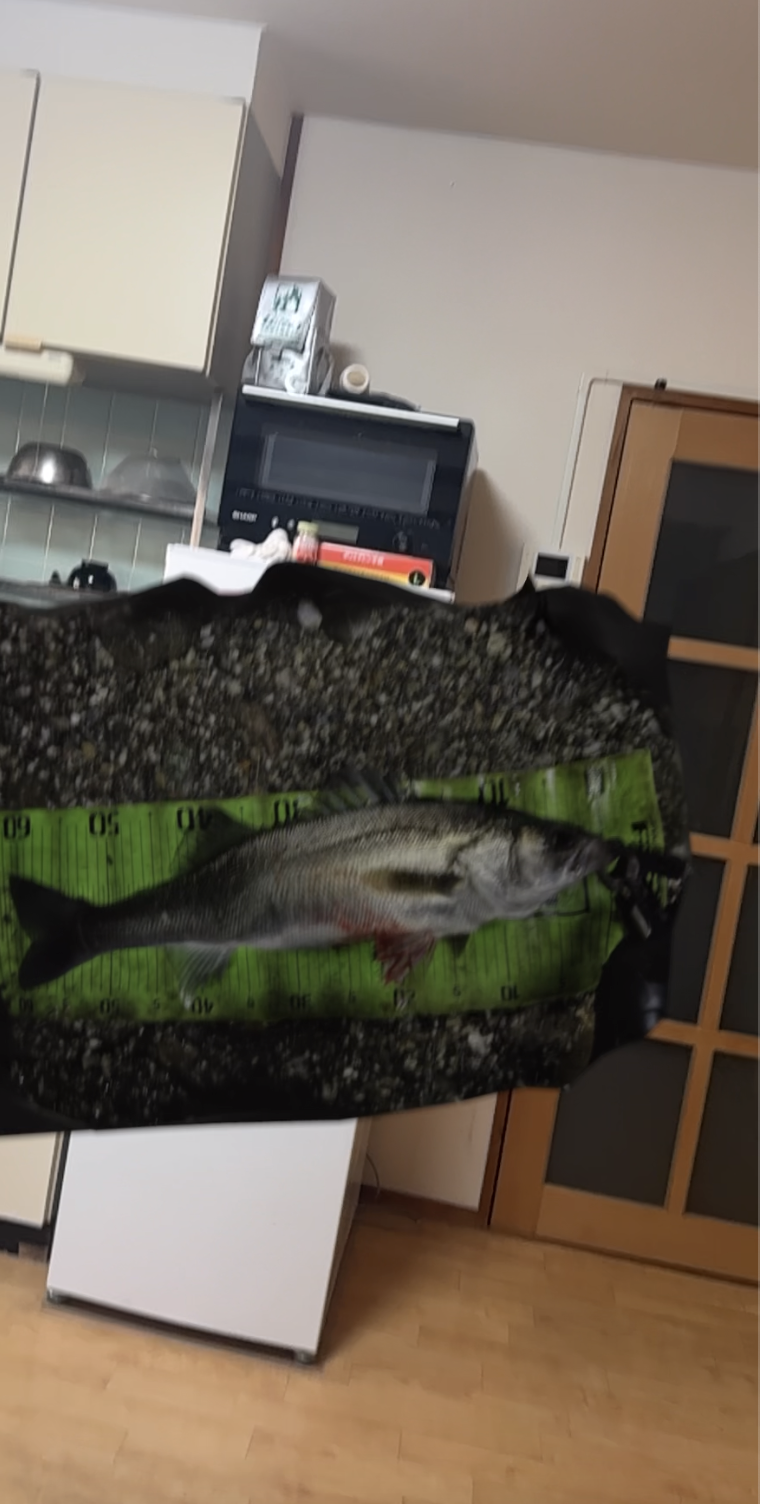
今回作ったのは以下のような簡単なARアプリ
 |
 |
 |
|---|---|---|
| PhotosPicker | usdz生成 | 画面に反映 |
LiDAR機能付きのiPhoneを使って、写真を読み込ませてAR上で配置するだけの簡単なものです
なんとなく公式ドキュメントを覗いてたら自分でも作れそうだな〜って感じたので試してみました
実装の流れとしては
- heic形式で画像をアプリ内に保存
- usdzファイル生成
- AR上で配置
では、行ってみましょう〜
手順1 権限設定
まずは被写体となる魚を釣りに行きます
そう、高知は良い魚が釣れるんだよね(移住した理由・第一位)
冗談はさておき、以下2つのアクセス権限をplistに記載します
写真フォルダアクセス
・NSPhotoLibraryUsageDescription
AR機能・カメラアクセス権限
・NSCameraUsageDescription
手順2 PhotosPickerから画像情報を取得
PhotosPicker経由で画像を取得できるように設定します
上記部分ですね
PhotosPickerを使って、写真の選択できるように調整
struct MainView: View {
    @State var selectedItems: [PhotosPickerItem] = []
    var body: some View {
        ... 省略
        PhotosPicker(selection: $selectedItems, matching: .images, photoLibrary: .shared()) {
            Text("画像選択")
        }
    }
}
手順3 選択した画像をheic形式に変更
選択した画像をheic形式に変更し、アプリ内に保存する
heic形式への変換は下記メソッドを使用します
今回はPhotosPickerItemの配列型を拡張し、Documents/Input/引数 配下に作成したheic形式の画像を保存しています
extension Array where Element == PhotosPickerItem {

    func saveToDocumentFolders(currentDateString: String) async {
        let documentDirectory = URL.documentsDirectory
        let folderPath = documentDirectory.appendingPathComponent("Inputs/\(currentDateString)/")

        // 保存先のフォルダを作成
        do {
            try FileManager.default.createDirectory(at: folderPath, withIntermediateDirectories: true, attributes: nil)
        } catch {
            print("Failed to create directory: \(error)")
            return
        }

        for (index, item) in self.enumerated() {
            do {
                // 画像をData形式で取得
                guard let data = try await item.loadTransferable(type: Data.self) else { return }
                // UIImageに変更し
                guard let uiImage = UIImage(data: data) else { return }

                // HEICデータの名前等を指定
                let fileName = "\(index + 1).HEIC"
                let fileURL = folderPath.appendingPathComponent(fileName)
                do {
                    // heic形式のデータを作成し
                    guard let heic = uiImage.heicData() else { return }
                    // フォルダに画像ファイルを生成
                    try heic.write(to: fileURL)
                    print("HEIC image saved to: \(fileURL.path)")
                } catch {
                    print("Failed to save HEIC image for item \(index + 1): \(error)")
                }
            } catch {
                print("Failed to load image data for item \(index + 1): \(error)")
            }
        }

    }
}
※動画ファイルを選択した場合とかは考慮していないです
手順4 usdzファイルを生成する
公式様(Apple)が便利なAPI提供してくださっているので、先ほど作成した画像ファイル群が格納されているフォルダとアウトプット先のパスを指定して処理実行
InputとOutputの情報を設定
// 出力先の情報を指定
let request = PhotogrammetrySession.Request.modelFile(url: url, detail: .reduced)
// 画像ファイルが格納されているフォルダパスを指定
let session = try PhotogrammetrySession(input: inputFolderUrl, configuration: config)
Sessionの開始し、ファイルの作成情報を監視
try session.process(requests: [request])

for try await output in session.outputs {
    switch output {
    case .processingComplete:
        DispatchQueue.main.async {
            self.isLoading = false
            self.isComplete = true
            self.outputUrl = outputUrl.absoluteURL
        }
        default:
            break
    }
}
処理全文
    func createUsdz(folderName: String) {
        Task {
            do {
                guard PhotogrammetrySession.isSupported else {
                    return
                }
                let inputsPath: String = URL.documentsDirectory.appendingPathComponent("Inputs/\(folderName)").path
                let outputUrl: URL = URL.documentsDirectory.appendingPathComponent("Outputs/\(folderName).usdz")

                let inputFolderUrl = URL(fileURLWithPath: inputsPath)
                let url = URL(fileURLWithPath: outputUrl.path)

                var config = PhotogrammetrySession.Configuration()
                // Use slower, more sensitive landmark detection.
                config.featureSensitivity = .high
                // Adjacent images are next to each other.
                config.sampleOrdering = .sequential
                // Object masking is enabled.
                config.isObjectMaskingEnabled = true


                let request = PhotogrammetrySession.Request.modelFile(url: url, detail: .reduced)
                let session = try PhotogrammetrySession(input: inputFolderUrl, configuration: config)

                try session.process(requests: [request])

                for try await output in session.outputs {
                    switch output {
                    case .processingComplete:
                        print("finished!")
                        DispatchQueue.main.async {
                            self.isLoading = false
                            self.isComplete = true
                            self.outputUrl = outputUrl.absoluteURL
                        }
                    default:
                        break
                    }
                }
            } catch {
                print("Output: ERROR = \(error)")
            }
        }
    }
手順5 手順4で作成したusdzファイルを画面上に配置
UIViewRepresentableを使ってSwiftUIから呼び出せるARContainerを作成して
struct ARViewContainer: UIViewRepresentable {
    let fileUrl: URL

    func makeUIView(context: Context) -> ARView {
        let arView = ARView(frame: .zero)
        let anchor = AnchorEntity(world: [0, 0, 0])
        arView.scene.addAnchor(anchor)

        // さっき作ったusdzファイルのパス指定して、Object配置
        if let modelEntity = try? ModelEntity.load(contentsOf: fileUrl) {
            modelEntity.scale = SIMD3<Float>(0.5, 0.5, 0.5)
            modelEntity.availableAnimations.forEach {
                modelEntity.playAnimation($0.repeat())
            }
            anchor.addChild(modelEntity)
        }

        return arView
    }

    func updateUIView(_ uiView: ARView, context: Context) {}
}
んで、SwiftUI Viewに以下を追加して、画面上に配置
ARViewContainer(fileUrl: outputUrl!)
    .edgesIgnoringSafeArea(.all)
と、ここまですれば画面上に反映されます
ん〜、読み込ませた画像が真っ暗闇の中で釣り上げた魚を雑に取った写真なので色々荒くなってますねぇ〜
写真の枚数や撮り方を工夫するか
Configの設定をしっかり調べて記述してあげないといけないかもですね
と、まぁこんな感じ
また、何か作ったら投稿しまーす