概要
Skip Toolsを使ったネイティブアプリ構築において、Skip ToolsではサポートされていないようなUIを両ネイティブで実装して、表示するまでが本記事の内容になります
経緯
Skip ToolsにはカレンダーUIが提供されていませんでした😭
(Date Pickerはあるんだけどね)
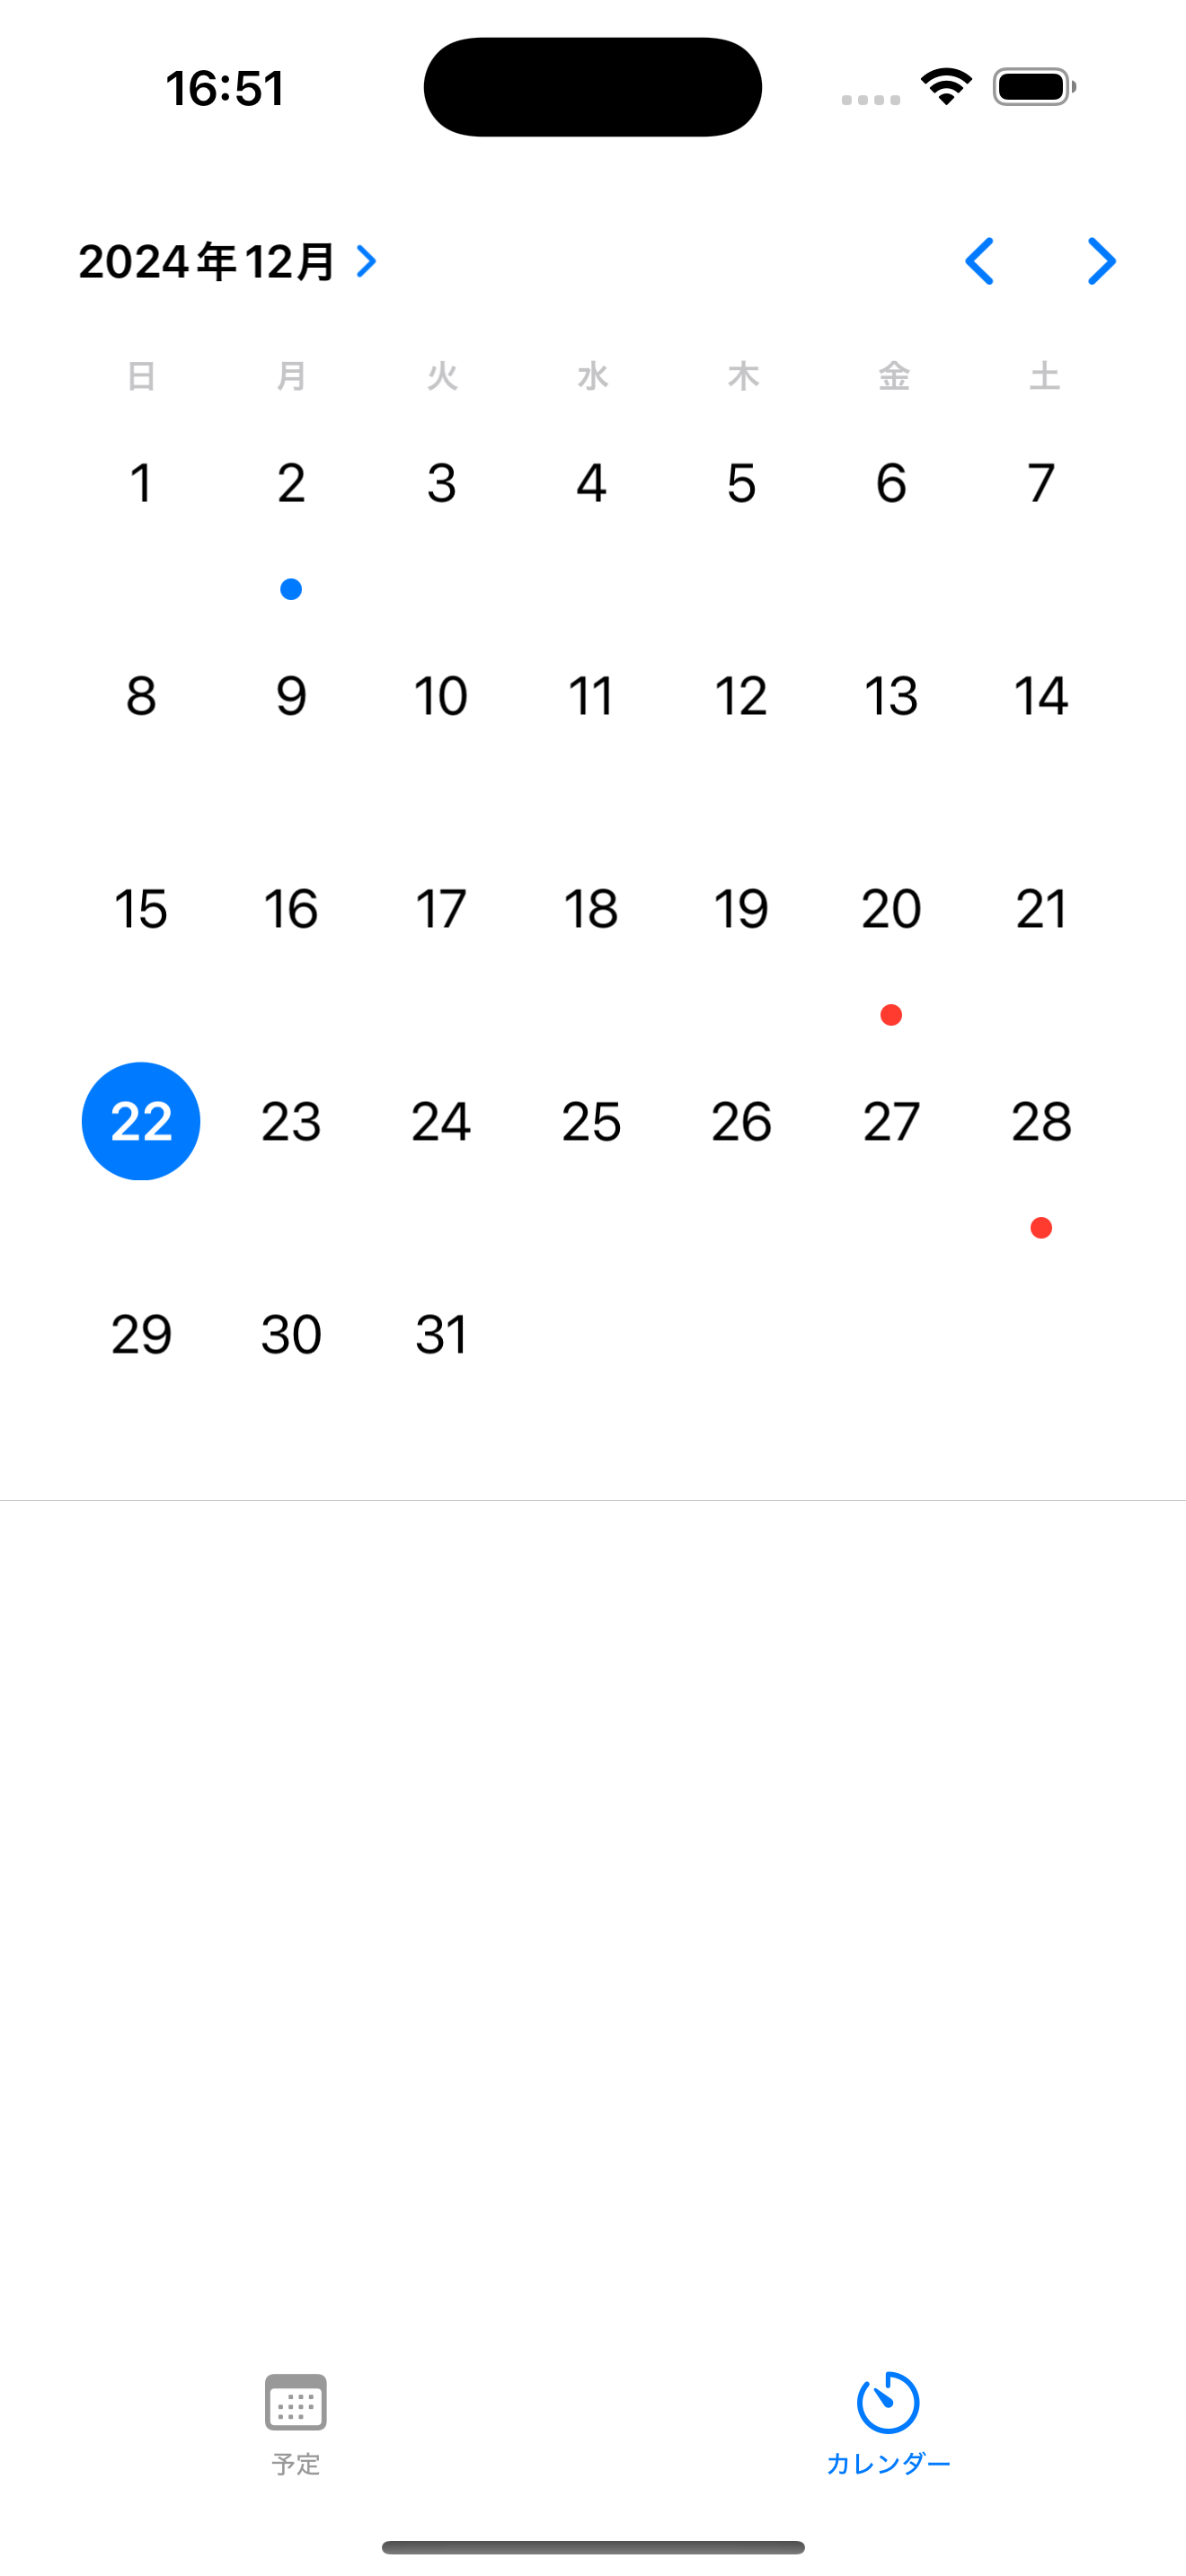
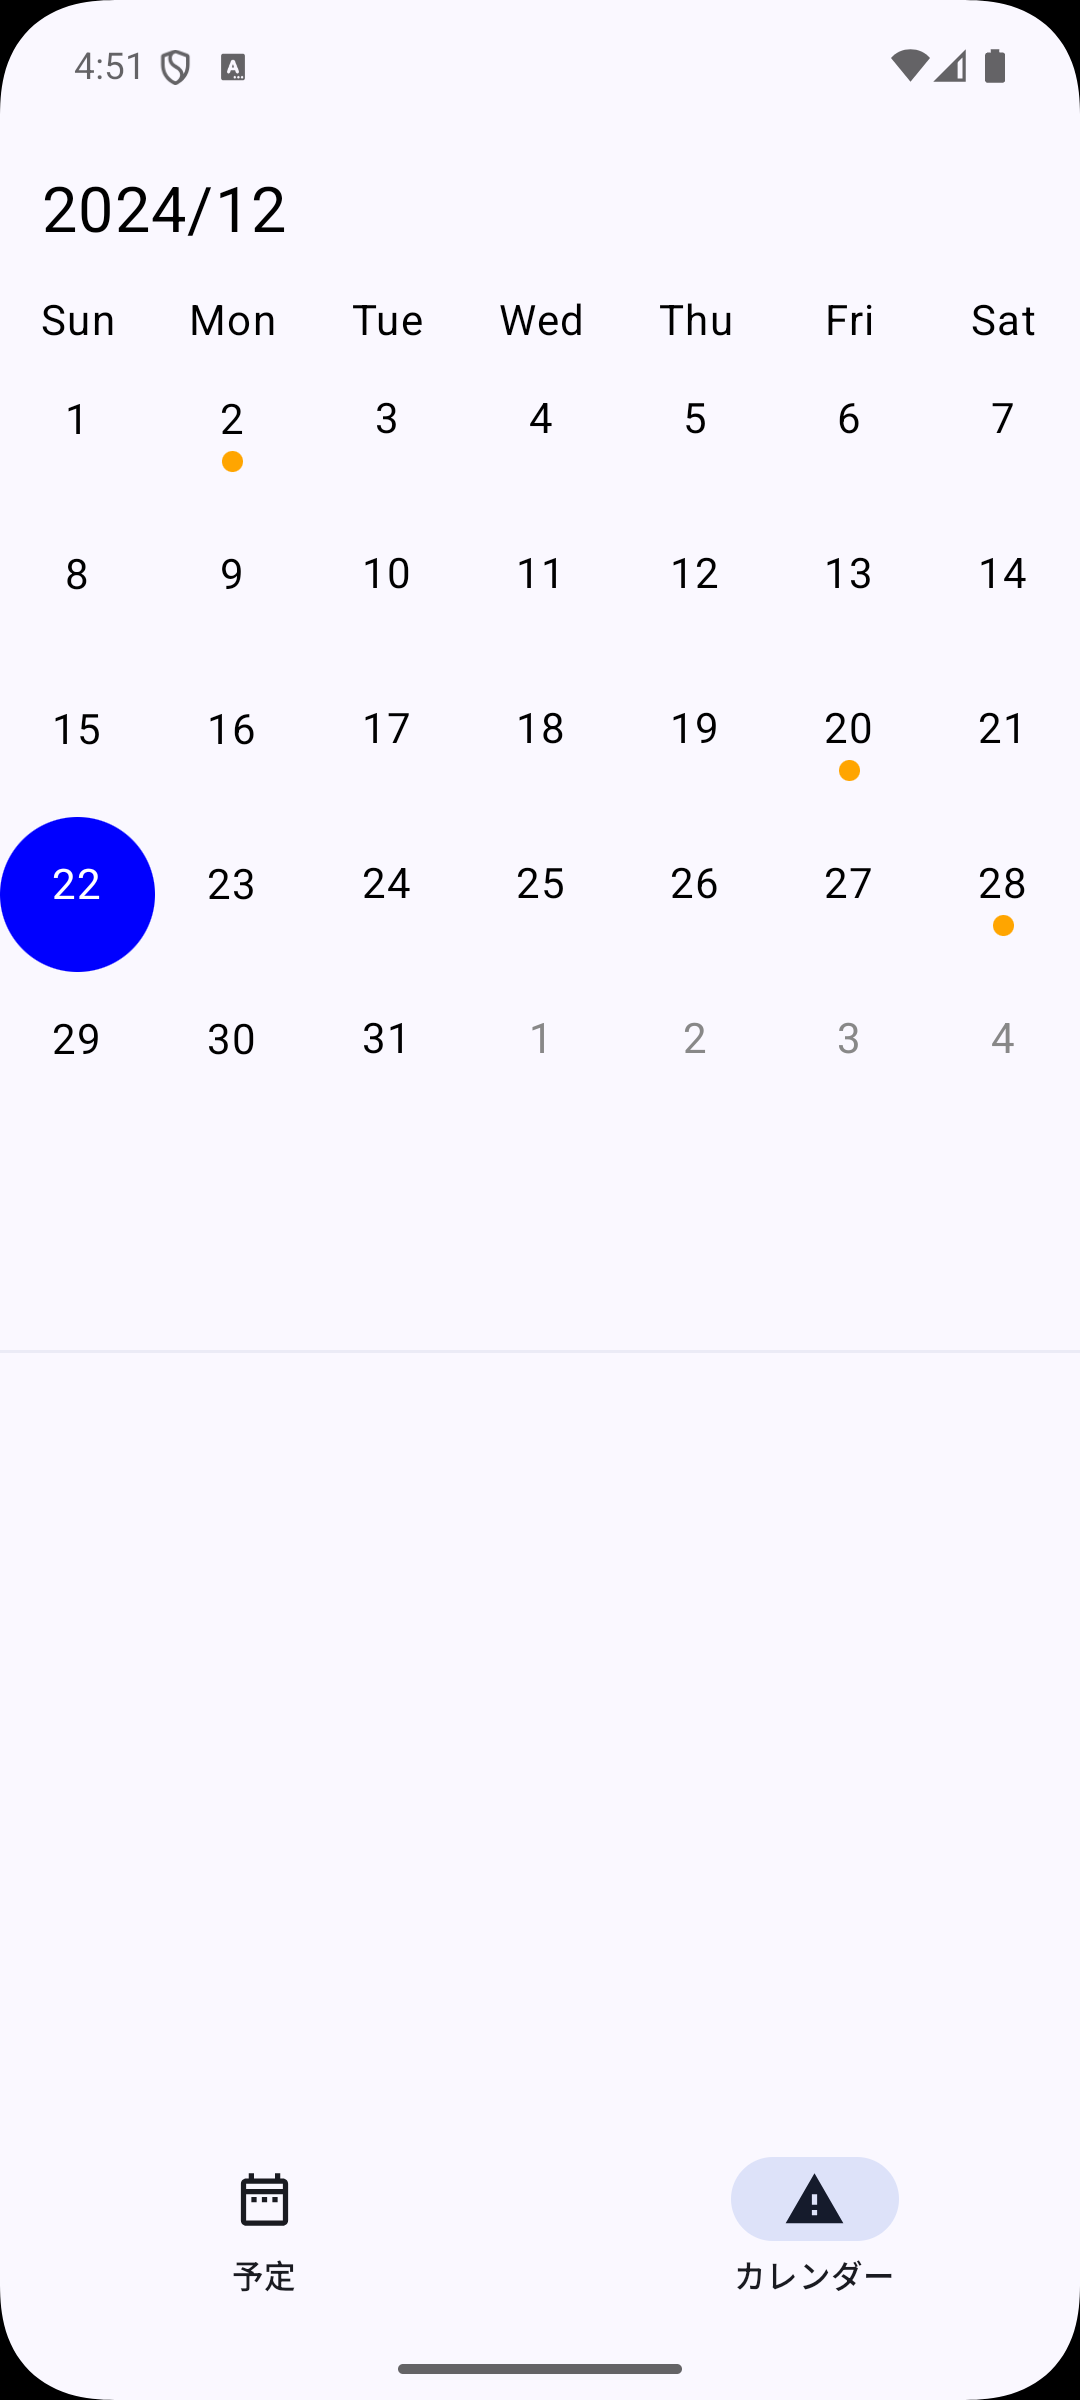
今回作るもの
・両ネイティブで使用できるカレンダーUI
 |
 |
|---|---|
| iOS | Android |
今回は以下を使って、両方使用できるようなUIを作っていこうと思います
・iOS -> UICalendarView
・Android -> Calendar
iOS側のカレンダー作成
UICalendaViewの作成
UIViewRepresentableを使用し、SwiftUIで使用できるようにラップします
※ 日付選択処理や、該当日付へのアイコン表示なども記載されています。
UICalendarViewRepresentable.swift
// android側では使用しないのでifdefを使用してiOSのみコードが読み込まれるようにします
#if !SKIP

import SwiftUI

struct UICalendarViewRepresentable: UIViewRepresentable {
    let selectedDate: Date
    let highlights: [CalendarItem]
    let onTap: (Date) -> Void

    class Coordinator: NSObject, UICalendarSelectionSingleDateDelegate, UICalendarViewDelegate {
        var parent: UICalendarViewRepresentable

        init(parent: UICalendarViewRepresentable) {
            self.parent = parent
        }

        // MARK: - Date Selection
        func dateSelection(_ selection: UICalendarSelectionSingleDate, didSelectDate dateComponents: DateComponents?) {
            if let date = dateComponents?.date {
                DispatchQueue.main.async {
                    self.parent.onTap(date)
                }
            }
        }

        // MARK: - Custom Decoration
        func calendarView(_ calendarView: UICalendarView, decorationFor dateComponents: DateComponents) -> UICalendarView.Decoration? {
            let calendar = Calendar.current
            guard let date = calendar.date(from: dateComponents) else { return nil }

            if let highlight = self.parent.highlights.first(where: { calendar.isDate($0.date, inSameDayAs: date) }) {
                // アイコンの色を `highlight.iconColor` から取得
                return .customView {
                    let circle = UIView()
                    circle.backgroundColor = UIColor(highlight.iconColor)
                    circle.frame = CGRect(x: 0, y: 0, width: 8, height: 8)
                    circle.layer.cornerRadius = 4
                    return circle
                }
            }

            return nil
        }
    }

    func makeCoordinator() -> Coordinator {
        Coordinator(parent: self)
    }

    func makeUIView(context: Context) -> UICalendarView {
        let calendarView = UICalendarView()
        calendarView.delegate = context.coordinator

        let selection = UICalendarSelectionSingleDate(delegate: context.coordinator)
        calendarView.selectionBehavior = selection

        return calendarView
    }

    func updateUIView(_ uiView: UICalendarView, context: Context) {
        let calendar = Calendar.current
        let dateComponents = calendar.dateComponents([.year, .month, .day], from: selectedDate)
        if let selection = uiView.selectionBehavior as? UICalendarSelectionSingleDate {
            selection.setSelected(dateComponents, animated: true)
        }
    }
}

#endif
画面の呼び出し
bodyに対してカレンダーComponentを定義します
SkipCalendar.swift
public struct SkipCalendar: View {

    private let initialSelectDate: Date
    private let highlights: [CalendarItem]
    private let onTap: (Date) -> Void

    public init(
        initialSelectDate: Date? = nil,
        highlights: [CalendarItem],
        onTap: @escaping (Date) -> Void = { _ in }
    ) {
        self.highlights = highlights
        self.onTap = onTap
        self.initialSelectDate = initialSelectDate ?? Date.now
    }

#if SKIP
    ...省略
#else
    public var body: some View {
        UICalendarViewRepresentable(selectedDate: initialSelectDate, highlights: self.highlights, onTap: self.onTap)
    }
#endif
    ... 省略
}
ここまでで、iOS側のカレンダー表示が完成です
Android側のカレンダー作成
java/kotlinの依存関係
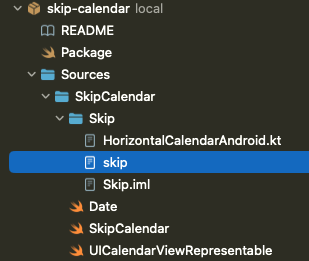
projectName/skip/skip.ymlに外部ライブラリをインポートするような記述をします
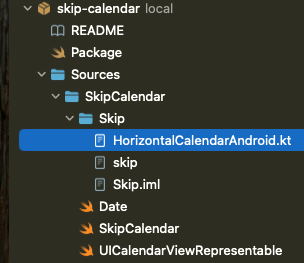
フォルダ構成
skip.yml
build:
  contents:
    - block: 'dependencies'
      contents:
        - 'implementation("com.kizitonwose.calendar:view:2.6.0")'
        - 'implementation("com.kizitonwose.calendar:compose:2.6.0")'
※ Skip Tools java/kotlinライブラリ依存関係についての公式ドキュメント
kotlinでUIを作成
kotlinファイルを用意し、カレンダー上に表示するcomponentを定義します
HorizontalCalendarAndroid.kt
package skip.calendar

// import文

@Composable
fun CalendarTitle(month: YearMonth) {
    Text(
        text = month.format(DateTimeFormatter.ofPattern("yyyy/MM")),
        fontSize = 24.sp,
        modifier = Modifier
            .fillMaxWidth()
            .padding(16.dp),
        textAlign = TextAlign.Left
    )
}


@Composable
fun DaysOfWeekTitle(daysOfWeek: List<DayOfWeek>) {
    Row(modifier = Modifier.fillMaxWidth()) {
        for (dayOfWeek in daysOfWeek) {
            Text(
                modifier = Modifier.weight(1f),
                textAlign = TextAlign.Center,
                text = dayOfWeek.getDisplayName(TextStyle.SHORT, Locale.getDefault()),
            )
        }
    }
}

@Composable
fun Day(
    day: CalendarDay,
    isSelected: Boolean,
    isHighlighted: Boolean,
    onClick: (CalendarDay) -> Unit
) {
    Box(
        modifier = Modifier
            .aspectRatio(1f)
            .clip(CircleShape)
            .background(color = if (isSelected) Color.Blue else Color.Transparent)
            .clickable(
                enabled = day.position == DayPosition.MonthDate,
                onClick = { onClick(day) }
            ),
        contentAlignment = Alignment.Center
    ) {
        Column(horizontalAlignment = Alignment.CenterHorizontally) {
            Text(
                text = day.date.dayOfMonth.toString(),
                color = if (isSelected) Color.White else if (day.position == DayPosition.MonthDate) Color.Black else Color.Gray
            )
            if (isHighlighted && day.position == DayPosition.MonthDate) {
                Box(
                    modifier = Modifier
                        .size(8.dp)
                        .clip(CircleShape)
                        .background(Color(0xFFFFA500))
                )
            } else {
                Box(
                    modifier = Modifier
                        .size(8.dp)
                        .clip(CircleShape)
                        .background(Color.Transparent)
                )
            }
        }
    }
}
Swift UI Componentに追加
ComposeContentをOverrideし、kotlin側のUIを呼び出します
SkipCalendar.swift
import SwiftUI

// android側のライブラリをimportする
#if SKIP

import androidx.compose.ui.Modifier
import androidx.compose.runtime.remember
import androidx.compose.runtime.mutableStateOf
import androidx.compose.runtime.derivedStateOf
import androidx.compose.foundation.layout.Column
import androidx.compose.foundation.layout.fillMaxWidth
import androidx.compose.foundation.layout.fillMaxSize
import com.kizitonwose.calendar.compose.HorizontalCalendar
import com.kizitonwose.calendar.compose.rememberCalendarState
import com.kizitonwose.calendar.core.daysOfWeek
import java.time.LocalDate
import java.time.YearMonth
import java.time.ZoneId
import java.time.DayOfWeek

#endif

public struct CalendarItem {
    let date: Date
    let iconColor: Color

    public init(date: Date, iconColor: Color) {
        self.date = date
        self.iconColor = iconColor
    }
}

public struct SkipCalendar: View {

    private let initialSelectDate: Date
    private let highlights: [CalendarItem]
    private let onTap: (Date) -> Void

    public init(
        initialSelectDate: Date? = nil,
        highlights: [CalendarItem],
        onTap: @escaping (Date) -> Void = { _ in }
    ) {
        self.highlights = highlights
        self.onTap = onTap
        self.initialSelectDate = initialSelectDate ?? Date.now
    }

#if SKIP
    @Composable public override func ComposeContent(context: ComposeContext) {

        let newList: kotlin.collections.MutableList<java.util.Date> = mutableListOf<java.util.Date>()
        for highlight in highlights {
            newList.add(highlight.date.kotlin())
        }

        let initialSelectedDate: LocalDate = self.initialSelectDate.kotlin().toInstant()
            .atZone(ZoneId.systemDefault())
            .toLocalDate()

        let highlightedLocalDates = newList.map { day in
            day.toInstant().atZone(ZoneId.systemDefault()).toLocalDate()
        }

        let currentMonth = remember { YearMonth.now() }
        let startMonth = remember { currentMonth.minusMonths(100) } // Adjust as needed
        let endMonth = remember { currentMonth.plusMonths(100) } // Adjust as needed
        let daysOfWeek = remember { daysOfWeek() }

        let state = rememberCalendarState(
            startMonth = startMonth,
            endMonth = endMonth,
            firstVisibleMonth = currentMonth,
            firstDayOfWeek = daysOfWeek.first()
        )

        // SKIP INSERT:
        // var selectedDate by remember { mutableStateOf<LocalDate?>(initialSelectedDate) }
        // val displayedMonth by remember {
        //     derivedStateOf {
        //         state.firstVisibleMonth.yearMonth
        //     }
        // }

        Column(modifier = Modifier.fillMaxSize()) {
            CalendarTitle(month = displayedMonth)
            DaysOfWeekTitle(daysOfWeek = daysOfWeek)
            // SKIP INSERT:
            // HorizontalCalendar(
            //     state = state,
            //     dayContent = { day ->
            //         Day(
            //             day = day,
            //             isSelected = selectedDate == day.date,
            //             isHighlighted = highlightedLocalDates.contains(day.date),
            //             onClick = { day ->
            //                 val newDate = if (selectedDate == day.date) null else day.date
            //                 selectedDate = newDate
            //                 changeDate(
            //                     newDate?.let { localDate ->
            //                     val zoneId = ZoneId.systemDefault()
            //                     val instant = localDate.atStartOfDay(zoneId).toInstant()
            //                     val javaDate = java.util.Date.from(instant)
            //                         skip.foundation.Date(javaDate)
            //                     } ?: skip.foundation.Date.now
            //                 )
            //            }
            //         )
            //     }
            // )
        }
    }
#else
    public var body: some View {
        UICalendarViewRepresentable(selectedDate: initialSelectDate, highlights: self.highlights, onTap: self.onTap)
    }
#endif

    func changeDate(date: Date) {
        DispatchQueue.main.async {
            self.onTap(date)
        }
    }
}
SKIP INSERTを使用してswiftファイル内でkotlinコードの処理を記述しています
詳細は下記ドキュメントを参考
いざ、呼び出し
呼び出したい画面で先ほど用意したUIを呼び出します
ContentView.swift
struct CalendarView: View {
    @State private var viewModel: CalendarViewModel = .init()

    var body: some View {
        GeometryReader { geometry in
            VStack {
                if viewModel.highlights.count > 0 {
                    SkipCalendar(initialSelectDate: viewModel.initialDate, highlights: viewModel.highlights, onTap: viewModel.changeDate)
                        .frame(height: geometry.size.height * 0.6)
                }
                Divider()
                ScrollView {
                    ForEach(viewModel.plans.filterByDate(date: viewModel.selectedDate), id: \.self) { plan in
                        VStack {
                            HStack {
                                Rectangle()
                                    .frame(width: 5, alignment: .leading)
                                    .foregroundColor(plan.startDate == viewModel.selectedDate ? .blue :.red)
                                    .cornerRadius(5.0)
                                Text(plan.title)
                                    .font(.title3)
                                    .foregroundColor(.black)
                                    .frame(maxWidth: .infinity, alignment: .leading)
                            }
                            .frame(maxWidth: geometry.size.width / 5 * 4, alignment: .leading)
                            Text("\(plan.startDate.format(style: "YYYY/MM/dd")) 〜 \(plan.endDate.format(style: "YYYY/MM/dd"))")
                                .font(.callout)
                                .foregroundStyle(Color.gray)
                                .frame(maxWidth: geometry.size.width / 5 * 4, alignment: .leading)
                        }
                        .frame(width: geometry.size.width, alignment: .center)
                    }
                }
            }.onAppear {
                viewModel.fetchPlans()
            }
        }
    }
}
 |
 |
|---|---|
| iOS | Android |
こんな感じで両ネイティブに対応した自作UIが表示できました!

