Gatsby CLIインストール
Gatsby CLIをまだインストールしていない場合はインストールしてください。
npm install -g gatsby-cli
バージョンが表示されればOK
$ gatsby -v

Gatsby CLI version: 2.7.8
まずはHello world
作成したいディレクトリ先で下記コマンド実行
hello-worldという名前でプロジェクトが作成される
gatsby new hello-world https://github.com/gatsbyjs/gatsby-starter-hello-world
作成したプロジェクトが動作するか確認
Hello world!が表示されていれば成功
cd hello-world

npm run develop
フォルダ構成
今回の登場フォルダだけを書き出しています。
足りないファイルは、あらかじめ作成しておきましょう。
hello-world
+├── gatsby-browser.js
 ├── gatsby-config.js
 └── src
     ├── pages
     │   └── index.js
+    ├── code.md
+    └── code-block-title.css
クエリーからファイル名やサイズなどを取得できるようにする
gatsby-source-filesystemをインストール
npm install --save gatsby-source-filesystem
gatsby-config.jsを以下のように編集
module.exports = {
  plugins: [
    {
      resolve: `gatsby-source-filesystem`,
      options: {
        name: `pages`,
        path: `${__dirname}/src/`, // 取得先を指定
      },
    },
  ]
}
npm run developし直し
GraphiQL へアクセス
query に allFileとfileが追加されており、
この二つのクエリー項目を起点にして、
Gatsby-config.jsで指定したディレクトリ以下のファイルの情報を取得できる。
以下はsrc配下の全ファイルのファイル名、サイズ、変更日時を取得しています

クエリー文がわかったところで実際にindex.jsで表示してみましょう
import React from "react"
import { graphql } from "gatsby"

// dataにクエリーの取得結果が渡される
export default ({ data }) => {
  const edges = data.allFile.edges;

  return (
    <div>
      {edges.map(({ node }) => {
        return (
            <ul key={node.name}>
              ---------------------------------------
              <h1>ファイル名:{node.name}</h1>
              <h2>サイズ:{node.size}</h2>
              <h3>変更日時:{node.changeTime}</h3>
            </ul>
          )
      })}
    </div>
  )
}

export const query = graphql`
query {
  allFile {
    edges {
      node {
        name
        size
        changeTime
      }
    }
  }
}
`
gatsby-config.jsを編集した場合はnpm run developし直します
そしてhttp://localhost:8000/ へアクセス
src配下のファイルが全て表示されていれば成功です

クエリーからMarkdownファイルの情報を取得できるようにする
gatsby-transformer-remarkをインストール
npm install --save gatsby-transformer-remark
gatsby-cinfig.jsに追加します
module.exports = {
  plugins: [
    {
      resolve: `gatsby-source-filesystem`,
      options: {
        name: `pages`,
        path: `${__dirname}/src/`,
      },
    },
+   `gatsby-transformer-remark`,
  ]
}
コードブロックを含んだマークダウンファイルを用意
---
title: "Syntax highlight"
date: "2017-08-21"
---

```javascript
const greeting = `Hello`;
console.log(greeting);
```
先ほど用意したマークダウンファイルを取得するためにindex.jsを編集します
import React from "react"
import { graphql } from "gatsby"

export default ({ data }) => {
  const node = data.allMarkdownRemark.edges[0].node;

  return (
    <div>
      <h1>{node.frontmatter.title}</h1>
      <h2>{node.frontmatter.date}</h2>
      <div dangerouslySetInnerHTML={{ __html: node.html }} />
    </div>
  )
}

export const query = graphql`
  query {
    allMarkdownRemark {
      totalCount
      edges {
        node {
          id
          frontmatter {
            title
            date(formatString: "DD MMMM, YYYY")
          }
          html
        }
      }
    }
  }
`
npm run developし直し
http://localhost:8000/ へアクセス
マークダウンファイルの内容は表示されますが
コードブロックは少々見辛い状態です

コードブロックに対してシンタックスハイライトをきかせる
gatsby-remark-prismjsとprismjsをインストール
npm install --save gatsby-remark-prismjs prismjs
gatsby-remark-prismjsはgatsby-transformer-remarkのpluginsとして追加します
optionでの設定内容については割愛します
module.exports = {
  plugins: [
    {
      resolve: `gatsby-source-filesystem`,
      options: {
        name: `pages`,
        path: `${__dirname}/src/pages/`,
      },
    },
    {
      resolve: `gatsby-transformer-remark`,
      options: {
        plugins: [
          {
            resolve: `gatsby-remark-prismjs`,
            /*
              options: {
                classPrefix: "language-",
                inlineCodeMarker: null,
                aliases: {},
                showLineNumbers: true,
                noInlineHighlight: false,
                languageExtensions: [
                  {
                    language: "superscript",
                    extend: "javascript",
                    definition: {
                      superscript_types: /(SuperType)/,
                    },
                    insertBefore: {
                      function: {
                        superscript_keywords: /(superif|superelse)/,
                      },
                    },
                  },
                ],
              }
            */
          }
        ]
      }
    },
  ]
}
コードブロックのスタイルを適用するためにgatsby-browser.jsへ以下のように編集
※ 今回はprism-solarizedlightというテーマを適用
他のテーマはこちら
require("prismjs/themes/prism-solarizedlight.css");
npm run developし直し
http://localhost:8000/ へアクセス
シンタックスハイライトがきいていれば成功です

コードブロックにタイトルをつける
gatsby-remark-code-titlesをインストール
npm install --save gatsby-remark-code-titles
gatsby-transformer-remarkのpluginsとして追加しますが
必ず先頭に追加してください
module.exports = {
  plugins: [
    {
      resolve: `gatsby-source-filesystem`,
      options: {
        name: `pages`,
        path: `${__dirname}/src/`,
      },
    },
    {
      resolve: `gatsby-transformer-remark`,
      options: {
        plugins: [
+         {
+           resolve: 'gatsby-remark-code-titles',
+         },
          {
            resolve: `gatsby-remark-prismjs`,
          }
        ]
      }
    },
  ]
}
コードブロックのタイトルはgatsby-code-titleというクラス名がデフォルトで割当たるため
cssで装飾していきます
.gatsby-code-title {
  margin-bottom: -0.6rem;
  padding: 0.5em 1em;
  font-family: Consolas, 'Andale Mono WT', 'Andale Mono', 'Lucida Console',
    'Lucida Sans Typewriter', 'DejaVu Sans Mono', 'Bitstream Vera Sans Mono',
    'Liberation Mono', 'Nimbus Mono L', Monaco, 'Courier New', Courier,
    monospace;

  background-color: #ffd342;
  color: black;
  z-index: 0;

  border-top-left-radius: 0.3em;
  border-top-right-radius: 0.3em;
}
先ほどのcssファイルを読み込む
  require("prismjs/themes/prism-solarizedlight.css");
+ require("./src/code-block-title.css");
マークダウンを編集
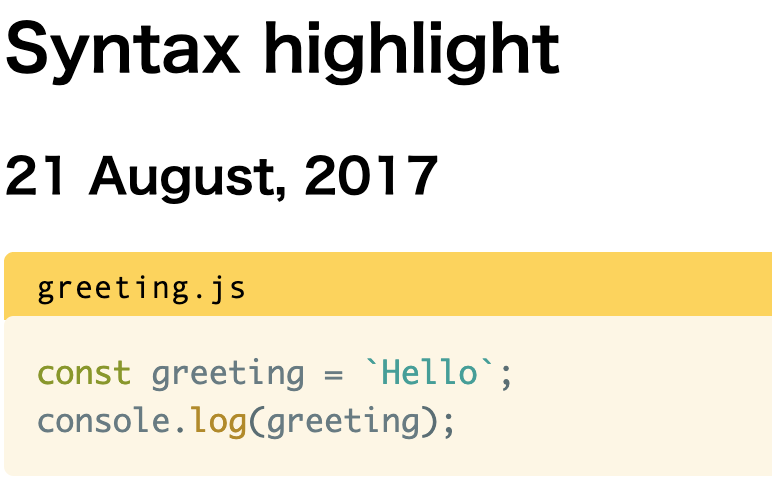
hoge:title=任意のタイトルでコードブロックに対してタイトルが付与されます
---
title: "Syntax highlight"
date: "2017-08-21"
---

```javascript:title=greeting.js
const greeting = `Hello`;
console.log(greeting);
```
npm run developし直し
http://localhost:8000/ へアクセス
タイトルも表示されました
お疲れ様です
参考
https://takumon.github.io/gatsby-starter-qiita/f18d04ac-9b1a-5ac8-8d43-8aa3d8f746a7/#gatsby-remark-prismjs
https://reactgo.com/gatsbyblog/syntaxhighlighting/
https://haodong.io/adding-code-syntax-highlights-to-gatsby-blog