目次
- はじめに
- Telemetryとは
- Pipelineとは
- PipelineのInstall
- XRのTelemetry情報をPipelineで出力してみた
- まとめ
はじめに
この記事はシスコの同志によるCisco Systems Japan Advent Calendar 2017の20日目です。
今年は社内でTelemetryについての勉強会やお客様にデモを実施をしたりしていたので、
IOS-XRとPipelineを用いて、Telemetry情報をサーバ側に出力するということをやってみたいと思います。
Telemetryとは
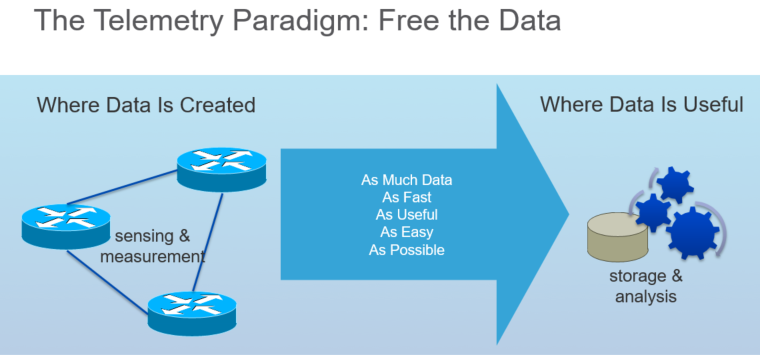
Telemetryは、SNMP等の従来のモニタリングツールの置き換えとなる新しい技術で、より多くの種類データを、より効率的に、マシーンフレンドリーな形式(JSON, GBP等)で送信する技術です。スケールの課題のために従来のPullモデル(SNMP Polling等)からPushモデルを採用しています。

そんなTelemetryですが、CiscoではIOS-XRで一足はやく実装され、それに続く形で、NX-OS、IOS-XEでも実装されています。
各種OSのTelemetryに関して気になる方は下記をご覧ください。
-IOS XR
NCS5500 Configuration Guide
-NX-OS Telemetry
Nexus9000 Configuration Guide
-IOS-XE Telemetry
IOS-XE Configuration Guide
Pipelineとは
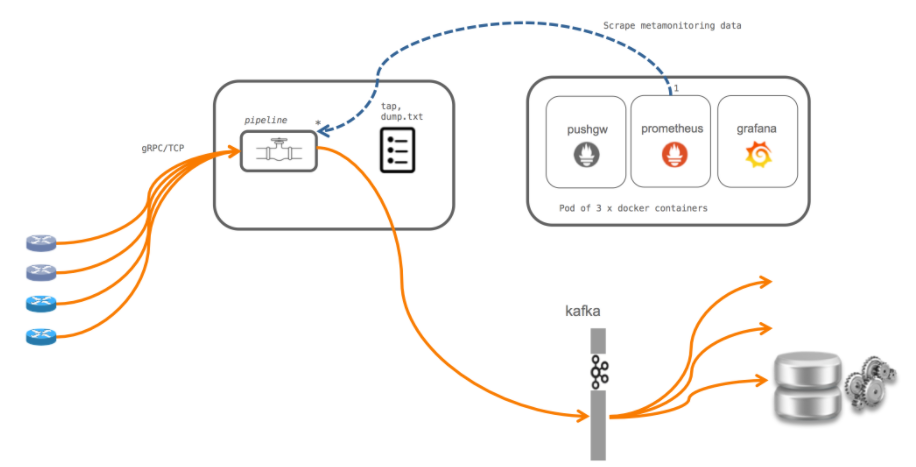
Ciscoが開発したGo言語製のTelemetry CollectorでOpen Source化されています。
https://github.com/cisco/bigmuddy-network-telemetry-pipeline
PipelineはあくまでCollector(データ取得、Filtering、整形、出力)機能のみですので、Infux DBやPrometheus等のDBと組み合わせて使用します。

下記にPipelineの特徴について記載します。
-入力側サポート
Support OS:IOS-XR, NX-OS
Transport:TCP, gRPC, UDP, Apache Kafka
Encoding:Compact GPB, GPB K/V, JSON
-データの出力側サポート
Kafka
TSDB(influxdb, Prometheus)
gRPC
CLI dump
Pipelineのインストール
GitをInstall後、PipelineをGit Cloneします。(本環境はCentOS 7.3(1611))
Pipelineのインストール
### GitのInstall
[root@localhost yumuraka]#yum install git
### PipelineのClone
[root@localhost yumuraka]#git clone https://github.com/cisco/bigmuddy-network-telemetry-pipeline
Pipelineのファイル構造
Cloneしたフォルダを覗くと下記のようなファイル構造になっています。
[root@localhost bigmuddy-network-telemetry-pipeline]# ls
bin                 docs                      makefile                metrics.go              pipeline.log            tools                       xport_grpc_out.proto
bpx.json            encap.go                  mdt_msg_samples         metrics_gpb.json        pipeline_test_bad.conf  topic_template_testA.txt    xport_grpc_out_test.go
codec.go            encap_st.go               message.go              metrics_influx.go       pipeline_test.conf      topic_template_testBAD.txt  xport_grpc_test.go
codec_gpb.go        encap_st_test.go          message_router.go       metrics_influx_test.go  pipeline_test.go        topic_template_testB.txt    xport_kafka.go
codec_gpb_test.go   filter_test.json          message_router_test.go  metrics.json            pipeline_test_tap.conf  topic_template_testC.txt    xport_kafka_test.go
codec_json.go       glide.lock                metamonitoring.go       metrics_prometheus.go   README.md               vendor                      xport_tcp.go
codec_json_test.go  glide.yaml                metricsdump.txt_wkid0   metrics_test.go         replay.go               vendor.patch                xport_tcp_test.go
crypt.go            id_rsa_FOR_TEST_ONLY      models.txt              skeleton                xport_grpc.go               xport_udp.go
crypt_test.go       id_rsa_FOR_TEST_ONLY_ALT   pipeline.conf           tap.go                  xport_grpc_out.go           xport_udp_test.go
docker              LICENSE      pipeline.go             tap_test.go             xport_grpc_out.pb.go
下記は主なファイルの簡単な説明です。
-bin
この中にPipeline本体(.bin)ファイルがあります
-pipeline.conf
PipelineのConfigファイルです。
-pipeline.log
Pipelineのログです。トラブルシューティングする際に有用です
-metrics.json
今回は使用しませんが、Filteringを行うためのファイルです。
TSDB(InfluxDBやPrometheus)と連携する際、どのデータをTSDBに出力するか記載することでフィルタリングを行うことができます。
今回はTelemetryのText Dumpを行うということで、pipeline.confに下記のような設定を行います。
[root@localhost bigmuddy-network-telemetry-pipeline]# cat pipeline.conf
[default]
[testbed]
stage = xport_input
type = tcp
encap = st
listen = :5432
[inspector]
stage = xport_output
type = tap
file = /data/dump.txt    <<<CLI Dump出力用のファイルの指定
XRのTelemetry情報をPipelineで出力してみた
Topology
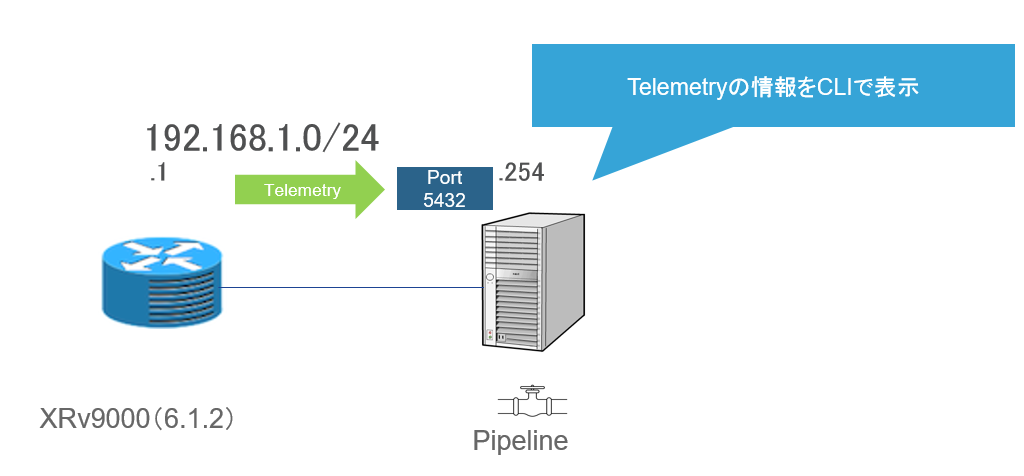
ESXi上でXRv9000とPipeline(CentOS)を下記のように接続しています。

XRv9000の設定
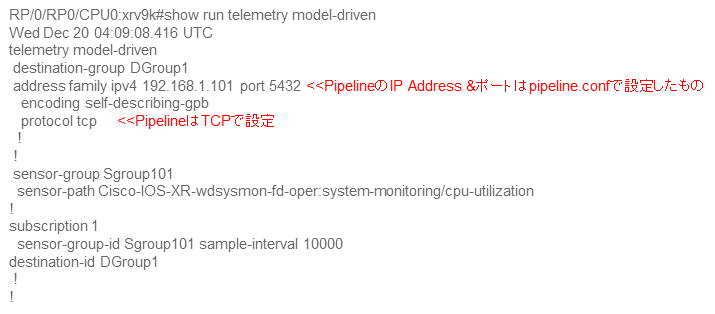
XRv9000側のTelemetryの設定ですが、下記のような設定を投入しています。
Transport:TCP
Encoding:Self Describing GPB
送信データ:CPUの使用率
余談)
IOS-XRのデータソースはYang(oper)で定義されたものであるため、送信したいデータのYangパスを入力します。
その際には下記のXRのYangファイルが参考になります。
https://github.com/YangModels/yang/tree/master/vendor/cisco/xr
Pipelineの起動
[root@localhost bigmuddy-network-telemetry-pipeline]# bin/pipeline &
[2] 19294
[root@localhost bigmuddy-network-telemetry-pipeline]# Startup pipeline
Load config from [pipeline.conf], logging in [pipeline.log]
Wait for ^C to shutdown
[root@localhost bigmuddy-network-telemetry-pipeline]#
Telemetryの取得データの確認
telemetry.confで設定した/data/dump.txtにTelemetryのデータが溜まっていきます。
tailをするとTelemetryデータを確認でき、CPU使用率に関してデータを取得していることを確認できます。
[root@localhost bigmuddy-network-telemetry-pipeline]# tail -f /data/dump.txt
------- 2017-12-19 12:00:06.026912693 +0900 JST -------
Summary: GPB(common) Message [192.168.1.1:25003(xrv9k)/Cisco-IOS-XR-wdsysmon-fd-oper:system-monitoring/cpu-utilization msg len: 42237]
{
    "Source": "192.168.1.1:25003",
    "Telemetry": {
        "node_id_str": "xrv9k",
        "subscription_id_str": "1",
        "encoding_path": "Cisco-IOS-XR-wdsysmon-fd-oper:system-monitoring/cpu-utilization",
        "collection_id": 89,
        "collection_start_time": 1513652393582,
        "msg_timestamp": 1513652393582,
        "collection_end_time": 1513652393589
    },
    "Rows": [
        {
            "Timestamp": 1513652393587,
            "Keys": {
                "node-name": "0/RP0/CPU0"
            },
            "Content": {
                "process-cpu_PIPELINE_EDIT": [
                    {
                        "process-cpu-fifteen-minute": 0,
                        "process-cpu-five-minute": 0,
                        "process-cpu-one-minute": 0,
                        "process-id": 1,
                        "process-name": "init"
                    },
                    {
                        "process-cpu-fifteen-minute": 0,
                        "process-cpu-five-minute": 0,
                        "process-cpu-one-minute": 0,
                        "process-id": 2023,
                        "process-name": "bash"
                    },
まとめ
今回はXRから出力されたTelemetryデータをPipelineを用いて、Text Dumpをしてみました。
さらなる発展系として、PipelineからInfluxDBにデータを挿入し、GrafanaでTelemetry情報を可視化するという
チュートリアルがありますので、ご興味がある方はご覧頂ければと思います。
Using Pipeline: Integrating with InfluxDB
免責事項
本サイトおよび対応するコメントにおいて表明される意見は、投稿者本人の個人的意見であり、シスコの意見ではありません。本サイトの内容は、情報の提供のみを目的として掲載されており、シスコや他の関係者による推奨や表明を目的としたものではありません。各利用者は、本Webサイトへの掲載により、投稿、リンクその他の方法でアップロードした全ての情報の内容に対して全責任を負い、本Web サイトの利用に関するあらゆる責任からシスコを免責することに同意したものとします。
