概要
1台のサーバー上でZooKeeperアンサンブルとKafkaクラスターを構成したときのメモです。
ZooKeeperはKafkaに同梱のものを使用しました。
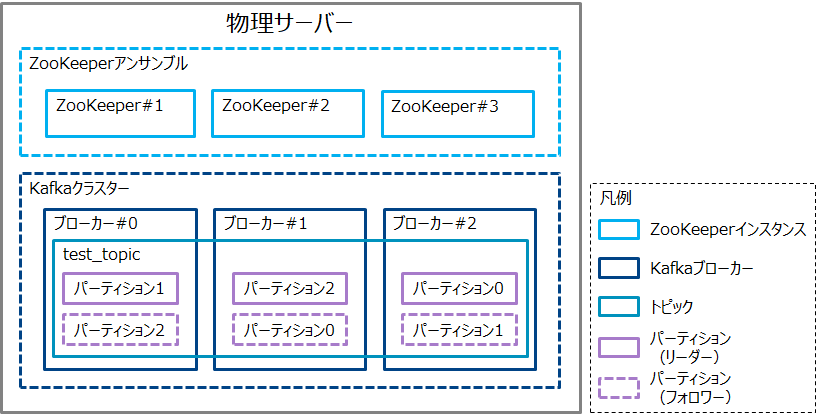
構成図は以下になります。
サーバーの環境情報は以下の通りです。
- CentOS V7.4
- OpenJDK V1.8
- Kafka V1.1.0
構成手順
ZooKeeperの設定ファイルの作成
今回ZooKeeperは3インスタンスでアンサンブルを構成するため、以下の3つのプロパティーファイルを用意します。
- ZooKeeper#1用プロパティーファイル
tickTime=2000
initLimit=5
syncLimit=2
dataDir=/var/lib/zookeeper1
clientPort=2181
server.1=localhost:2888:3888
server.2=localhost:2889:3889
server.3=localhost:2890:3890
- ZooKeeper#2用プロパティーファイル
tickTime=2000
initLimit=5
syncLimit=2
dataDir=/var/lib/zookeeper2
clientPort=2182
server.1=localhost:2888:3888
server.2=localhost:2889:3889
server.3=localhost:2890:3890
- ZooKeeper#3用プロパティーファイル
tickTime=2000
initLimit=5
syncLimit=2
dataDir=/var/lib/zookeeper3
clientPort=2183
server.1=localhost:2888:3888
server.2=localhost:2889:3889
server.3=localhost:2890:3890
1台の上で3インスタンスを稼働させるためには、下記のパラメーターを固有の値にする必要があります。
-
dataDir
ZooKeeperインスタンスのデータディレクトリ -
clientPort
ZooKeeperインスタンスのListen Port -
server.Xで指定するPort番号
左側(2888~2890): ZooKeeperのリーダー-フォロワーでPeer to Peerで通信するPort
右側(3888~3890): ZooKeeperのリーダー選出をおこなう際に相互通信するPort
ZooKeeperデータディレクトリとmyidファイルの作成
ZooKeeperのプロパティーファイルに定義したディレクトリを作成し、各ディレクトリ下にZooKeeperインスタンスの識別ID(プロパティーファイル内のserver.Xの"X"をファイルに保管)を記載したmyidファイルを配置します。
- ZooKeeper#1用ディレクトリとmyidファイルの作成
[root@localhost ~]# mkdir /var/lib/zookeeper1
[root@localhost ~]# echo 1 > /var/lib/zookeeper1/myid
[root@localhost ~]# cat /var/lib/zookeeper1/myid
1
[root@localhost ~]#
- ZooKeeper#2用ディレクトリとmyidファイルの作成
[root@localhost ~]# mkdir /var/lib/zookeeper2
[root@localhost ~]# echo 2 > /var/lib/zookeeper2/myid
[root@localhost ~]# cat /var/lib/zookeeper2/myid
2
[root@localhost ~]#
- ZooKeeper#3用ディレクトリとmyidファイルの作成
[root@localhost ~]# mkdir /var/lib/zookeeper3
[root@localhost ~]# echo 3 > /var/lib/zookeeper3/myid
[root@localhost ~]# cat /var/lib/zookeeper3/myid
3
[root@localhost ~]#
Kafka設定ファイルの作成
今回ブローカー3台でクラスターを構成するため、ブローカーのデフォルトのプロパティーファイル"server.properties"をコピーし、ブローカー#0~2用のプロパティーファイルを用意します。
以下は、デフォルトプロパティーファイルから変更したパラメーターのみを抜粋しています。
- ブローカー#0用プロパティーファイル
broker.id=0
listeners=PLAINTEXT://localhost:9092
log.dirs=/opt/kafka/kafka-logs0
zookeeper.connect=localhost:2181,localhost:2182,localhost:2183
- ブローカー#1用プロパティーファイル
broker.id=1
listeners=PLAINTEXT://localhost:9093
log.dirs=/opt/kafka/kafka-logs1
zookeeper.connect=localhost:2181,localhost:2182,localhost:2183
- ブローカー#2用プロパティーファイル
broker.id=2
listeners=PLAINTEXT://localhost:9094
log.dirs=/opt/kafka/kafka-logs2
zookeeper.connect=localhost:2181,localhost:2182,localhost:2183
"zookeepr.connect"には、ZooKeeperインスタンス3台の接続先を記載します。
ブローカーの接続先ZooKeeperのQuorumが同一の場合、それらブローカーはKafkaクラスターとして構成されます。
また、1台の上で3ブローカーを稼働させるためには、下記のパラメーターを固有の値にする必要があります。
-
broker.id
ブローカーを識別するためのID(1台構成に限らずKafkaクラスターを構成する上で固有にする必要がある) -
listeners
ブローカーのListen Port -
log.dirs
メッセージ本体がログファイルとして永続化されるディレクトリ
ZooKeeperインスタンス & Kafkaブローカーの起動
ZooKeeper、Kafkaの順で起動します。
- ZooKeeperの起動
[root@localhost ~]# /opt/kafka/bin/zookeeper-server-start.sh /opt/kafka/config/zookeeper1.properties > /dev/null 2>&1 &
[1] 3866
[root@localhost ~]# /opt/kafka/bin/zookeeper-server-start.sh /opt/kafka/config/zookeeper2.properties > /dev/null 2>&1 &
[2] 4137
[root@localhost ~]# /opt/kafka/bin/zookeeper-server-start.sh /opt/kafka/config/zookeeper3.properties > /dev/null 2>&1 &
[3] 4413
[root@localhost ~]#
- Kafkaブローカーの起動
[root@localhost ~]# /opt/kafka/bin/kafka-server-start.sh /opt/kafka/config/server0.properties > /dev/null 2>&1 &
[4] 7413
[root@localhost ~]# /opt/kafka/bin/kafka-server-start.sh /opt/kafka/config/server1.properties > /dev/null 2>&1 &
[5] 7725
[root@localhost ~]# /opt/kafka/bin/kafka-server-start.sh /opt/kafka/config/server2.properties > /dev/null 2>&1 &
[6] 8390
[root@localhost ~]#
トピックの作成
稼働確認として、トピック"test_topic"をパーティション数3、レプリカ数2で作成します。
[root@localhost ~]# /opt/kafka/bin/kafka-topics.sh --create --zookeeper localhost:2181 --replication-factor 2 --partitions 3 --topic test_topic
OpenJDK 64-Bit Server VM warning: If the number of processors is expected to increase from one, then you should configure the number of parallel GC threads appropriately using -XX:ParallelGCThreads=N
WARNING: Due to limitations in metric names, topics with a period ('.') or underscore ('_') could collide. To avoid issues it is best to use either, but not both.
Created topic "test_topic".
[root@localhost ~]#
作成したトピックの詳細を確認します。(接続するZooKeeperインスタンスは、上記とは別のインスタンスを指定してみました。)
[root@localhost ~]# /opt/kafka/bin/kafka-topics.sh --describe --zookeeper localhost:2182 --topic test_topic
OpenJDK 64-Bit Server VM warning: If the number of processors is expected to increase from one, then you should configure the number of parallel GC threads appropriately using -XX:ParallelGCThreads=N
Topic:test_topic        PartitionCount:3        ReplicationFactor:2     Configs:
        Topic: test_topic       Partition: 0    Leader: 2       Replicas: 2,1   Isr: 2,1
        Topic: test_topic       Partition: 1    Leader: 0       Replicas: 0,2   Isr: 0,2
        Topic: test_topic       Partition: 2    Leader: 1       Replicas: 1,0   Isr: 1,0
[root@localhost ~]#
"test_topic"のパーティションとレプリカは、概要に添付した構成図のように配置されています。(構成図はこの結果をもとに書いています。)
おわりに
1台のサーバー上でもZooKeeperアンサンブル & Kafkaクラスターを構成することは可能ですので、検証等で利用することが簡単にできると思います。