第3回
Ansibleのcloudfront_distributionを使用して実際にCloudFrontを構築してみる。
aws-cliを使用して実行している記事はあるんですが、モジュールを使用しての記事ってあんまないんですよね…
やりたいこと
- CloudFrontの構築
- Originはとりあえず1つ(ゆくゆくは3つ作る予定)
- Behaviorの設定
やったこと
今回は実際にモジュールを使用して構築できるかまでを確認したい。
ディレクトリ構造などは気にせず、1つのymlファイルで完結させる。
今後はCloudFront以外にもCloudSearch、Lambdaなど構築したいので、本格的に開発する際にvars、rolesディレクトリなど作成し整理していきたい。
create_cdn.yml作成
CloudFront構築用のymlファイルを作成
基本的には公式マニュアルを参考にデバッグしながら調整していきました。
・公式マニュアル
https://docs.ansible.com/ansible/latest/modules/cloudfront_distribution_module.html
実行時に注意したことはリストにすべきところと、そうしなくても大丈夫なところ。
例えば、「cache_behaviors」を複数作成したく、「path_pattern」が何個も必要だったため、「path_pattern」の記載の前に「-」をつけてあげリストとして扱わせています。
その際にインデントも揃えないと正常に読み込まれない状態があるようなので、インデントもしっかりと揃えるようにしています。
これをしないと、同じ変数で定義されたものは上書きされてしまうため、「cache_behaviors」を3つ作ろうとしても、実際には1つなんてことになってしまいます。
- hosts: localhost
  become: yes
  vars:
    key: [ここにkeyを設定。下のaws_access_keyに直接書き込んでもOK]
    sercret: [ここにsercretを設定。下のaws_secret_keyに直接書き込んでもOK]
  tasks:
    - name: cloudfront_distribution
      cloudfront_distribution:
        aliases: 'test.mofumofu.jp'
        aws_access_key: "{{ key }}"
        aws_secret_key: "{{ sercret }}"
        origins:
          - id: 'Custom-test.mofumofu.jp'
            domain_name: 'test.mofumofu.jp'
        default_cache_behavior:
          target_origin_id: 'Custom-test.mofumofu.jp'
          forwarded_values:
            query_string: true
            cookies:
              forward: all
            headers:
              - '*'
          viewer_protocol_policy: allow-all
          smooth_streaming: true
          compress: true
          allowed_methods:
            items:
              - GET
              - HEAD
            cached_methods:
              - GET
              - HEAD
        cache_behaviors:
          - path_pattern : '*.png'
            target_origin_id: 'Custom-test.mofumofu.jp'
            forwarded_values:
              query_string: true
              cookies:
                forward: none
              headers:
                - '*'
            viewer_protocol_policy: redirect-to-https
            smooth_streaming: true
            compress: true
            allowed_methods:
              items:
                - GET
                - HEAD
              cached_methods:
                - GET
                - HEAD
          - path_pattern : '*.jpg'
            target_origin_id: 'Custom-test.mofumofu.jp'
            forwarded_values:
              query_string: true
              cookies:
                forward: none
              headers:
                - '*'
            viewer_protocol_policy: redirect-to-https
            smooth_streaming: true
            compress: true
            allowed_methods:
              items:
                - GET
                - HEAD
              cached_methods:
                - GET
                - HEAD
          - path_pattern : '*.gif'
            target_origin_id: 'Custom-test.mofumofu.jp'
            forwarded_values:
              query_string: true
              cookies:
                forward: none
              headers:
                - '*'
            viewer_protocol_policy: redirect-to-https
            smooth_streaming: true
            compress: true
            allowed_methods:
              items:
                - GET
                - HEAD
              cached_methods:
                - GET
                - HEAD
        ipv6_enabled: yes
        enabled: true
        comment: 'test cloudfront distribution.'
実行
以下コマンドにて実行。
「-vvv」をつけることで、詳細な実行ログが出力されます。
エラーが出ている際など、非常に助かるので常にオプション付与して実行しています!
ansible-playbook -vvv -i localhost, -c local create_cdn.yml
実行結果
コマンドの実行結果は長いので最後のみ記載します。
「changed=1」になっていればOKです。
エラーの場合は「failed=1」になります。
localhost : ok=2 changed=1 unreachable=0 failed=0
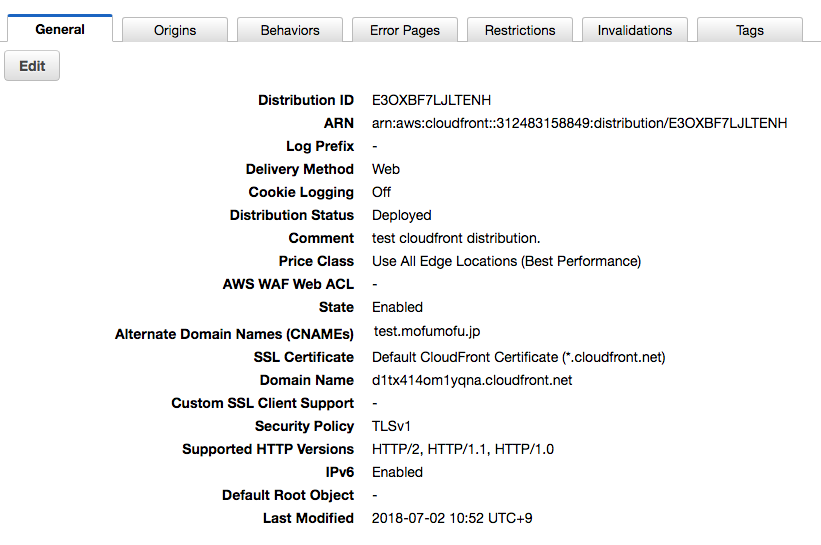
では実際にマネージメントコンソールを確認。
Distributions
General
Origins
Behaviors
ymlで記載した通り、defaultと3つのPath Patternができている!

感想
以前aws-cliでBehaviorsの設定に難儀して断念したのですが、Ansibleのモジュール使用したら、思ったより簡単に設定ができた!
やはり提供されているモジュールを使用することで開発コストなども削減できる面を考えると、イチから全て組むより時間短縮できるのはいいと思いました!
エラーメッセージがちょっと分かりづらい時があるけど、そこは頑張ってみる…w


