自己紹介
- @mumoshu at GitHub/Twitter
- Primary maintainer of kubernetes-incubator/kube-aws
- SRE at

Istio?
- "An open platform to connect, manage, and secure microservices. https://istio.io'
- Kubernetesで動くService Meshの一つ
Istio Ingress?
- istio-ingress-controller
- KubernetesのIngress Controllerの一種
- Ingress ... L7ロードバランシング(の設定)
- Ingress Controller ... Ingressリソースの内容に応じてL7ロードバランサをプロビジョニングする
アーキテクチャ
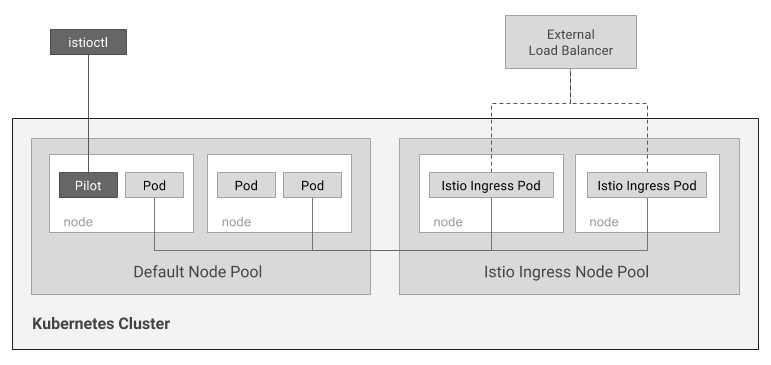
ref: @kelseyhightower-san, https://github.com/kelseyhightower/istio-ingress-tutorial#architecture
- Nginx Ingresesとかと同じ構成
- Istio Ingress Node Pool
- 例: インターネットに公開する場合
- インターネットに公開したL4、L7ロードバランサ経由(Classic Load Balancer, Application Load Balancer)で、プライベートサブネット内ノードのIstio Ingress Controllerへ
- AWS Network Load Balancer経由でパブリックサブネット内ノードのIstio Ingress Controllerへ
- 例: インターネットに公開する場合
Istio Ingressでできないこと
以下はIstio Ingressの責任範囲外
- AWS Security Groupの設定
- 手動、Terraform, CloudFormation、kube-awsなどのクラスタプロビジョニングツールを使う
- AWS ELB, ALBのプロビジョニング
- 手動、Terraform, CloudFormationなどで管理
- Istio Ingressと他のIngress Controllerを併用する(kube-ingress-aws-controller)
- AWS Route53 Record Setの作成
- 手動、Terraform, CloudFormationなどで管理
- kubernetes-incubator/external-dnsを使う
典型的なistioのインストール手順
前提として、RBACは有効に、istio専用のネームスペースをつくり、デフォルトのzipkin以外で分散トレースするとして・・・
helm installと、立て続けにhelm upgradeを実行する必要があるところがわかりづらい。
まずhelm installでCRD(Customer Resource Definition)をつくり、
$ helm install incubator/istio --set rbac.install=true --namespace istio-system --devel
helm upgradeでCRD以外をつくる。
helm upgrade eponymous-billygoat incubator/istio --reuse-values --set istio.install=true --devel
kubectlを打つのが面倒なので、kubensでistio-systemを選択。
alias k=kubectl
alias kn=kubens

kn istio-system
istio configmapにistioが接続するzipkinのホスト名が書いてあるので、それを変更。
k edit configmap istio
デフォルトでは以下のようになっている。
# Zipkin trace collector
zipkinAddress: zipkin:9411
Stackdriverにトレースを流す場合
zipkinAddress: stackdriver-zipkin.kube-system:9411
dd-zipkin-proxy+Datadog APMにトレースを流す場合、
iptablesで$MAGIC_IP:9411->$HOST_IP:9411にredirectさせてから、
zipkinAddress: 169.254.169.256:9411
Istio Ingressを試す
Ingressのプロキシ先バックエンドサービスをデプロイする
いつものKubernetesへのDeployment + istioctl kube-inject
httpbinをデプロイする。
$ git clone git@github.com:istio/istio.git
$ cd istio/samples/httpbin
$ kn istio-ingress-test
$ k apply -f <(istioctl kube-inject -f samples/httpbin/httpbin.yaml)
k apply -f httpbin.yaml のかわりに k apply -f <(istioctl kube-inject -f httpbin.yaml)としてIstio Sidecarの定義を付け加えている。
Kubernetes Ingressリソースの作成
cat <<EOF | kubectl create -f -
apiVersion: extensions/v1beta1
kind: Ingress
metadata:
  name: simple-ingress
  annotations:
    kubernetes.io/ingress.class: istio
spec:
  rules:
  - http:
      paths:
      - path: /.*
        backend:
          serviceName: httpbin
          servicePort: 8000
EOF
kind: IngressとあるとおりKubenetesの一般的なIngressリソースをつくるだけ。
Istio Ingress ControllerがこのIngressを検知して、よしなにEnvoyの設定変更をしてくれる。Nginx Ingress Controllerの場合よしなに設定変更されるのがNginxという違い。
Istio Ingressからバックエンドへのルーティング
あとは、Istioで一般に使うRouteRuleを設定することで、リクエストをルーティングする。Istio "Ingress"に特別なことはない。
istioのRouteRuleとは?
RouteRuleはistio管理下のService A・B間でどういうルーティングをするかという設定を表す。
Service A ---istio w/ RouteRule---> Service B
Istio Ingress + RouteRule
Istio Ingressに対してRouteRuleを設定する場合、基本的にsourceがistio-ingressになる(kubectl --namespace istio get svcするとistio-ingressというServiceがいるが、それ)。
Istio Ingress ---istio w/ RouteRule---> Backend Service A
Istio Ingress + RouteRuleの例
例えば、バックエンド障害時のIstio Ingressの挙動を確認したい場合。以下のようなRouteRuleで、istio ingressから全バックエンドへのリクエストを遮断する・・・というのもルーティングの範疇。
cat <<EOF | istioctl create -f -
## Deny all access from istio-ingress
apiVersion: config.istio.io/v1alpha2
kind: RouteRule
metadata:
  name: deny-route
spec:
  destination:
    name: httpbin
  match:
    # Limit this rule to istio ingress pods only
    source:
      name: istio-ingress
      labels:
        istio: ingress
  precedence: 1
  route:
  - weight: 100
  httpFault:
    abort:
      percent: 100
      httpStatus: 403 #Forbidden for all URLs
EOF
Istio Ingressでできること
クラスタ内部向けのRouteRule同様、specに色々かいて活用すると以下のようなことができる。
- Cookieが特定のパターンにマッチしたらサービスv2、そうでなければサービスv1にルーティング
- ユーザがアクセスするWebサービス、Web APIのA/Bテスト
- β版Web UIの先行公開
- バックエンドの重み付け(
route[].weight)- ミドルウェアやライブラリの更新を一部リクエストで試したい
- レートリミット
- 重いWeb APIに全体で100 req/sec以上のリクエストが送られないように
- リトライ(
httpReqRetries)- 不安定なサービスへのリクエストが失敗したら、Istio Ingressレイヤーでリトライ。クライアント側でリトライしなくて済む
- タイムアウト(
httpReqTimeout)
あわせて読みたい: Istio / Rules Configuration
まとめ
- 同じL7のALBなど単体ではできないL7ロードバランシングが実現できます
- User-Facingなサービスへのデプロイを柔軟にできて、アプリやミドルウェアの更新起因の大きな障害の予防になる
AWSの場合は使わなさそうな機能
使わなくていいものをうっかり使ってしまわないように。
Secure Ingress
Istio IngressがTLS終端してくれる機能。SNIに対応してない(Envoyレベルで)とか、証明書の管理が面倒(AWS ACMよりも)などの点から、使うことはなさそう。