TL;DR;
公式Dockerイメージがないので、まずはdocker runしたコンテナ上にSelf-Hosted Runnerをインストールし、稼働させるところまでやってみました。
まとめ ~ Dockerfileを書くにあたって抑えたいポイント
まえおき
GitHub Actions v2がGAになる直前に、Self-Hosted Runnerという新機能が追加されました。
これはCIのコントロールプレーンをSaaSに管理してもらい、ワーカーのみを自社ネットワーク内にデプロイできるという機能です。
例えばCIから利用する強い権限につながるクレデンシャル類を他社サービスに渡したくないが、かといって自社でCIをセルフホストするのも避けたい・・・という場合に必要になる機能です。
これまで、運用の手間をできるだけ減らしつつ、他社サービスにクレデンシャル類を直接渡したくないような場合、
- CodefreshのEnterpriseプランに代表されるようにSaaSの特定プランを利用する
- JekinsなどのCIをセルフホストする
- CircleCIのEnterpriseプランのようにコントロールプレーンごと自社ネットワーク内に置くASP型のサービスを利用する
という選択肢しかありませんでした。
GitHub ActionsのSelf-Hosted Runnerを利用すると、これが追加料金なしで(ワーカーの費用はもちろん自社持ちですが)実現できる、ということで個人的に期待しています。
さて、このSelf-Hosted Runnerですが、今流行の?コンテナ化前提にはなっていません。公式の手順だと物理マシン・仮想マシン・コンテナなどでいくつかのコマンドを実行することでセットアップする、ということになっています。
コンテナでも動かせる、というような趣旨の説明はドキュメントにも書かれていますが、DockerfileやDockerイメージが配布されているわけではありません。
Self-Hosted Runnerは利用したいが、そのためにVMの管理をするのはできるだけ避けたいので、まずはDockerfileを書きたい・・・ということで、公式のセットアップ手順をコンテナ内で実行して、実際コンテナ化できそうか確認してみたいと思います。
手順
各レポジトリのSettings > Actions以下(https://github.com/$OWNER/$REPO/settings/actions)から公式のRunner追加手順や、現在登録されているRunnerとその稼働状況が確認できる。
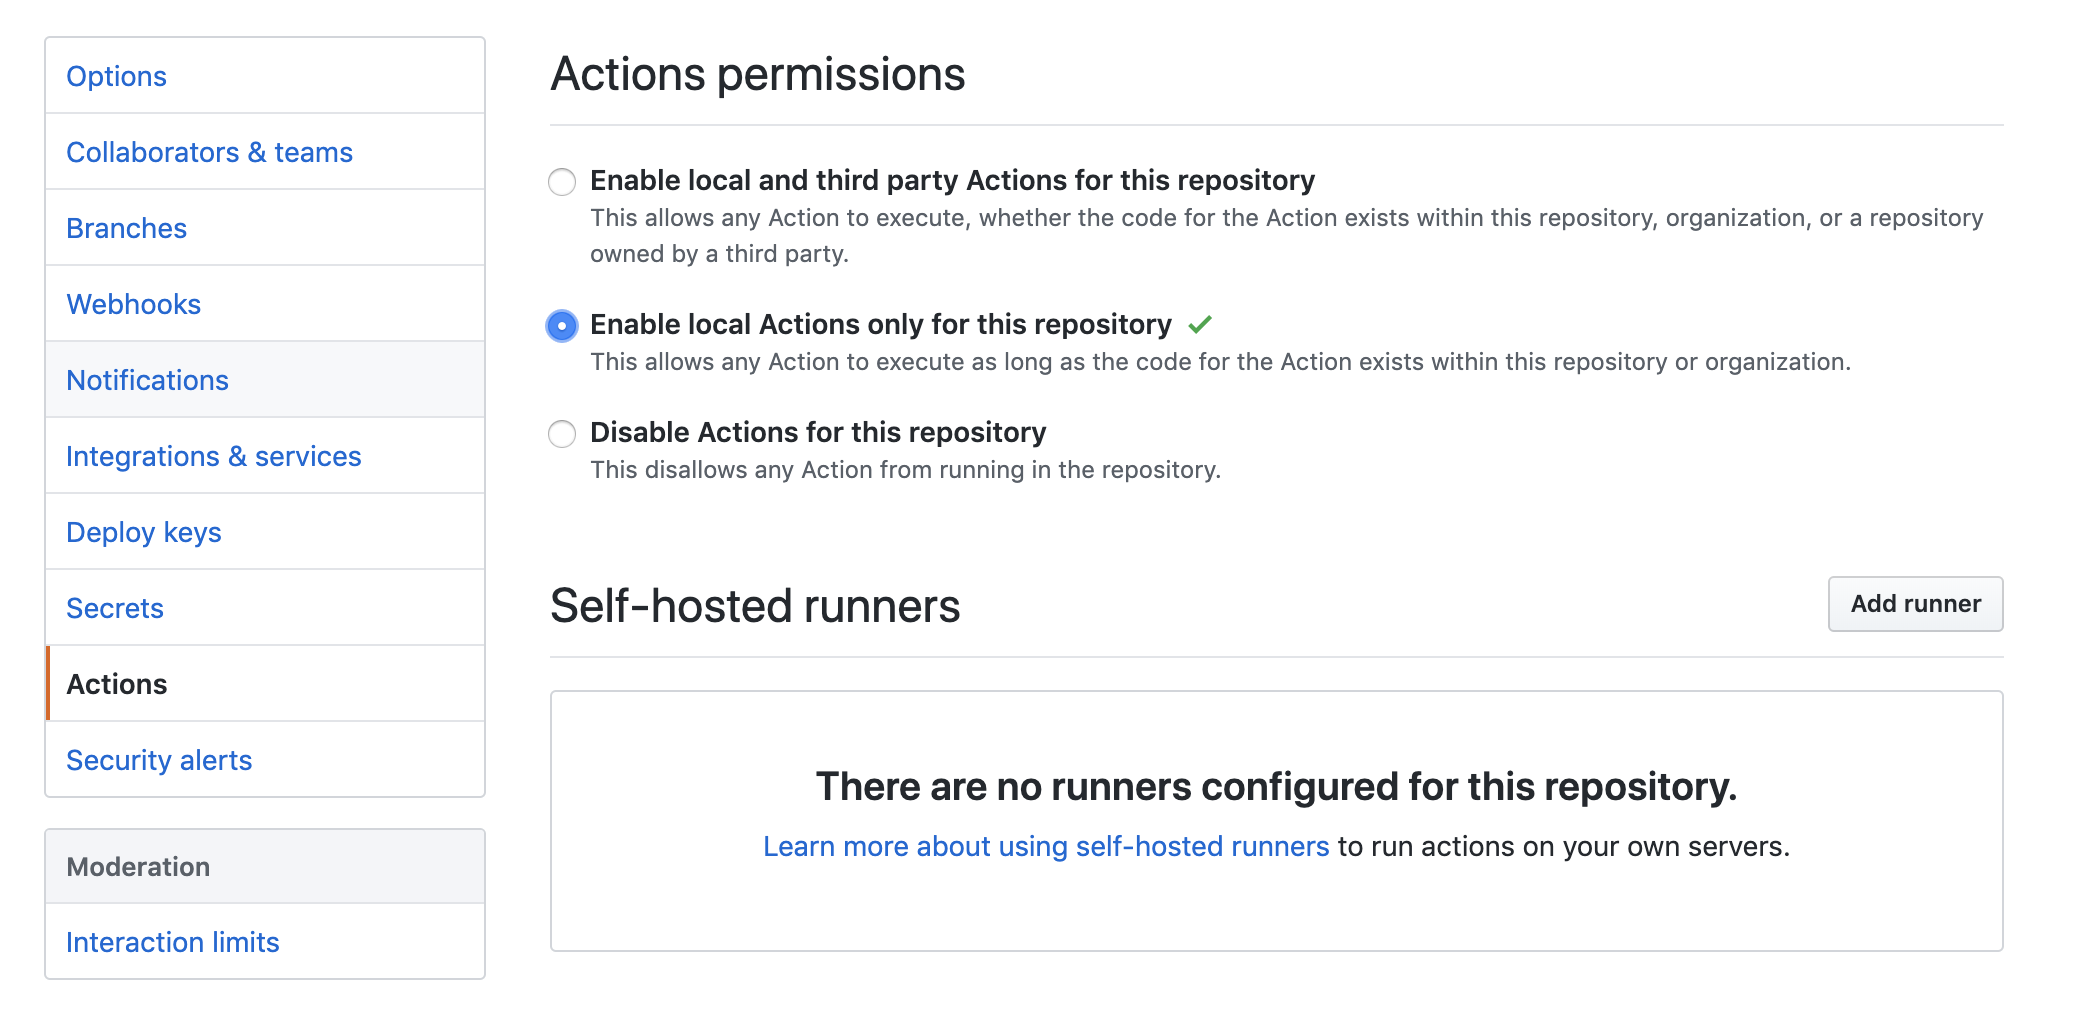
「Add runner」をクリックすると、以下のような手順が表示される。基本的にはこの手順にそっていけばよい。
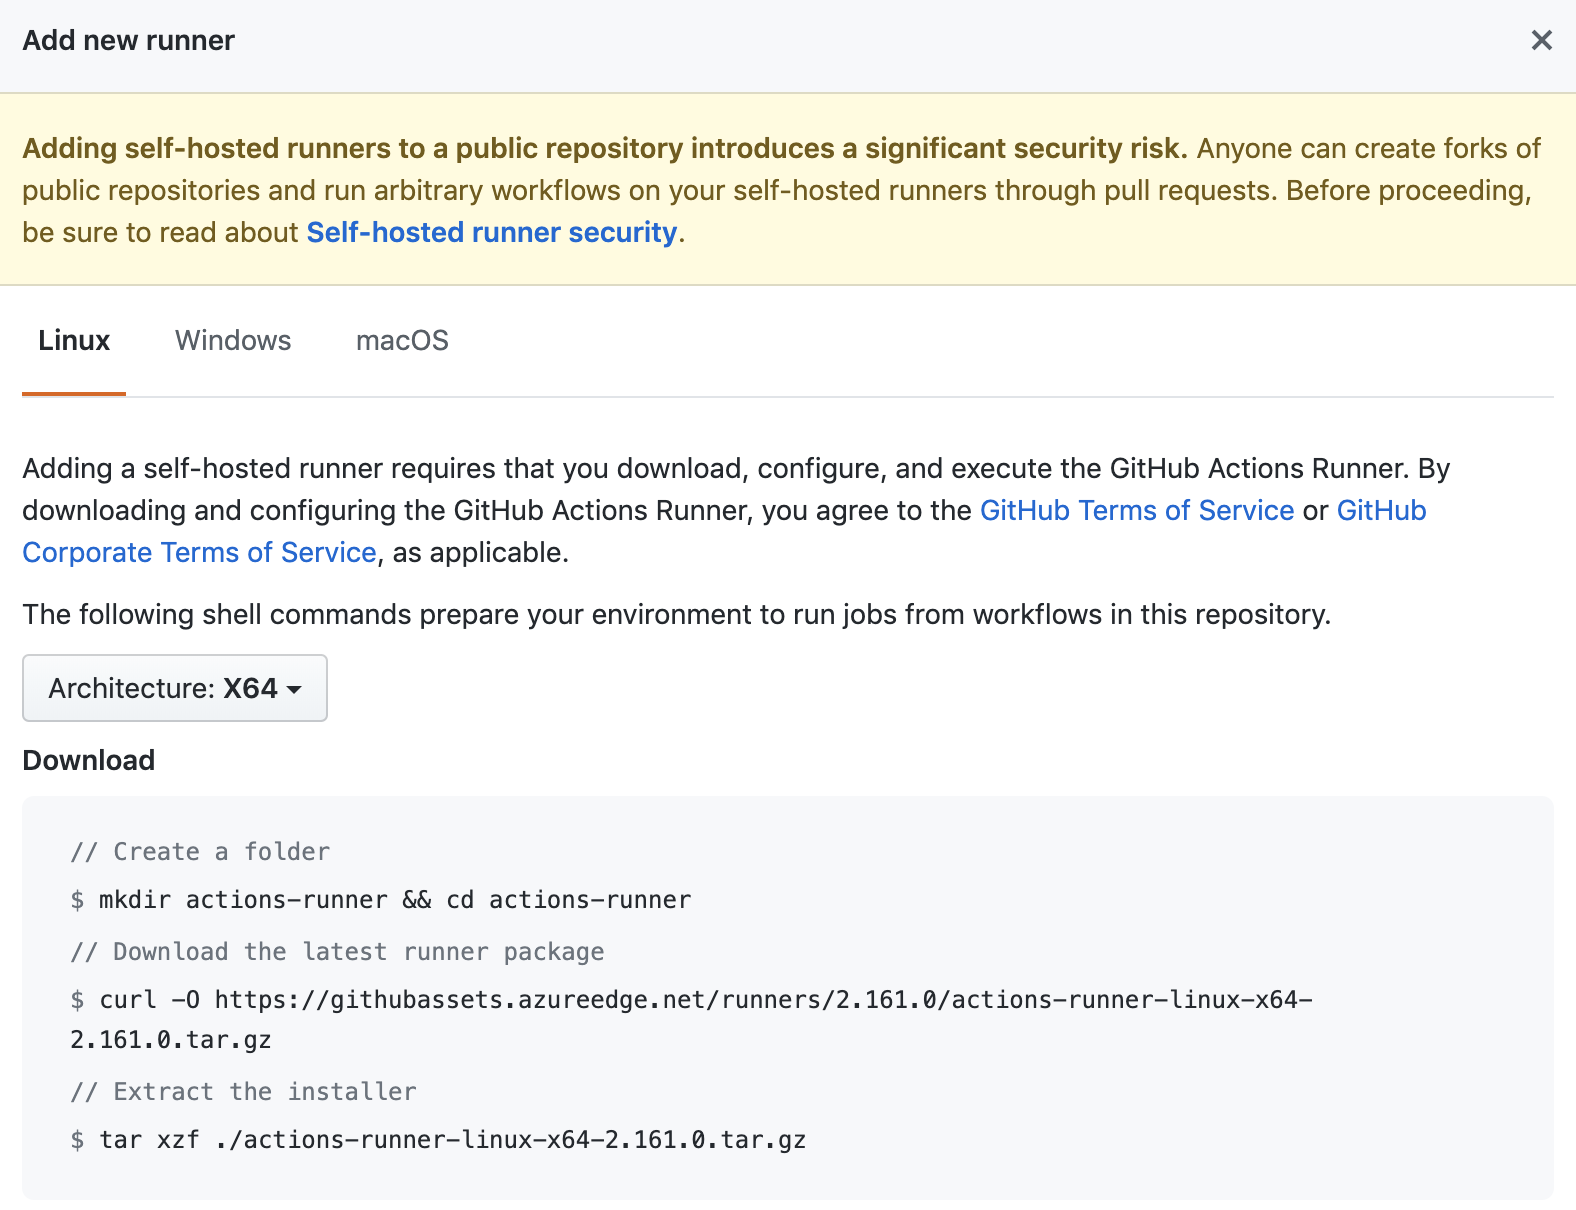
公式イメージも、Dockerfileもない状態なので、今回は勘所を掴むことを目的に、適当なコンテナの中で公式のインストール手順を追ってみる。
$ docker run --rm -it ubuntu:latest sh
手順通り、curlでリリースアーカイブをダウンロード、展開する。
# apt-get update -y
# apt-get install curl -y
# curl -O https://githubassets.azureedge.net/runners/2.161.0/actions-runner-linux-x64-2.161.0.tar.gz
# tar xzf ./actions-runner-linux-x64-2.161.0.tar.gz
actions-runner というディレクトリ内にファイル一式が展開される。そこで、手順どおり config.sh を実行してみる。
# cd actions-runner
# ./config.sh --url https://github.com/${OWNER}/${REPO} --token ${TOKEN}
Must not run with sudo
root では実行できない・・ということなので、適当なユーザをつくる。ここでは runner とする。
# adduser --disabled-password --gecos "" runner
Adding user `runner' ...
Adding new group `runner' (1000) ...
Adding new user `runner' (1000) with group `runner' ...
The home directory `/home/runner' already exists.  Not copying from `/etc/skel'.
runner ユーザがリリースアーカイブから展開したファイルにアクセスできるように、chownしておく。
# chown runner: /actions-runner
su -l runner
再度config.shを実行してみる。
$ ./config.sh --url https://github.com/${OWNER}/${REPO} --token ${TOKEN}
Libicu's dependencies is missing for Dotnet Core 3.0
Execute ./bin/installdependencies.sh to install any missing Dotnet Core 3.0 dependencies.
手順には明記されていなかったが、 必要なパッケージ等が足りない場合はリリースアーカイブに同梱されている bin/installdependencies.sh を実行してインストールする必要がある模様。
これは root で実行する。
$ ./bin/installdependencies.sh
Need to run with sudo privilege
# /actions-runner/bin/installdependencies.sh
--------OS Information--------
NAME="Ubuntu"
VERSION="18.04.3 LTS (Bionic Beaver)"
ID=ubuntu
ID_LIKE=debian
PRETTY_NAME="Ubuntu 18.04.3 LTS"
VERSION_ID="18.04"
HOME_URL="https://www.ubuntu.com/"
SUPPORT_URL="https://help.ubuntu.com/"
BUG_REPORT_URL="https://bugs.launchpad.net/ubuntu/"
PRIVACY_POLICY_URL="https://www.ubuntu.com/legal/terms-and-policies/privacy-policy"
VERSION_CODENAME=bionic
UBUNTU_CODENAME=bionic
Building dependency tree
Reading state information... Done
zlib1g is already the newest version (1:1.2.11.dfsg-0ubuntu2).
libkrb5-3 is already the newest version (1.16-2ubuntu0.1).
libkrb5-3 set to manually installed.
The following NEW packages will be installed:
  liblttng-ust-ctl4 liblttng-ust0 liburcu6
0 upgraded, 3 newly installed, 0 to remove and 2 not upgraded.
Need to get 287 kB of archives.
After this operation, 1348 kB of additional disk space will be used.
Get:1 http://archive.ubuntu.com/ubuntu bionic/universe amd64 liblttng-ust-ctl4 amd64 2.10.1-1 [80.8 kB]
Get:2 http://archive.ubuntu.com/ubuntu bionic/main amd64 liburcu6 amd64 0.10.1-1 [52.1 kB]
Get:3 http://archive.ubuntu.com/ubuntu bionic/universe amd64 liblttng-ust0 amd64 2.10.1-1 [154 kB]
Fetched 287 kB in 2s (129 kB/s)
debconf: delaying package configuration, since apt-utils is not installed
Selecting previously unselected package liblttng-ust-ctl4:amd64.
(Reading database ... 4570 files and directories currently installed.)
Preparing to unpack .../liblttng-ust-ctl4_2.10.1-1_amd64.deb ...
Unpacking liblttng-ust-ctl4:amd64 (2.10.1-1) ...
Selecting previously unselected package liburcu6:amd64.
Preparing to unpack .../liburcu6_0.10.1-1_amd64.deb ...
Processing triggers for libc-bin (2.27-3ubuntu1) ...
Reading package lists... Done
Building dependency tree
Reading state information... Done
Note, selecting 'libssl1.1' for regex 'libssl1.1$'
libssl1.1 is already the newest version (1.1.1-1ubuntu2.1~18.04.5).
libssl1.1 set to manually installed.
0 upgraded, 0 newly installed, 0 to remove and 2 not upgraded.
Reading package lists... Done
Building dependency tree
Reading state information... Done
E: Unable to locate package libicu63
Reading package lists... Done
Building dependency tree
Reading state information... Done
The following NEW packages will be installed:
  libicu60
0 upgraded, 1 newly installed, 0 to remove and 2 not upgraded.
Need to get 8054 kB of archives.
After this operation, 31.8 MB of additional disk space will be used.
Get:1 http://archive.ubuntu.com/ubuntu bionic/main amd64 libicu60 amd64 60.2-3ubuntu3 [8054 kB]
Fetched 8054 kB in 5s (1708 kB/s)
debconf: delaying package configuration, since apt-utils is not installed
Selecting previously unselected package libicu60:amd64.
(Reading database ... 4613 files and directories currently installed.)
Preparing to unpack .../libicu60_60.2-3ubuntu3_amd64.deb ...
Unpacking libicu60:amd64 (60.2-3ubuntu3) ...
Setting up libicu60:amd64 (60.2-3ubuntu3) ...
Processing triggers for libc-bin (2.27-3ubuntu1) ...
-----------------------------
 Finish Install Dependencies
-----------------------------
改めて、非rootユーザでconfig.shを実行してみる。
$ ./config.sh --url https://github.com/${OWNER}/${REPO} --token ${TOKEN}

--------------------------------------------------------------------------------
|        ____ _ _   _   _       _          _        _   _                      |
|       / ___(_) |_| | | |_   _| |__      / \   ___| |_(_) ___  _ __  ___      |
|      | |  _| | __| |_| | | | | '_ \    / _ \ / __| __| |/ _ \| '_ \/ __|     |
|      | |_| | | |_|  _  | |_| | |_) |  / ___ \ (__| |_| | (_) | | | \__ \     |
|       \____|_|\__|_| |_|\__,_|_.__/  /_/   \_\___|\__|_|\___/|_| |_|___/     |
|                                                                              |
|                       Self-hosted runner registration                        |
|                                                                              |
--------------------------------------------------------------------------------

# Authentication


√ Connected to GitHub

# Runner Registration

Enter the name of runner: [press Enter for 44c227a0da80] Exiting...
どうやら実行時に対話的にrunner名と作業用ディレクトリのパスを入力しなければならないようだ。できれば環境変数、コマンドライン引数等で予め指定できると自動化しやすいが・・・。
$ ./config.sh --help

Commands:,
 ./config.sh          Configures the runner
 ./config.sh remove   Unconfigures the runner
 ./run.sh             Runs the runner interactively. Does not require any options.

Options:
 --version  Prints the runner version
 --commit   Prints the runner commit
 --help     Prints the help for each command
--help をみてもrunner名を先に決めておくためのオプションはないようなので、expectで自動化することにする。
# apt-get install expect -y --no-install-recommends
# !/bin/bash

if [ -z "${RUNNER_NAME}" ]; then
  echo "RUNNER_NAME must be set" 1>&2
  exit 1
fi

if [ -z "${OWNER}" ]; then
  echo "OWNER must be set" 1>&2
  exit 1
fi

if [ -z "${REPO}" ]; then
  echo "REPO must be set" 1>&2
  exit 1
fi

if [ -z "${TOKEN}" ]; then
  echo "TOKEN must be set" 1>&2
  exit 1
fi

expect -c "
set timeout 10
spawn ./config.sh --url https://github.com/${OWNER}/${REPO} --token ${TOKEN}
expect \"Enter the name of runner:\"
send \"${RUNNER_NAME}\n\"
expect \"Enter name of work folder:\"
send \"\n\"
expect \"$\"
exit 0
"
これをautoconfのような適当な名前のファイルに保存して実行する。
$ chmod +x autoconf
--------------------------------------------------------------------------------
|        ____ _ _   _   _       _          _        _   _                      |
|       / ___(_) |_| | | |_   _| |__      / \   ___| |_(_) ___  _ __  ___      |
|      | |  _| | __| |_| | | | | '_ \    / _ \ / __| __| |/ _ \| '_ \/ __|     |
|      | |_| | | |_|  _  | |_| | |_) |  / ___ \ (__| |_| | (_) | | | \__ \     |
|       \____|_|\__|_| |_|\__,_|_.__/  /_/   \_\___|\__|_|\___/|_| |_|___/     |
|                                                                              |
|                       Self-hosted runner registration                        |
|                                                                              |
--------------------------------------------------------------------------------

# Authentication


√ Connected to GitHub

# Runner Registration

Enter the name of runner: [press Enter for ${HOSTNAME}] bar
bar

√ Runner successfully added
√ Runner connection is good

# Runner settings

Enter name of work folder: [press Enter for _work]

√ Settings Saved.
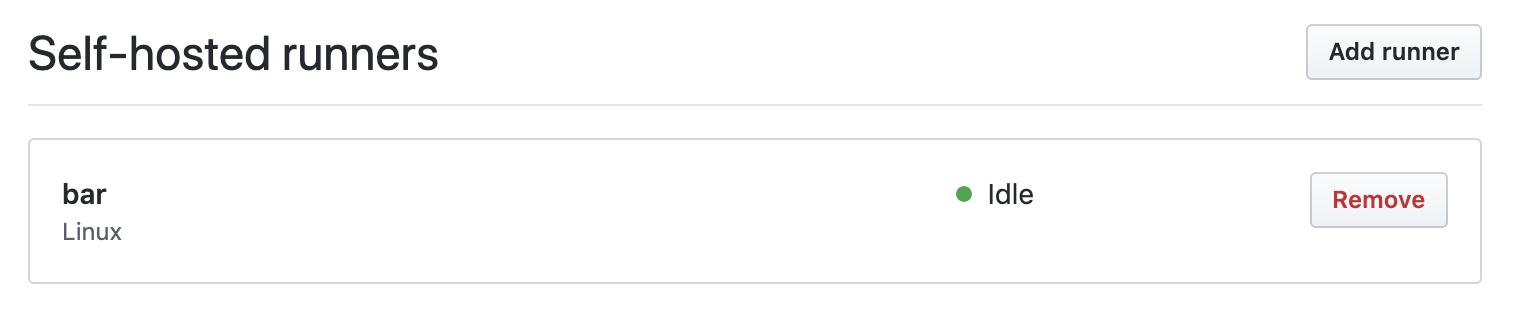
これで指定した名前のRunnerがActionsに登録される。

この設定内容は.runnerというファイルに保存されている模様。
$ cat .runner
{
  "agentId": REDUCTED,
  "agentName": "bar",
  "poolId": REDUCTED,
  "poolName": "Default",
  "serverUrl": "https://pipelines.actions.githubusercontent.com/REDUCTED/",
  "gitHubUrl": "https://github.com/OWNER/REPO",
  "workFolder": "_work"
}
これで設定が完了したので、Runnerを起動する。
$ ./run.sh

√ Connected to GitHub

2019-12-01 06:25:00Z: Listening for Jobs
無事起動したら、GitHubのWeb UI上で以下のように実行待ち状態になったことが確認できる。
最後に、Workflow中で以下のようにSelf-Hosted Runnerを指定する。
runs-on: self-hosted
手順のおさらい
# セットアップに必要なcurl, expectのインストール
apt-get update -y
# ca-certicatesを明示的にいれないと、2020/01時点のubuntu:latestではcurl https://github.com/...でエラーになる
apt-get install ca-certificates curl expect -y --no-install-recommends -y

# リリースアーカイブのダウンロードと展開
mkdir -p /actions-runner
cd $_
curl -O -L https://github.com/actions/runner/releases/download/v2.164.0/actions-runner-linux-x64-2.164.0.tar.gz
tar xzf ./actions-runner-linux-x64-2.164.0.tar.gz

# 依存パッケージのインストール
/actions-runner/bin/installdependencies.sh

# Runner用のLinuxユーザを作成する
adduser --disabled-password --gecos "" runner
chown runner: /actions-runner
su -l runner

cd /actions-runner

# RunnerをGitHubに登録する
cat > autoconf
# ここで上記autocofの内容をコピペしてC-c

chmod +x autoconf
OWNER=xxx REPO=xxx TOKEN=xxx RUNNER_NAME=xxx ./autoconf

# Runnerを起動する
./run.sh
その他に気になった点
トークンを使い回せない
同じトークンを使って別名のRunnerを登録しようとしたところ、以下のように401 Unauthorizedになってしまった。
--------------------------------------------------------------------------------
|        ____ _ _   _   _       _          _        _   _                      |
|       / ___(_) |_| | | |_   _| |__      / \   ___| |_(_) ___  _ __  ___      |
|      | |  _| | __| |_| | | | | '_ \    / _ \ / __| __| |/ _ \| '_ \/ __|     |
|      | |_| | | |_|  _  | |_| | |_) |  / ___ \ (__| |_| | (_) | | | \__ \     |
|       \____|_|\__|_| |_|\__,_|_.__/  /_/   \_\___|\__|_|\___/|_| |_|___/     |
|                                                                              |
|                       Self-hosted runner registration                        |
|                                                                              |
--------------------------------------------------------------------------------

# Authentication

Http response code: Unauthorized from 'POST https://api.github.com/repos/${OWNER}/${REPO}/actions-runners/registration'
{"message":"Token expired.","documentation_url":"https://developer.github.com/v3"}
Response status code does not indicate success: 401 (Unauthorized).
気になって確認してみたところ、(考えてみれば当たり前かもしれないが)、Runnerを追加するたびに次のRunner専用のトークンが払い出されているようだ。また、Runnerを追加していなくてもしばらくすると払い出されるトークンが変わっているようだが、このタイミングは不明(おそらく、有効期限内に一度も利用されなかったものは消されて再度払い出されたりしている?)
まとめ ~ Dockerfileを書くにあたって抑えたいポイント
-
OSの選択肢はいくつかある。今回はubuntu:latestで問題ないことが確認できた。
- ちなみにubuntu:latestは最新LTSに追従しているので、定期的にビルドし直す前提でこれをベースイメージしてしまってもよいかもしれない。
- curlおよびexpectのインストール、リリースアーカイブのダウンロードと展開、installdependencies.sh、config.sh、run.shの順で実行する。
- config.shにはトークンが必要なため、docker build中ではなくコンテナ作成後に実行しなければならない
- installdependencies.shはdocker build時に実行しておくと起動時間短縮になりそう
- 全ビルドから共通で使われるコマンド、パッケージ類はインストールしておくとビルド時間の短縮になりそう
- Add runner時にGitHubが提示してくれるトークンはRunnerを追加するたびに変わる。したがって、1つランナーを立ち上げるたびにトークンを人力で確認し入力しなければならない・・・。
GitHubさんへのお願い
Runnerの追加を自動化できるようにしてほしい
Runnerの追加を自動化できるようにしてほしいです。
現状、Runnerを追加するたびに手動でトークンをGitHubのUI上で確認しないといけないため、自動化が難しいです(Web UIをスクレイピングすればやれないことはないとは思いますが・・・)。
例えば、KubernetesのDeploymentやDaemonset、StatefulSetなどでRunnerの個数を柔軟に変えられるようにしようと思った場合、素朴に実装すると、同じトークンで複数のRunnerが登録・起動できるようになっているとうれしいです。
(おそらくそうなのだと思いますが)それがセキュリティ的に望ましくないということであれば、Runner用のトークンを払い出す専用のトークンを作れるようにしてほしいです。それがあれば、Kubernetes Operatorなどを自作し、そこからRunnerのインスタンス毎にトークンを払い出すようなことが可能だと思います。