UIImageをCoreGraphicsで回転させる
前置き
CoreGraphics
CoreGraphicsフレームワークは,2Dの描画処理を手軽に行うことができるC言語ベースのAPIとなっております.
CoreGraphicsを用いた描画処理の基本的な考え方やコーディングについては,以下の記事が参考になると思います.
SwiftでCoreGraphics画像作成(基本)【メモ】
[Objective-C] 画像処理についてのまとめ
Core Graphics Framework Reference
UIImageの回転
UIImageは画像を扱うためのクラスですが,画像を回転させるためのメソッドは用意されていません.
そのため,UIImageに対して回転等の処理を行いたい場合は上記のフレームワークを用いてコーディングする必要があります.
UIImage Class Reference
今回はUIImageクラスを拡張し,回転させた画像を取得するメソッドを実装しています.
※ Swift2.2 iOS8.0~ 動作確認済み
画像の中心を基準に任意の角度で回転させた画像を取得
したいこと

実装コード
extension UIImage {
    func rotate(angle: CGFloat) -> UIImage{
        // (1)
        UIGraphicsBeginImageContextWithOptions(CGSize(width: self.size.width, height: self.size.height), false, 0.0)
        let context: CGContextRef = UIGraphicsGetCurrentContext()!
        // (2)
        CGContextTranslateCTM(context, self.size.width/2, self.size.height/2)
        // (3)
        CGContextScaleCTM(context, 1.0, -1.0)

        // (4)
        let radian: CGFloat = (-angle) * CGFloat(M_PI) / 180.0
        CGContextRotateCTM(context, radian)
        // (5)
        CGContextDrawImage(context, CGRectMake(-self.size.width/2, -self.size.height/2, self.size.width, self.size.height), self.CGImage)

        // (6)
        let rotatedImage: UIImage = UIGraphicsGetImageFromCurrentImageContext()
        UIGraphicsEndImageContext()

        return rotatedImage
    }
}
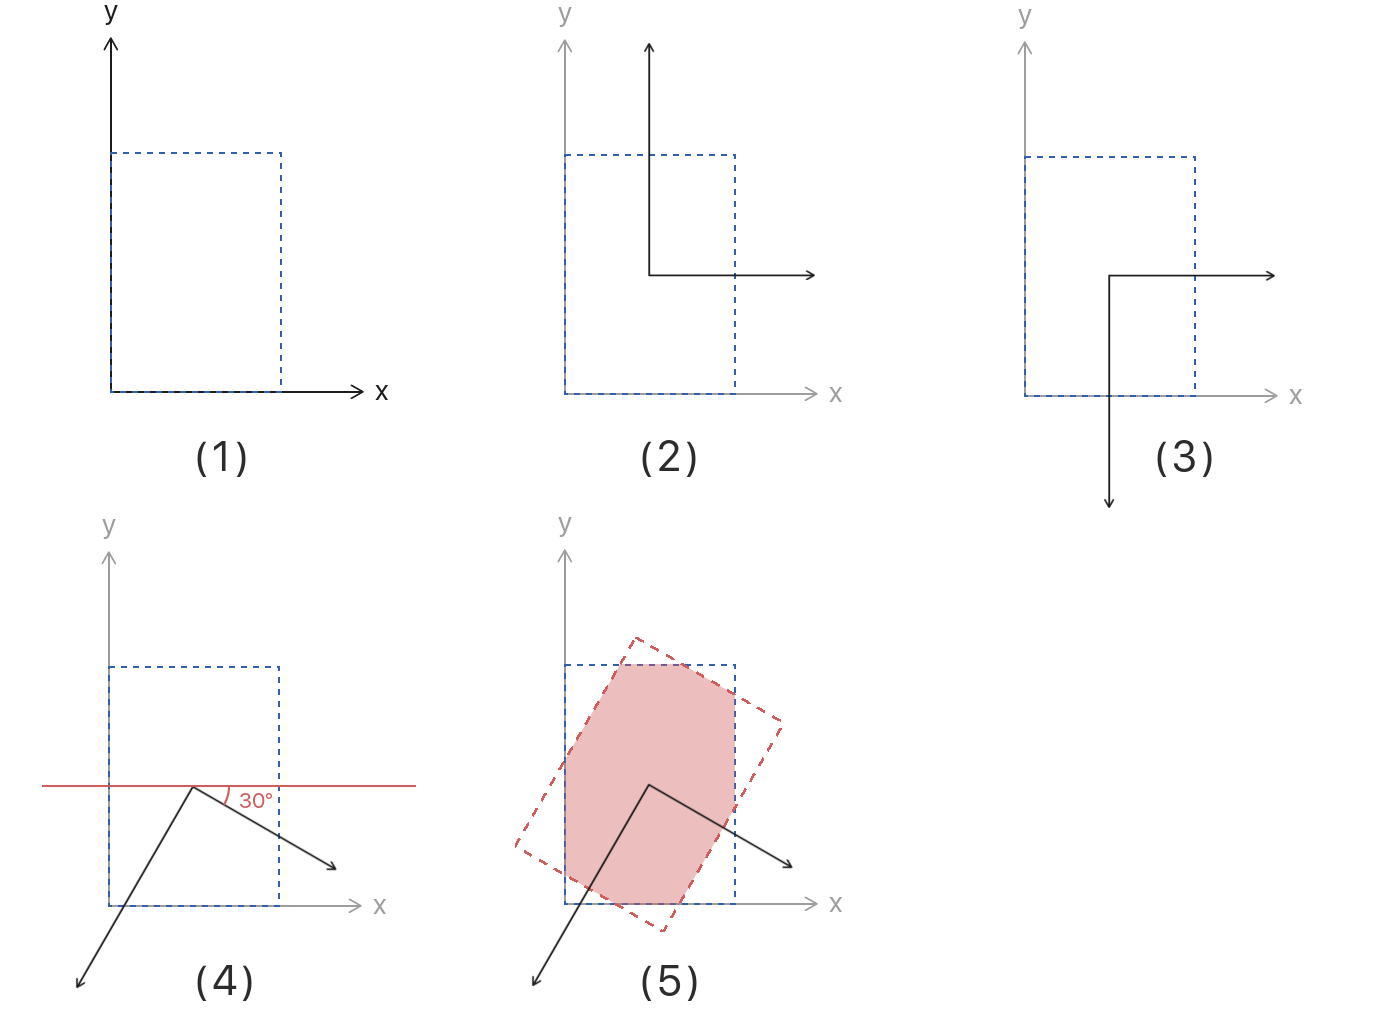
解説
(1) オリジナルの画像サイズと同じサイズでコンテキストを開きます.
(2) 座標軸の原点を画像の中心点に移動させます.
(3) CoreGraphicsのデフォルト座標系はy軸が上を向いているので,iOSのデフォルト座標系と合わせるために,y軸を反転させます.
(4) 座標系を任意の角度で回転させます.今回は時計回りを正の方向としたかったので,引数で受け取った角度の符号を反転させています.
(5) 座標軸の原点を基準にRect領域を作成し,そこにオリジナル画像を描画します.
(6) 現在のコンテキストが持っている描画情報から画像を取得し,コンテキストを閉じます.
CoreGraphics 図解
任意の点を基準に任意の角度で回転させた画像を取得
上記の実装を少し修正して,画像の中心ではなく任意の点で回転させた画像を取得できるようにします.
したいこと

実装コード
extension UIImage {
    func rotate(angle: CGFloat, point: CGPoint) -> UIImage{
        // (1)
        UIGraphicsBeginImageContextWithOptions(CGSize(width: self.size.width, height: self.size.height), false, 0.0)
        let context: CGContextRef = UIGraphicsGetCurrentContext()!
        // (2)
        CGContextTranslateCTM(context, point.x, point.y)
        // (3)
        CGContextScaleCTM(context, 1.0, -1.0)

        // (4)
        let radian: CGFloat = (-angle) * CGFloat(M_PI) / 180.0
        CGContextRotateCTM(context, radian)
        // (5)
        CGContextTranslateCTM(context, -(point.x - self.size.width / 2), (point.y - self.size.height / 2))
        // (6)
        CGContextDrawImage(context, CGRectMake(-self.size.width/2, -self.size.height/2, self.size.width, self.size.height), self.CGImage)

        // (7)
        let rotatedImage: UIImage = UIGraphicsGetImageFromCurrentImageContext()
        UIGraphicsEndImageContext()

        return rotatedImage
    }
}
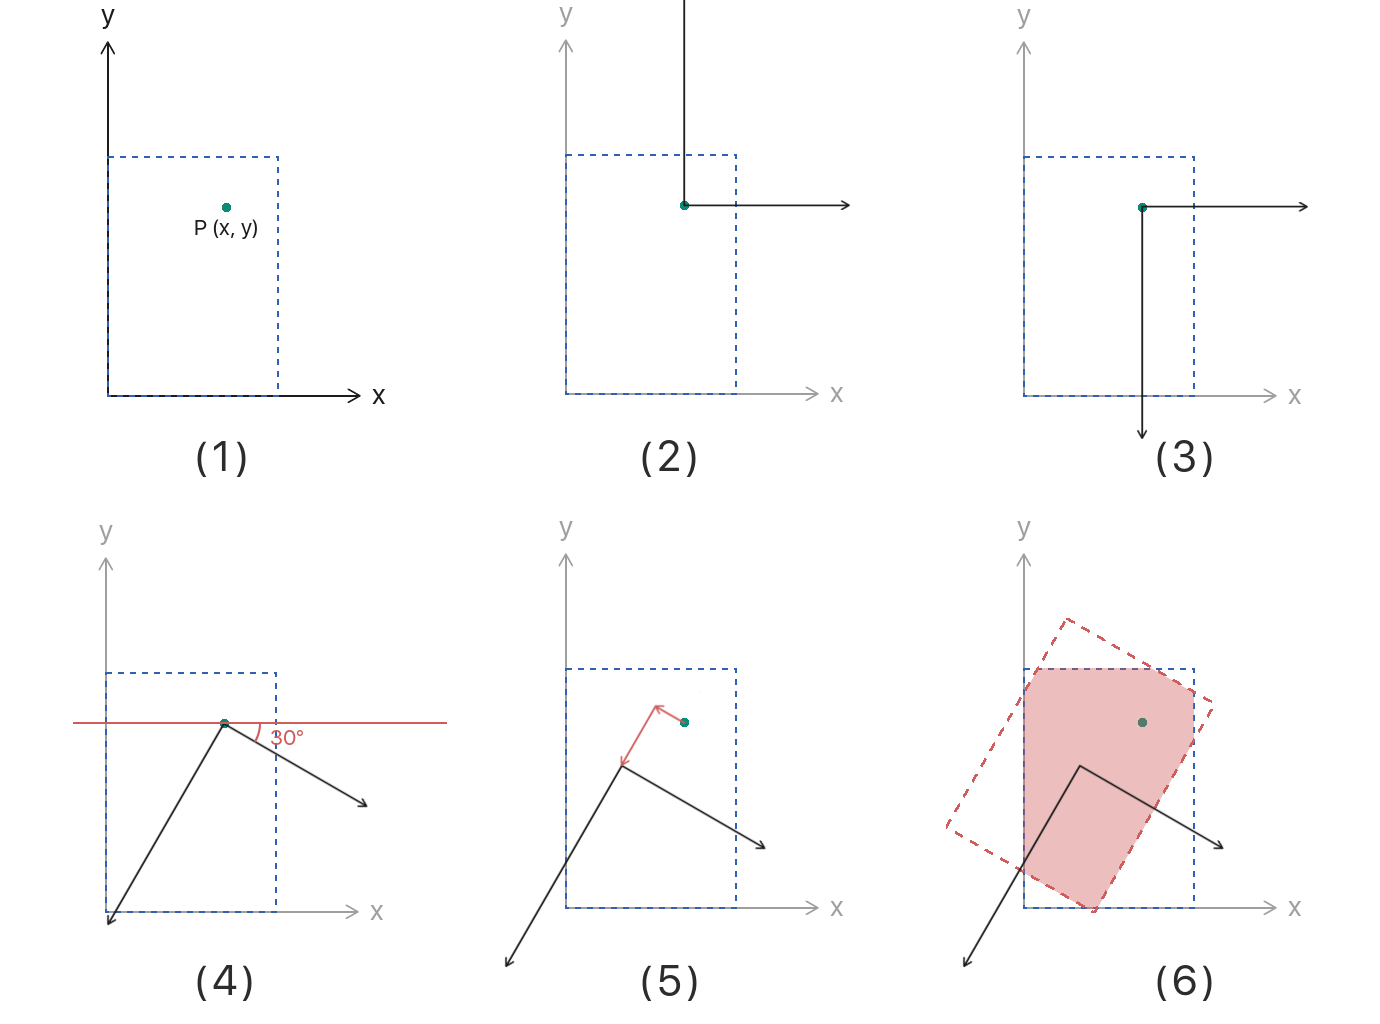
解説
(1) オリジナルの画像サイズと同じサイズでコンテキストを開きます.
(2) 座標軸の原点を指定された点に移動させます.
(3) iOSのデフォルト座標系と合わせるために,y軸を反転させます.
(4) 座標系を任意の角度で回転させます.
(5) 座標系を回転させた後,指定された点(x, y)と画像の中心点(x, y)との差分で原点を移動させます.(3)においてy軸が反転させられているので,y軸方向の差分値は符号反転させていません.
(6) 座標軸の原点を基準にRect領域を作成し,そこにオリジナル画像を描画します.
(7) 現在のコンテキストが持っている描画情報から画像を取得し,コンテキストを閉じます.
CoreGraphics 図解
呼び出し側
self.imageView1.image = originalImage.rotate(30)
self.imageView2.image = originalImage.rotate(30, refPoint)