昨年Googleに買収されたことで最近注目されているFirebaseを触ってみました。
チャットアプリのような物が簡単に実装できるらしいので、チャットアプリ(iOSアプリ)を作りました。
また、個人的にちょっと使ってみたかったJSQMessagesViewControllerというチャット用フレームワークを使ってみました。
なお、この記事をベースに実装したものはGitHubで公開しています。
https://github.com/mugicha755/firebase-chat
Firebaseとは
- BaaSの一種
- URLに紐付いたデータベースをリアルタイムに共有する
- iOS,Android SDKも用意されており、Webサービス以外でも利用可能
- オフラインでも利用可能
- ソーシャルログイン機能による認証もサポート
- 昨年Googleに買収されて注目されている
https://www.firebase.com/
無料でも機能確認程度には利用できそう
JSQMessagesViewControllerとは
- チャット機能のUIを手軽に実装できるフレームワーク
- CocoaPodsで提供されている
- 多くのアプリで利用されているらしい
開発までの流れ
FirebaseとJSQMessageViewControllerを利用するまでの流れをまとめます。
主にFirebase側の導入手順となります。
- ユーザ登録
- アプリケーション登録
- CocoaPods設定
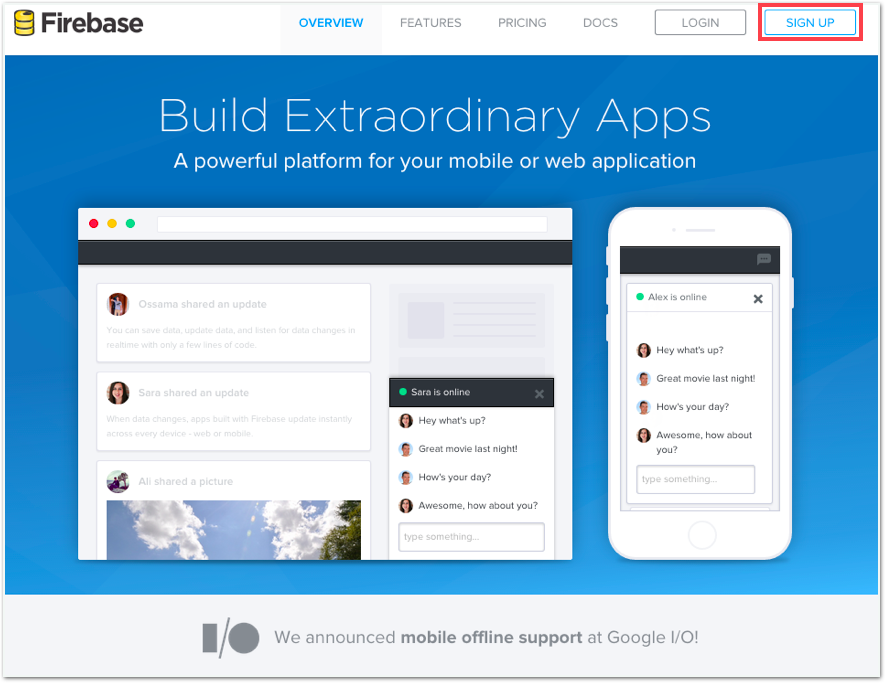
1. ユーザ登録
"SIGN UP"
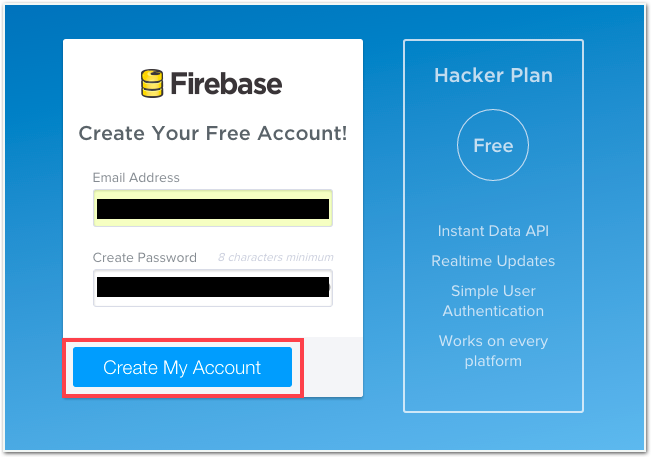
利用するメールアドレス、パスワードを入力して"Create My Account"
登録完了するとこの画面になる
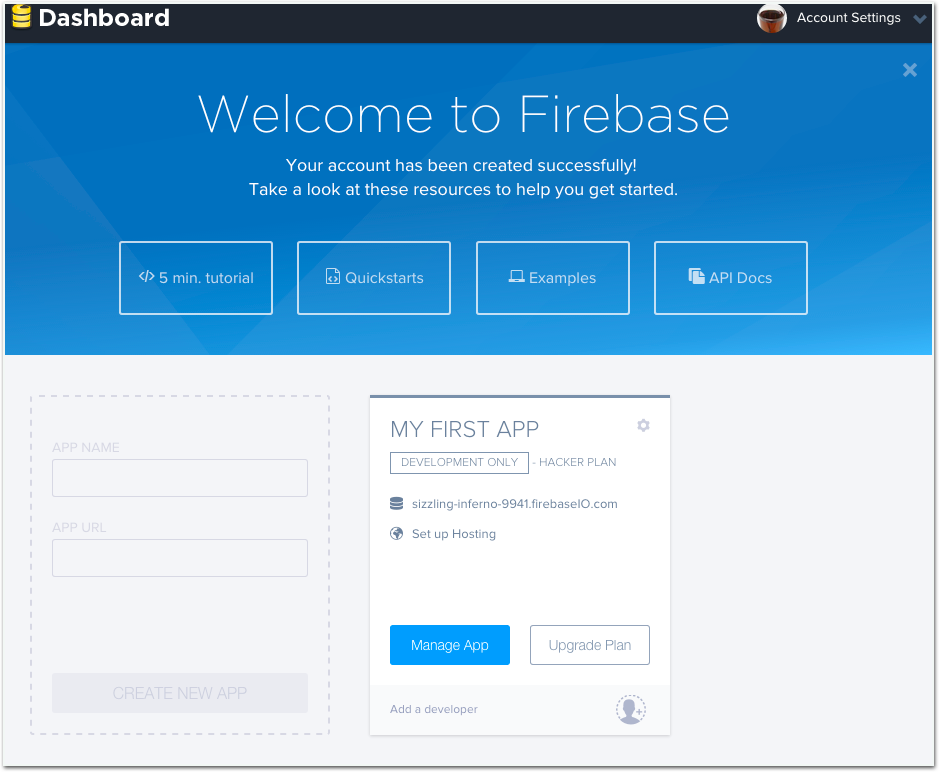
2. アプリケーション登録
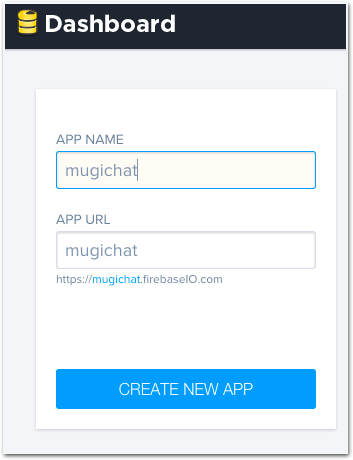
Dashboardからアプリケーション名を登録
ここではダミーで"mugichat"にしました
3. CocoaPods設定
FirebaseとJSQMessageViewControllerはどちらもCocoaPodsで導入することができます。
platform :ios, '8.0'
pod 'JSQMessagesViewController'
pod 'Firebase'
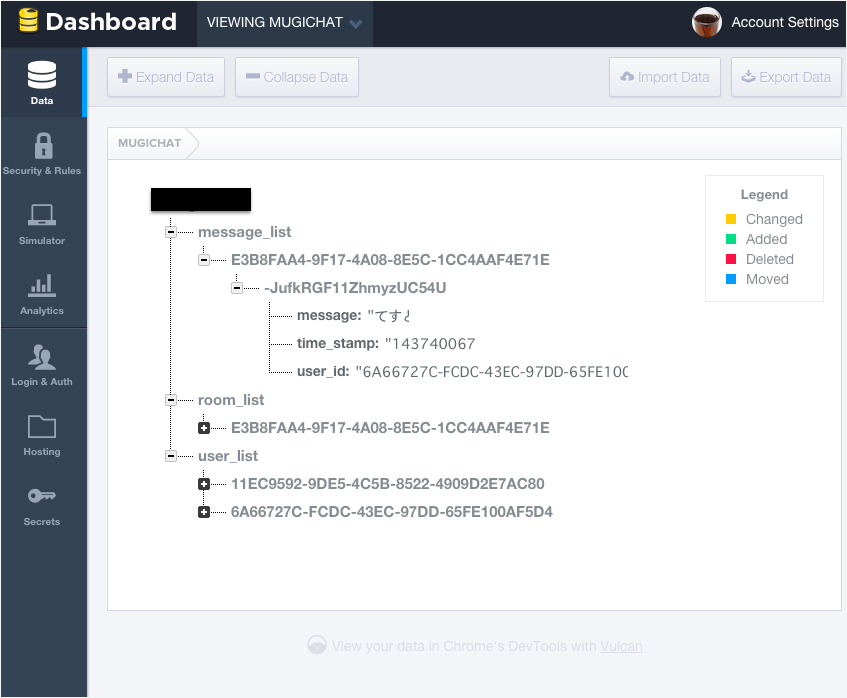
チャットルームのデータ構造
Firebaseのデータ構造は、1つのJSONの中に全てのデータを配置するので、下記のような構造としました。
- チャットルーム
- ユーザ一覧
- メッセージリスト
{
	// チャットルーム
	"room_list": {
		// ルームID : ユニーク値とするためUUID
		"room_id" : {
			"room_name" : "room_name",
			"create_at" : "1436864620",
		}
	},

	// ユーザ一覧
	"user_list" : {
		// ユーザID : ユニーク値とするためUUID
		"user_id" : {
			"user_name" : "user_name",
			"create_at" : "1436864591",
		}
	},

	// メッセージリスト
	"message_list" : {
		// ルームID毎のメッセージ
        "room_id" : {
        	// ランダムID : Firebase内で自動割り当て
			"randam_id" : {
				"user_id" : "user_id",
				"message" : "message",
				"time_stamp" : "1436864753",
			}
        }
	}

}
実装
Firebase
初期化
子要素毎のFirebaseオブジェクトを生成する。
message listはroom作成が完了(もしくは生成済みが確定)したら初期化する。
公式のドキュメントはこちら : https://www.firebase.com/docs/
# define FB_ROOT_URL         @"https://{your application}.firebaseio.com/"
# define FB_USER_LIST_URL    @"https://{your application}.firebaseio.com/user_list/"
# define FB_ROOM_LIST_URL    @"https://{your application}.firebaseio.com/room_list/"
# define FB_MESSAGE_LIST_URL @"https://{your application}.firebaseio.com/message_list/"

~省略

@interface fbMng() {
    // blocksで操作するためblock修飾子を追加
    __block Firebase *_fbRoot;
    __block Firebase *_fbUserListMng;
    __block Firebase *_fbRoomListMng;
    __block Firebase *_fbMessageListMng;

~省略

}

@end


@implementation fbMng


// 初期化
-(id)initWithId:(NSString *)userID
            bot:(NSString *)botID
       observer:(id)setObsever
       callback:(SEL)callback {

    // notification center登録
    // chat room生成完了を通知するための配慮
    NSNotificationCenter *pNotificationCenter = [NSNotificationCenter defaultCenter];
    [pNotificationCenter addObserver:setObsever
                            selector:callback
                                name:kCreateRoom
                              object:nil];

    // ID保存
    _fbBotID = botID;
    _fbUserID = userID;

    // Firebase初期設定
    [self initFb];
    return self;
}


-(void)initFb {
    _fbRoot = [[Firebase alloc] initWithUrl:FB_ROOT_URL];
    _fbUserListMng = [[Firebase alloc] initWithUrl:FB_USER_LIST_URL];
    _fbRoomListMng = [[Firebase alloc] initWithUrl:FB_ROOM_LIST_URL];
    [self reqEventFromRoot];
}
ユーザとルームの生成
rootのURLに子要素が追加されているか確認する。
問い合わせ結果は非同期で、Blocksで実装する必要がある。
未生成時はユーザとルームを作り、Firebaseに追加。
生成or生成済みが確定したら、NSNotificationCenterで完了を通知。
ここでは、一度だけチェックしたいので、observeSingleEventOfType:withBlock:を利用しています。
observeEventOfType:withBlock:を利用することで、定期的にイベントをチェックすることもできます(新着チェック等に利用可能)
-(void)reqEventFromRoot
{
    [_fbRoot observeSingleEventOfType:FEventTypeValue withBlock:^(FDataSnapshot *snapshot) {
        // 子要素なし判定
        if( snapshot.childrenCount == 0 ) {
            // 子要素の初期設定
            NSLog(@"%s",__func__);

            //room id
            NSString *roomID = [NSUUID UUID].UUIDString;

            //room list
            NSDictionary *roomList = @{
                                        roomID :   @{
                                                @"room_name" : @"mugi_room",
                                                @"create_at" : [NSString stringWithFormat:@"%ld",(long)[[NSDate date] timeIntervalSince1970]]
                                                }
                                        };

            //user list
            NSDictionary *userList = @{
                                        _fbUserID :   @{
                                                @"room_name" : @"mugicha",
                                                @"create_at" : [NSString stringWithFormat:@"%ld",(long)[[NSDate date] timeIntervalSince1970]]
                                                },
                                        _fbBotID :   @{
                                                @"room_name" : @"bot",
                                                @"create_at" : [NSString stringWithFormat:@"%ld",(long)[[NSDate date] timeIntervalSince1970]]
                                                }
                                        };

            // RoomID永続化
            NSUserDefaults *userDef = [NSUserDefaults standardUserDefaults];
            [userDef setObject:roomID forKey:kChatRoomId];
            [userDef synchronize];

            // 初期データ設定
            [[_fbRoot childByAppendingPath:@"room_list"] setValue:roomList];
            [[_fbRoot childByAppendingPath:@"user_list"] setValue:userList];

            // message list用URL
            NSString *messageURL = [NSString stringWithFormat:@"%@%@/",FB_MESSAGE_LIST_URL,roomID];
            _fbMessageListMng = [[Firebase alloc] initWithUrl:messageURL];

        }
        else {
            // 永続化した情報の読み出し
            NSUserDefaults *userDef = [NSUserDefaults standardUserDefaults];
            NSString *roomIdFromUserDef = [userDef stringForKey:kChatRoomId];

            // message list用URL
            NSString *messageURL = [NSString stringWithFormat:@"%@%@/",FB_MESSAGE_LIST_URL,roomIdFromUserDef];
            _fbMessageListMng = [[Firebase alloc] initWithUrl:messageURL];
        }

        // post
        [NSNotification notificationWithName:kQueryMessage object:self];
        [[NSNotificationCenter defaultCenter] postNotificationName:kCreateRoom
                                                            object:self
                                                          userInfo:nil];
    }];
}
JSQMessageViewController
初期設定
SubclassをJSQMessagesViewControllerで新しくメッセージ(チャット)用クラスを作成する。
公式のドキュメントはこちら : http://cocoadocs.org/docsets/JSQMessagesViewController/
JSQMessageViewControllerを利用するには、最低限次の3点を設定する必要がある。
- メッセージを送信するユーザの情報
- 吹き出しの背景色
- ユーザアイコン
ここではユーザ情報で利用するIDはFirebase上のユーザIDと共通化しています。
@interface messageView () {

    NSMutableArray *_messageList;

    NSString *_botID;
    NSString *_userID;

    JSQMessagesBubbleImage *_incomingBubble;
    JSQMessagesBubbleImage *_outgoingBubble;
    JSQMessagesAvatarImage *_incomingAvatar;
    JSQMessagesAvatarImage *_outgoingAvatar;

    fbMng *_fbMng;
}


@end


~ 省略


-(void)initUser {

    self.inputToolbar.contentView.leftBarButtonItem = nil;

	// firebaseに登録するユーザ情報とローカルの情報を一致させるため
	// 先にIDの生成と永続化(とその読み出し)を行う

    // ID読み出し
    NSUserDefaults *userDef = [NSUserDefaults standardUserDefaults];

    _botID = [userDef stringForKey:kMessageViewBotID];
    _userID = [userDef stringForKey:kMessageViewUserID];

    // 未生成判定
    if(( nil == _botID ) || ( nil == _userID )){

        // ID生成
        _botID = [NSUUID UUID].UUIDString;
        _userID = [NSUUID UUID].UUIDString;
        [userDef setObject:_botID forKey:kMessageViewBotID];
        [userDef setObject:_userID forKey:kMessageViewUserID];
        [userDef synchronize];
    }

    // user設定 : senderID(firebase上のuser_hashを利用)
    self.senderId = _userID;
    // user設定 : 画面上の名前
    self.senderDisplayName = @"mugicha";

    // 吹き出し
    JSQMessagesBubbleImageFactory *bubbleFactory = [JSQMessagesBubbleImageFactory new];
    // 吹き出し設定 : 受信
    _incomingBubble = [bubbleFactory  incomingMessagesBubbleImageWithColor:[UIColor lightGrayColor]];
    // 吹き出し設定 : 送信
    _outgoingBubble = [bubbleFactory  outgoingMessagesBubbleImageWithColor:[UIColor jsq_messageBubbleBlueColor]];

    // アイコン設定 : 受信
    _incomingAvatar = [JSQMessagesAvatarImageFactory avatarImageWithImage:[UIImage imageNamed:@"ava_bot.png"] diameter:64];
    // アイコン設定 : 送信
    _outgoingAvatar = [JSQMessagesAvatarImageFactory avatarImageWithImage:[UIImage imageNamed:@"ava_mugicha.png"] diameter:64];

    _messageList = [NSMutableArray array];
}
Delegateの実装
Delegateを実装する。
最低限下記の5つを実装しておけば大丈夫だと思います。
ここには挙げていませんが、タイムスタンプ、ユーザ名等の表示も設定できます。
- メッセージ送信
- メッセージ数
- メッセージ毎の吹き出しの背景色
- メッセージ毎のユーザアイコン
- 参照するメッセージオブジェクト
メッセージ送信
- (void)didPressSendButton:(UIButton *)button
           withMessageText:(NSString *)text
                  senderId:(NSString *)senderId
         senderDisplayName:(NSString *)senderDisplayName
                      date:(NSDate *)date {
    // 送信サウンド
    [JSQSystemSoundPlayer jsq_playMessageSentSound];

    // メッセージオブジェクト生成(id + name + 日付 + テキスト)
    JSQMessage *message = [[JSQMessage alloc] initWithSenderId:senderId
                                             senderDisplayName:senderDisplayName
                                                          date:date
                                                          text:text];
    [_messageList addObject:message];

    // 送信
    [self finishSendingMessageAnimated:YES];

~ 省略

}
メッセージ数
- (NSInteger)collectionView:(UICollectionView *)collectionView
     numberOfItemsInSection:(NSInteger)section {

    return _messageList.count;
}
メッセージ毎の吹き出しの背景色
自身とその他ユーザで背景を分ける。
- (id<JSQMessageBubbleImageDataSource>)collectionView:(JSQMessagesCollectionView *)collectionView
             messageBubbleImageDataForItemAtIndexPath:(NSIndexPath *)indexPath {

    JSQMessage *message = [_messageList objectAtIndex:indexPath.item];
    if ([message.senderId isEqualToString:self.senderId]) {
        return _outgoingBubble;
    }
    return _incomingBubble;
}
メッセージ毎のユーザアイコン
背景と同様に、自身とその他ユーザでアイコンを分ける。
- (id<JSQMessageAvatarImageDataSource>)collectionView:(JSQMessagesCollectionView *)collectionView
                    avatarImageDataForItemAtIndexPath:(NSIndexPath *)indexPath {

    JSQMessage *message = [_messageList objectAtIndex:indexPath.item];
    if ([message.senderId isEqualToString:self.senderId]) {
        return _outgoingAvatar;
    }
    return _incomingAvatar;
}
参照するメッセージオブジェクト
- (id<JSQMessageData>)collectionView:(JSQMessagesCollectionView *)collectionView
       messageDataForItemAtIndexPath:(NSIndexPath *)indexPath {

    return [_messageList objectAtIndex:indexPath.item];
}
Firebaseとの連携
ここまでの実装で、Firebaseの初期設定や画面はできたので、Firebaseとの連携部分を作ります。
メッセージ投稿
message listに「送信」したメッセージを追加します。
まずmessage listにレコードを追加する処理を用意。
子要素のIDは自動割り当てにする。
-(void)setFbValue:(id)newRecode {

    [[_fbMessageListMng childByAutoId] setValue:newRecode];
}
続いてmessageView内のメッセージ送信時のメソッドに用意したメソッド(レコード追加)をコール。
- (void)didPressSendButton:(UIButton *)button
           withMessageText:(NSString *)text
                  senderId:(NSString *)senderId
         senderDisplayName:(NSString *)senderDisplayName
                      date:(NSDate *)date {

~ 省略

    [_fbMng setFbValue:@{@"user_id" : senderId,
                         @"message" : text,
                         @"time_stamp" : [NSString stringWithFormat:@"%ld",(long)[[NSDate date] timeIntervalSince1970]]
                          }];
}
メッセージ読み込み
message listに追加したレコードを読み込み、履歴を取得します。
まずはFirebaseにmessage list配下のデータをクエリする。
なおクエリもBlocksでの実装なので、結果はNSNotificationCenterで通知する。
- (void) reqMessageQuery:(SEL)callback
                observer:(id)setObsever
{
    // notification center登録
    NSNotificationCenter *pNotificationCenter = [NSNotificationCenter defaultCenter];
    [pNotificationCenter addObserver:setObsever
                            selector:callback
                                name:kQueryMessage
                              object:nil];

    [[_fbMessageListMng queryOrderedByValue] observeSingleEventOfType:FEventTypeValue
                                                            withBlock:^(FDataSnapshot *snapshot) {

                                                                // post
                                                                [NSNotification notificationWithName:kQueryMessage object:self];
                                                                [[NSNotificationCenter defaultCenter] postNotificationName:kQueryMessage
                                                                                                                    object:self
                                                                                                                  userInfo:(NSDictionary*)snapshot];

                                                            }
                                                      withCancelBlock:^(NSError *error) {
                                                          NSLog(@"error %@",error);
                                                      }];
}
続いてmessageView内で用意したメソッドをコールする。
また、その結果を受け取る処理も追加する。
結果を受け取った後、メッセージオブジェクトとして、メッセージを登録する。
-(void)reqMessage {

    // メッセージ情報をQuery
    [_fbMng reqMessageQuery:@selector(resultQuery:) observer:self];
}


-(void)resultQuery:(NSNotification*)userInfo {

    FDataSnapshot *snapshot = (FDataSnapshot*)userInfo.userInfo;

    NSEnumerator *enumerator = snapshot.children;
    FDataSnapshot* obj;

    while( obj = [enumerator nextObject] ) {

        // firebase格納のメッセージの取り出し
        NSDictionary *messageVal = obj.value;

        // メッセージオブジェクト生成(id + name + 日付 + テキスト)
        JSQMessage *message = [[JSQMessage alloc] initWithSenderId:[messageVal valueForKey:@"user_id"]
                                                 senderDisplayName:@"mugicha"
                                                              date:[NSDate dateWithTimeIntervalSince1970:[[messageVal valueForKey:@"time_stamp"] intValue]]
                                                              text:[messageVal objectForKey:@"message"]];
        [_messageList addObject:message];

        // 送信
        [self finishSendingMessageAnimated:YES];

    }


}
ちゃんと作るなら、ユーザ情報のリストもFirebaseから取得し、ユーザ名等を振り分ける必要がありますが、今回は割愛します。
アプリケーション画面
アプリの画面はこんな感じになります。
アイコンは綾鷹KAMONジェネレーターで作ったものを利用 : http://ayataka.jp/fun/kamon/

Dashboardではこのように表示されます。
Botのメッセージは同期させていませんが、自身が送信したメッセージと同様の処理を行えば、Firebaseに登録されます。
まとめ
- 前評判の通り、リアルタイムに同期されるため、チャット等と相性が良さそう
- ただし、無料枠ではクライアントアプリとFirebaseだけで閉じることはできなそう(無料枠の50connection制限のため)