つくるもの
-
Slash interactive message を使ったインタラクティブな Slack
- 今回は slash command ですが、もちろん、 outgoing と組み合わせたり bot にしても大丈夫です
-
GolangでSlack Interactive Messageを使ったBotを書く ではコードはかけると思うのですが、 Slack 上での設定が多すぎて迷うと思ったので書きました。
-
実装側は Deeeet さんので十分です
やること
- Slack 上での登録/設定
- Global から Request できる Web サーバ (API)
補足
- 本番環境は適宜設定するとして、開発環境は ngrok を使うとよいです(が自社のセキュリティルールに合わせてください)
- mac の場合は
brew cask install ngrokで入ります
Slack 上での登録/設定
事前に ngrok http 3000 などを実行し、エンドポイントを取得しておいてください
- https://api.slack.com/apps を開く
- 「Create New App」で App を作成

- Slack Team を選ぶ
- あとで配ったりもできるので、手元のテスト環境用の team で大丈夫です
- 「Basic information」->「Add features and functionality」から「Slash Commands」を選択し、下記を設定
- Command: Slack 上で 「/XXX」 と入力して app を呼び出すコマンドを決めます
- Request URL: app の呼び出しエンドポイントを登録します
- その他は適当に
- 「Interactive Messages」を設定
- Request URL: Button / Menu を選択したときに呼び出されるエンドポイントを登録します
API サーバを書く
- 今回は適当に node で書いていますが、好きな言語で書いてください。
Slash Command を受けて Button / Menu を返す
- slash コマンドからの API 呼び出しは
POSTで来ます
{
  "token":"XXXXXXXXXXXXXXXXX",
  "team_id":"XXXXXXXXXXXX",
  "team_domain":"muddydixon",
  "channel_id":"XXXXXXXXXXX",
  "channel_name":"general",
  "user_id":"XXXXXXXXXXXX",
  "user_name":"muddydixon",
  "command":"/deploy",
  "text":"",
  "response_url":"https://hooks.slack.com/commands/XXXXXXXXX/XXXXXXX/XXXXXXXXXXX
}
- command を確認して適切な処理に振り分ければ1アプリで複数のコマンドを受けることができます
- Interactive Message は現時点で Button と Menu を使うことができます。
- Interactive Messages にサンプルの JSON も載っていますので参考にしてください
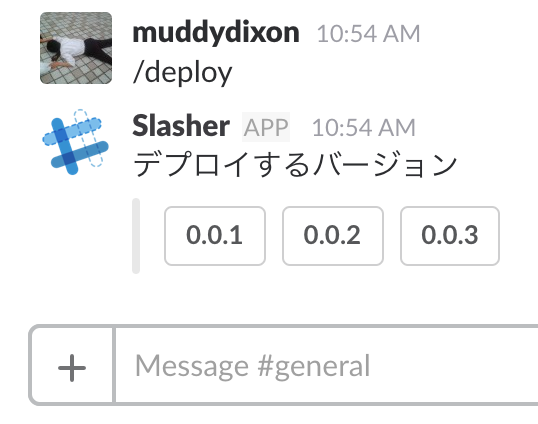
- Button と Menu の場合で返却する JSON が異なるので、適当に
messageBuilderを作って簡略化しておきました - Slack の該当 channel で設定した slack command をうち、うまくいくと下記のように応答が返ってきます
Interactive Message のユーザ応答を受ける
- Interactive Message からの API 呼び出しも
POSTできます - body.payload の中身は文字列化された JSON で parse が必要です (下記には parse した JSON を記載しておきます)
{
  "actions":[{"name": "version", "type": "button", "value": "0.0.2"}],
  "callback_id": "version",
  "team": {"id": "XXXXXXX", "domain": "muddydixon"},
  "channel": {"id": "XXXXXXXXX", "name": "general"},
  "user": {"id": "XXXXXXXXX", "name": "muddydixon"},
  "action_ts": "1499824071.755716",
  "message_ts": "1499824068.033282",
  "attachment_id": "1",
  "token": "XXXXXXXXXXXXXXXXX",
  "is_app_unfurl": false,
  "original_message": {
    "text": "デプロイするバージョン",
    "bot_id": "XXXXXXXXX",
    "attachments": [
      {
        "callback_id": "version",
        "fallback": "choose version",
        "id": 1,
        "actions": [
          {
            "id": "1", "name": "version", "text": "0.0.1",
            "type": "button", "value": "0.0.1", "style": ""
          }, {
            // 略
          }
        ]
      }
    ],
    "type": "message",
    "subtype": "bot_message",
    "ts": "1499824068.033282"
  },
  "response_url": "https: //hooks.slack.com/actions/XXXXXXXXXXXX/XXXXXXXXXXXXXXX/XXXXXXXXXXXXXXX"
}
- レスポンスのルールとしてはきちんと
{text: "XXX"}を返して、履歴を残すようにしましょう
サンプルコード
const http = require("http");
const express = require("express");
const BodyParser = require("body-parser");

const app = express();
app.use(BodyParser.json());
app.use(BodyParser.urlencoded({extended: true}));

// body を確認するため
app.use((req, res, next)=>{
  console.log(`${req.path}, ${req.method}, ${JSON.stringify(req.query)}, ${JSON.stringify(req.body)}`);
  next();
});

// 返却する json を組み上げるのが面倒なので builder
const messageBuilder = (text = "", subtext = "", type = "button", name = "choice", actions = [], options = {})=>{
  if(["button", "select"].indexOf(type) === -1) return null;
  return {
    text,
    response_type: options.responseType || "in_channel",
    attachments: [
      {
        text: subtext,
        fallback: options.fallback || `choose ${name}`,
        callback_id: options.callback_id || `${name}`,
        color: options.color || "info",
        attachment_type: "default",
        actions: type === "button" ? actions.map((action)=>{
          return {
            name,
            text: action,
            type,
            value: action.toLowerCase()
          };
        }) : [{
          name,
          type,
          text: `pick a ${name}`,
          options: actions.map((action)=>{
            return {
              text: action,
              value: action
            };
          })
        }]
      }
    ]
  };
};

// commands
const commands = {
  "/deploy": ()=>{
    // ここでなんかの処理を書く
    // ansible 叩くとか

    return messageBuilder(
      "デプロイするバージョン", "", "button", "version",
      ["0.0.1", "0.0.2", "0.0.3"]);
  }
};

Object.keys(commands).forEach((command)=>{
  app.post(`${command}`, (req, res, next)=>{
    if(!req.body) return null;
    if(req.body.command){
      return res.json(commands[req.body.command]());
    }else if(req.body.payload){
      const payload = JSON.parse(req.body.payload);
      const action = payload.actions[0];
      const type = action.type;
      return res.json({
        text: `you choose ${type === "button" ? action.value : action.selected_options[0].value}`
      });
    }
    return res.json({text: "invalid message"});
  });
  app.post(`${command}/options`, (req, res, next)=>{
    res.json({});
  });
});


const server = http.createServer(app);
const port = process.env.PORT || 3000;
server.listen(port);
server.on("listening", ()=>{
  console.log(`listening on ${port}`);
});
server.on("error", (err)=>{
  console.error(err);
});