本記事は、 Magento Advent Calendar 2019 の17日目の記事になります。
もくじ
- そもそもどうして動的にカテゴリ商品を決める必要が出てくるか
- ツールの紹介
- ステップ1 Elasticseachをインストール&起動
- ステップ2 SmileSA/ElasticSuite をインストール&起動
- ステップ3 VirtualCategory(仮想カテゴリ)、ルールを作成
*環境はUbuntuを前提としています。詳しい理由が知りたい方はMagentoをインストールしてみよう | さくらのナレッジをご参照ください。
1. そもそもどうして動的にカテゴリ商品を決める必要が出てくるか
1.1 カテゴリの作成が楽
商品登録やカテゴリ作成にいちいち手間をかけなくてよくなります。
人的ミスが防げるのも良い点でしょう。
1.2 カテゴリの運用も楽
カテゴリを構成する商品を入れ替える際やカテゴリのお引越しする際などにも、ルールの変更をすればいいだけなのでまた楽チンです。
1.3 柔軟性のある運営ができる
割引のある商品だけを表示する、あるフラグの立っている商品だけを表示する、など柔軟性のある運営が可能です。
またブランドごと、商品のスペックごとなど、カスタム商品属性の値を使ってVirtual Categoryを作るとより自由度が上がって便利です。
条件の組み合わせを使ってあるブランドで割引中のものだけを表示、といったこともできます。
2. ツールの紹介
Elasticsearch
検索と分析に使われるツールで、今回紹介する機能はこちらに依存します。
Magentoの標準では検索がイマイチなので基本どのプロジェクトにも導入をおすすめします。
商品検索の精度や速度が改善したり、仮想カテゴリの実現などが容易になります。
Magento2.3ではElasticsearch6.x系を使用します。(DevDocsのリンクから飛ぶと7.x系のインストラクションにいく罠があるのでご注意)
Smile ElasticSuite
Elasticsearchを元にした、Magentoですぐに商用パッケージのような機能が使えるようになるモジュール群です。
MagentoにElasticsearchを使う際は基本こちらを使っていきます。
今回はその中でもSmile_ElasticsuiteVirtualCategoryを利用します。
Magento2.3では ElasticSuite2.8.x系を使用します。
3. ステップ1 Elasticseachをインストール
3.1 Javaのインストール
// パッケージの更新 & OpenJDKをインストール
sudo apt-get update && sudo apt-get install default-jdk

// インストールVersionを確認
java -version
以下のようなアウトプットが出たらOKです。
openjdk version “1.8.0_222”
OpenJDK Runtime Environment (build 1.8.0_222-8u222-b10-1ubuntu1~16.04.1-b10)
OpenJDK 64-Bit Server VM (build 25.222-b10, mixed mode)
3.2 Elasticsearchのインストール&起動
// Public signing keyを取得
wget -qO - https://artifacts.elastic.co/GPG-KEY-elasticsearch | sudo apt-key add -

// APTレポジトリをインストール
sudo apt-get install apt-transport-https

// aptのソースにレポジトリ定義を保存
echo “deb https://artifacts.elastic.co/packages/6.x/apt stable main” | sudo tee -a /etc/apt/sources.list.d/elastic-6.x.list

// パッケージの更新 & Elasticsearchをインストール
sudo apt-get update && sudo apt-get install elasticsearch

// Elasticsearchを起動(systemdの場合)
sudo systemctl start elasticsearch.service

// システム立ち上げ時に自動的に起動するようにする
sudo /bin/systemctl daemon-reload
sudo /bin/systemctl enable elasticsearch.service
curlで起動を確認して
以下のようなアウトプットが出たら起動完了。
curl -X GET "localhost:9200/?pretty"


{
  “name” : “u_euS1C”,
  “cluster_name” : “elasticsearch”,
  “cluster_uuid” : “7se8J-n5Sem0Ee1CAoNayQ”,
  “version” : {
    “number” : “6.8.5”,
    “build_flavor” : “default”,
    “build_type” : “deb”,
    “build_hash” : “78990e9”,
    “build_date” : “2019-11-13T20:04:24.100411Z”,
    “build_snapshot” : false,
    “lucene_version” : “7.7.2”,
    “minimum_wire_compatibility_version” : “5.6.0”,
    “minimum_index_compatibility_version” : “5.0.0”
  },
  “tagline” : “You Know, for Search”
}
3.3 Elasticsuiteに必要なプラグインもインストールしておく
cd /usr/share/elasticsearch

bin/elasticsearch-plugin install analysis-phonetic
bin/elasticsearch-plugin install analysis-icu
これでElasticsearchの準備はできました。
4. ステップ2 SmileSA/ElasticSuite をインストール
DocumentRootに移動し、composer.jsonを編集して
“require”: {
   “smile/elasticsuite”: “^2.8”,
}
を追加。
その後、
composer update
を実行してモジュールをインストールします。
次にモジュールの有効化です。
bin/magento module:enable Smile_ElasticsuiteCore Smile_ElasticsuiteCatalog Smile_ElasticsuiteCatalogRule Smile_ElasticsuiteCatalogOptimizer Smile_ElasticsuiteVirtualCategory

// モジュール有効/無効時には毎回setup:upgradeが必要です。
bin/magento setup:upgrade
これでElasticsuiteが使えるようになりました。
5. ステップ3 VirtualCategory(仮想カテゴリ)を作成
まずは管理画面から普通にカテゴリを追加します。
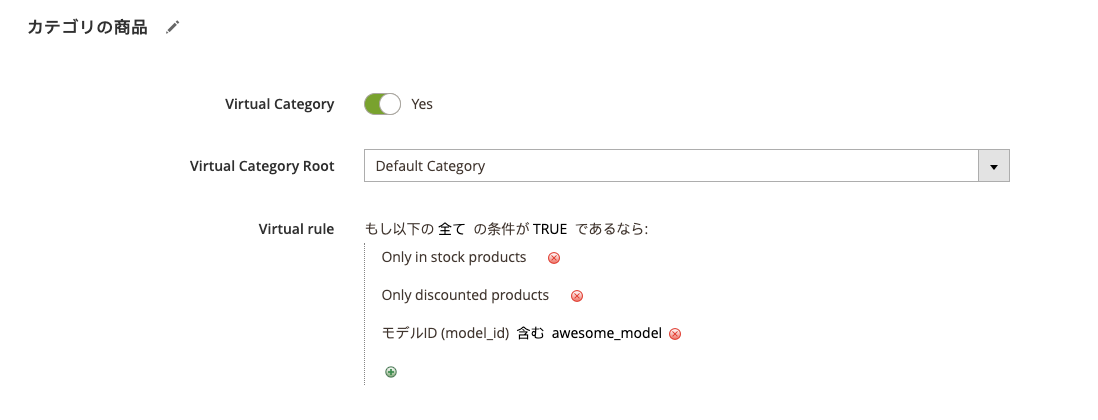
するとカテゴリの商品を選ぶタブにVirtual Categoryにするかどうか選ぶボタンが出るので、Yesを選びます。
ルールを追加します。
インデックスを再構築して完成です。
MagentoのサーバーでProject Rootまで移動して、
bin/magento indexer:reindex elasticsuite_categories_fulltext
お疲れさまでした。
効率よくカテゴリの運用を行うヒントになれば幸いです!

