前編で取り組んだこと・今回の取組内容
前編では、データセットの準備まで行いました。
取り組んだ背景やデータセットなど準備については前編をご覧ください。
後編では、SageMakerでの学習とエンドポイント作成を行います。
Part3:学習
先程のデータを使って、ガンが良性か悪性か分類するモデルを学習させていきます。
今回はxgboostを使いました。Sagemakerのチュートリアルを参考にしながら書いています。
ここでinstance_typeを指定しますが、学習量に見合ったインスタンスを使用することをオススメします。(いきなり大きすぎるインスタンスを使うとコストが跳ね上がってしまうので)
仮で'ml.m5.large'を指定していますが、今回のデータ量であればもっと小さなインスタンスでも十分動作すると思いますので、料金表にあるインスタンスタイプとにらめっこしながら選択いただければと思います。
ちなみに、sagemakerSDKにはxgboostフレームワークの他にも色々なアルゴリズムが含まれているようです。
# Part3:学習
## XGBoostイメージURIとXGBoostコンテナを指定
xgboost_container = sagemaker.image_uris.retrieve("xgboost", my_region, "latest")

## 学習用インスタンスの設定
xgb = sagemaker.estimator.Estimator(
    xgboost_container,
    role,
    instance_count=1,
    instance_type='ml.m5.large',
    output_path=f's3://{bucket}/{prefix}/output',
    sagemaker_session=sagemaker.Session()
)

## ハイパーパラメータの設定
xgb.set_hyperparameters(
    max_depth=5,
    eta=0.2,
    gamma=4,
    min_child_weight=6,
    subsample=0.8,
    silent=0,
    objective='binary:logistic',
    num_round=100
)

## 学習の実行
s3_input_train = sagemaker.inputs.TrainingInput(s3_data=f's3://{bucket}/{prefix}/train', content_type='csv')
xgb.fit({'train': s3_input_train})
学習が完了したら、SageMakerダッシュボードの「推論>モデル」に作成されたモデルがホスティングされていると思います。

Part4:モデルのデプロイ・エンドポイント作成
学習が終わったら、作成したモデルをデプロイしてエンドポイントを作成します。
ここでも適切なインスタンスタイプとエンドポイントの名前を指定しましょう。
xgb_predictor = xgb.deploy(
    initial_instance_count=1,
    instance_type='ml.t2.medium',
    endpoint_name='endpoint-qiita-test'
)
エンドポイント作成が完了したら、先ほどと同じくSageMakerダッシュボードの「推論>エンドポイントモデル」に作成されたモデルがホスティングされていると思います。

エンドポイントが作成し終わりましたら、ホスティングされたモデルを消去しても動きます。
モデルのホスティングにも料金がかかるので、もし不必要であればこの段階で消しておくといいかもしれません。
Part5:エンドポイントを使った予測実行(モデルの評価)
最後に、先ほど作成したエンドポイントを使い、testデータで予測をしてみました。
# Part5:エンドポイントを使った予測実行(モデルの評価)
client = boto3.client('sagemaker-runtime')

## データセットを配列に変換
test_data_array = X_test.values.tolist()
predictions_array = sum(y_test.values.tolist(), []) #2次元配列を1次元配列に変換


i = 0
result_data_array = []

for i in range(len(test_data_array)):
    request = list()
    for hoge in list(test_data_array[i]):
        request.append(str(hoge))
    request = ','.join(request)

    print(test_data_array[i])

    ##エンドポイント実行
    response = client.invoke_endpoint(
        EndpointName = 'endpoint-qiita-test',
        ContentType = 'text/csv',
        Accept = 'application/json',
        Body = request
    )

    #予測結果出力
    for hoge in response['Body']:
        result_data_array.extend([[float(hoge),predictions_array[i]]])
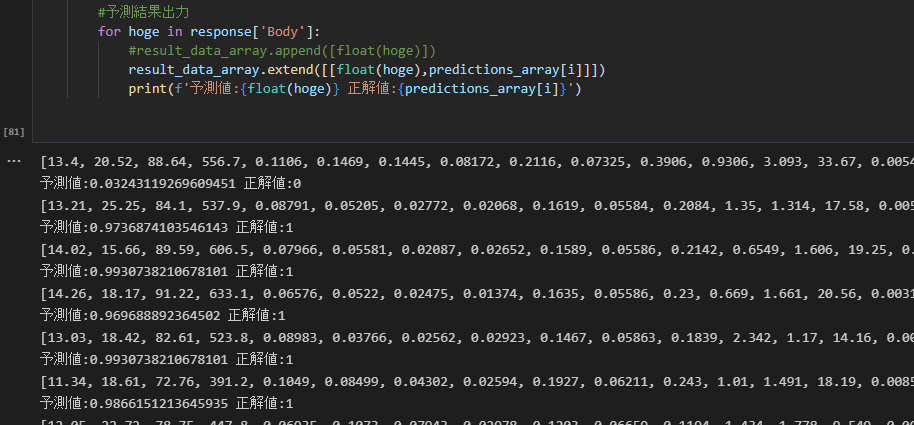
        print(f'予測値:{float(hoge)} 正解値:{predictions_array[i]}')
print文で、予測値(0~1の範囲)と、testデータにおける正解値(0,1)が各特徴量毎に算出されます。

予測値は0~1の範囲で出力されるので、閾値を0.5と置いて、0.5未満だと0・0.5以上だと1というように分類することにしました。
一番上の列だと、予測値が0.03243119269609451で、正解値が0ですので、予測結果が当たっているということが見てとれます。
ただこれですと全体の結果がいまいちよくわからないので、混同行列を作成しました。
## 混同行列の作成
dat = np.round(result_data_array)
ans_array = [r[0] for r in dat]

cm = pd.crosstab(index=np.round(ans_array), columns=np.round(predictions_array), rownames=['Observed'], colnames=['Predicted'])
tn = cm.iloc[0,0]; fn = cm.iloc[1,0]; tp = cm.iloc[1,1]; fp = cm.iloc[0,1]; p = (tp+tn)/(tp+tn+fp+fn)*100

print("\n{0:<20}{1:<4.1f}%\n".format("Overall Classification Rate: ", p))
print("{0:<15}{1:<15}{2:>8}".format("Predicted", "malignant(0:悪性)", "benign(1:良性)"))
print("{0:<15}{1:<2.0f}% ({2:<}){3:>6.0f}% ({4:<})".format("malignant(0:悪性)", tn/(tn+fn)*100,tn, fp/(tp+fp)*100, fp))
print("{0:<16}{1:<1.0f}% ({2:<}){3:>7.0f}% ({4:<}) \n".format("benign(1:良性)", fn/(tn+fn)*100,fn, tp/(tp+fp)*100, tp))
結果は94.7%が正しく分類できたと示されています。
データが少ないのでモデルの精度は度外視いただきたいのですが、偽陽性(False Positive)や偽陰性(False Negative)の値を見ながら、ハイパーパラメータの調整をしていくべきだと考えます。
ここまでで予測は終了です。
SageMakerで無駄なコストを生じさせないために、エンドポイントやS3に保存したモデルを削除しておくことをオススメします。
# エンドポイントの削除
xgb_predictor.delete_endpoint(delete_endpoint_config=True)

# トレーニングアーティファクトとS3バケットの削除
bucket_to_delete = boto3.resource('s3').Bucket(bucket_name)
bucket_to_delete.objects.all().delete()
最後に
お試しでローカルPCからSageMakerの環境を触ってみました。
今回はサンプルデータで行いましたが、今度は大きなデータやXgboost以外のモデルを使って学習をしたときに、どのような対応が必要かを探っていければと思います。
