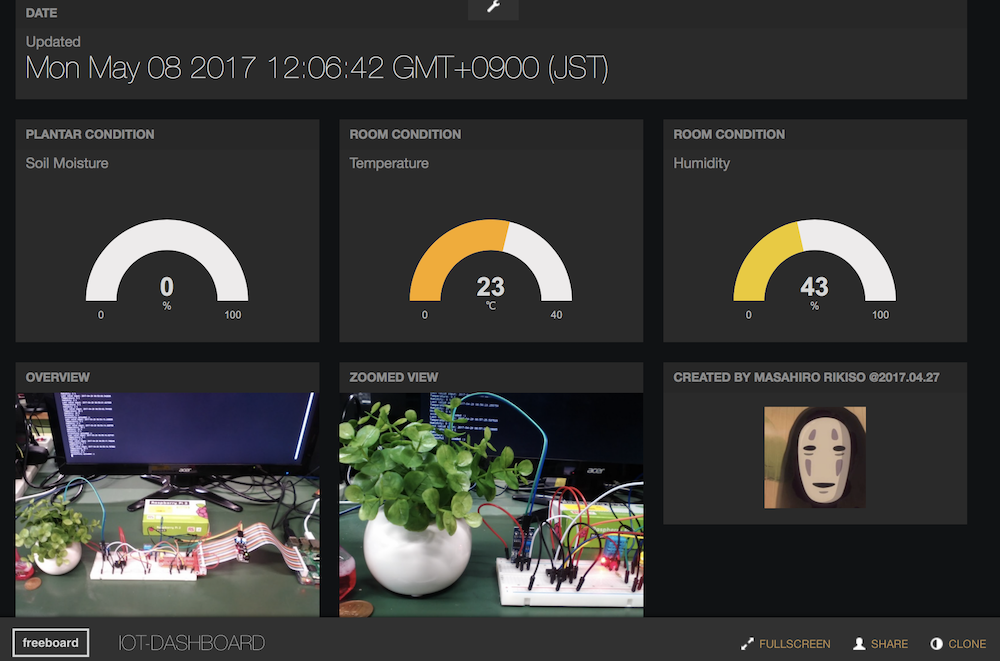
WebAPIを使って、dweet.ioという、IoTデータのメッセージングサービスを利用してみます。下の画像は Raspberry Piとdweet.ioのサービスを利用して作ってみた植物状態監視ダッシュボードです。(詳細は別記事にてご紹介予定です)
方法1. Terminalコマンドで WebAPIにアクセスする
最後はpythonにやらせるとしても、動作確認がterminalでサクッとできると便利です。
HTTPieのインストール
$ brew install httpie
Github Starsが30000もついている鉄板ライブラリです!ハイライトでResponseヘッダーがすごく見やすい。
インストールすると httpコマンドで HTTPメソッドが使えるようになります。(デフォルトはGETメソッドです)
データの登録
dweet.ioは https://dweet.io/dweet/for/<id>のURLに、?key=valueのqueryを投げることで、簡単にデータを登録できます。(POSTメソッドを使うと、JSONデータを登録することもできます(後述))
# -v オプションで request_headerも出力できます
$ http https://dweet.io/dweet/for/my-thing-name?hello=world
HTTP/1.1 200 OK
Access-Control-Allow-Origin: *
Connection: keep-alive
Content-Encoding: gzip
Content-Type: application/json
Date: Mon, 08 May 2017 03:13:38 GMT
Transfer-Encoding: chunked

{
    "by": "dweeting",
    "the": "dweet",
    "this": "succeeded",
    "with": {
        "content": {
            "hello": "world"
        },
        "created": "2017-05-08T03:13:38.230Z",
        "thing": "my-thing-name",
        "transaction": "54f19ae4-3428-4ea3-8275-1a77d49a11a0"
    }
}
データの取得
dweet.ioは https://dweet.io/get/latest/dweet/for/<id>のURLにGETメソッドでアクセスすることで、JSON形式でデータを取得できます。
$ http https://dweet.io/get/latest/dweet/for/my-thing-name
HTTP/1.1 200 OK
Access-Control-Allow-Origin: *
Connection: keep-alive
Content-Encoding: gzip
Content-Type: application/json
Date: Mon, 08 May 2017 03:13:55 GMT
Transfer-Encoding: chunked

{
    "by": "getting",
    "the": "dweets",
    "this": "succeeded",
    "with": [
        {
            "content": {
                "hello": "world"
            },
            "created": "2017-05-08T03:13:38.230Z",
            "thing": "my-thing-name"
        }
    ]
}
方法2. Pythonから WebAPIにアクセスする
Requestsのインストール
$ pip install requests
Requestsは非常に直感的なAPIを持ち、人間にとって使いやすいPython用のHTTPライブラリです。こちらもGitHub Starsが25000と鉄板のライブラリです。
Requestsライブラリの使い方は以下の通りです。公式の quickstartが非常にまとまった documentになっていてオススメです。
import requests

# get
r = requests.get('url')
# get: query付き
payload = {'key1': 'value1', 'key2': 'value2'}
r = requests.get('url', params=payload)

# post
r = requests.post('url', data = {'key':'value'})

# cookies
r = requests.get('url')
cookie = r.cookies['cookie_name']
r = requests.get('url', cookies=cookie)

# response
print(r.url)
print(r.status_code)
print(r.headers)
print(r.text)
print(r.content)
print(r.json())
urlが間違っていた場合の動作:
- siteが存在しない: 例外を吐いて終了する
- pageが存在しない: 何かしらのobjectが返ってくる (status_code=404など)
データの登録・取得
Requestsを使った、dweet.ioへのデータ登録・取得は以下のようにしてできます
import requests
import pprint
import time

# データの登録: post
for i in range(10):
  r = requests.post('https://dweet.io/dweet/for/iot-data', data = {'temp':'23', 'humid':'40'})
  time.sleep(1)

# データの取得: get
r = requests.get("https://dweet.io/get/latest/dweet/for/iot-data")
pprint.pprint(r.json())
{u'by': u'getting',
 u'the': u'dweets',
 u'this': u'succeeded',
 u'with': [{u'content': {u'humid': 40, u'temp': 23},
            u'created': u'2017-05-08T04:04:18.887Z',
            u'thing': u'iot-data'}]}