目次
1.はじめに
2.実行環境
3.制作の流れ
4.アプリの実装
5.まとめ
1.はじめに
こんにちは。今回、プログラミング初心者が機械学習を学び、画像認識のWEBアプリを作成してみました。
作成したWEBアプリは「花の画像を識別し、その花の花言葉を表示する」という内容になります。
学び始めた当初は「pythonとは?」という状態でしたが、なんとかアプリの実装まで頑張ってみましたので、温かい目でご覧いただけますと幸いです。
2.実行環境
・Visual Studio Code
・Google Colaboratory
3.制作の流れ
■Step1.学習用データの準備
こちらの記事を参考に「向日葵」「チューリップ」「パンジー」「アジサイ」「カーネーション」の5種類の花の画像を集めました。
参考文献:【Python】画像認識で世界のタワーの識別
https://qiita.com/ogssus0011/items/0c5325a91d2788046e1b
#pythonライブラリの「icrawler」でBing用モジュールをインポート
from icrawler.builtin import BingImageCrawler

#sunflowerをキーワードとする
search_word = "sunflower"
#ダウンロードするキーワード
crawler = BingImageCrawler(storage={'root_dir': "/content/drive/MyDrive/seikabutsu/image/sunflower"})
#ダウンロードする画像の最大枚数は200枚
crawler.crawl(keyword=search_word, max_num=200)

#tulipをキーワードとする
search_word = "tulip"
#ダウンロードするキーワード
crawler = BingImageCrawler(storage={'root_dir': "/content/drive/MyDrive/seikabutsu/image/tulip"})
#ダウンロードする画像の最大枚数は200枚
crawler.crawl(keyword=search_word, max_num=200)

#carnationをキーワードとする
search_word = "carnation"
#ダウンロードするキーワード
crawler = BingImageCrawler(storage={'root_dir': "/content/drive/MyDrive/seikabutsu/image/carnation"})
#ダウンロードする画像の最大枚数は200枚
crawler.crawl(keyword=search_word, max_num=200)

#pansyをキーワードとする
search_word = "pansy"
#ダウンロードするキーワード
crawler = BingImageCrawler(storage={'root_dir': "/content/drive/MyDrive/seikabutsu/image/pansy"})
#ダウンロードする画像の最大枚数は200枚
crawler.crawl(keyword=search_word, max_num=200)

#hydrangeaをキーワードとする
search_word = "hydrangea"
#ダウンロードするキーワード
crawler = BingImageCrawler(storage={'root_dir': "/content/drive/MyDrive/seikabutsu/image/hydrangea"})
#ダウンロードする画像の最大枚数は200枚
crawler.crawl(keyword=search_word, max_num=200)
ー苦戦した点ー
最初は花の名前を漢字で表記していたのですが、閲覧禁止を示すエラーコード403やページが無いなどのエラーコード404などまた、タイムアウト等のエラーが発生してしまい、最大枚数通りに取集することができませんでした。
漢字ではなく英語で花の名前を指定することで収集率が上がったので、英語表記に直し最大枚数を増やしたことで100枚以上画像を収集することができました。
■Step2.画像の前処理
収集した画像データを確認し、花束などほかの花が一緒に写っているような画像を削除しました。
例:向日葵以外の花が写っている

■Step3.モデルの定義
最終的に記述したコードは下記の通りとなります。
import os#osモジュール
import cv2#画像や動画を処理するオープンライブラリ
import numpy as np#python拡張モジュール
import matplotlib.pyplot as plt#グラフ可視化
from tensorflow.keras.utils import to_categorical#正解ラベルをone-hotベクトルで求める
from tensorflow.keras.layers import Dense, Dropout, Flatten, Input#全結合層、過学習予防、平滑化、インプット
from tensorflow.keras.applications.vgg16 import VGG16#学習済モデル
from tensorflow.keras.models import Model, Sequential#線形モデル
from tensorflow.keras import optimizers#最適化関数

path_sunflower = os.listdir('/content/drive/MyDrive/test_seika/test_img/t_sunflower/')
path_tulip = os.listdir('/content/drive/MyDrive/test_seika/test_img/t_tulip/')
path_pansy = os.listdir('/content/drive/MyDrive/test_seika/test_img/t_pansy/')
path_hydrangea = os.listdir('/content/drive/MyDrive/test_seika/test_img/t_hydrangea/')
path_carnation = os.listdir('/content/drive/MyDrive/test_seika/test_img/t_carnation/')

img_sunflower = []
img_tulip = []
img_pansy = []
img_hydrangea = []
img_carnation = []

for i in range(len(path_sunflower)):
    img = cv2.imread('/content/drive/MyDrive/test_seika/test_img/t_sunflower/' + path_sunflower[i])
    b,g,r = cv2.split(img)
    img = cv2.merge([r,g,b])
    img = cv2.resize(img, (50,50))
    img_sunflower.append(img)

for i in range(len(path_tulip)):
    img = cv2.imread('/content/drive/MyDrive/test_seika/test_img/t_tulip/' + path_tulip[i])
    b,g,r = cv2.split(img)
    img = cv2.merge([r,g,b])
    img = cv2.resize(img, (50,50))
    img_tulip.append(img)

for i in range(len(path_pansy)):
    img = cv2.imread('/content/drive/MyDrive/test_seika/test_img/t_pansy/' + path_pansy[i])
    b,g,r = cv2.split(img)
    img = cv2.merge([r,g,b])
    img = cv2.resize(img, (50,50))
    img_pansy.append(img)

for i in range(len(path_hydrangea)):
    img = cv2.imread('/content/drive/MyDrive/test_seika/test_img/t_hydrangea/' + path_hydrangea[i])
    b,g,r = cv2.split(img)
    img = cv2.merge([r,g,b])
    img = cv2.resize(img, (50,50))
    img_hydrangea.append(img)

for i in range(len(path_carnation)):
    img = cv2.imread('/content/drive/MyDrive/test_seika/test_img/t_carnation/' + path_carnation[i])
    b,g,r = cv2.split(img)
    img = cv2.merge([r,g,b])
    img = cv2.resize(img, (50,50))
    img_carnation.append(img)

X = np.array(img_sunflower + img_tulip + img_pansy + img_hydrangea + img_carnation)
y = np.array([0]*len(img_sunflower) + [1]*len(img_tulip) + [2]*len(img_pansy) + [3]*len(img_hydrangea) + [4]*len(img_carnation))

rand_index = np.random.permutation(np.arange(len(X)))
X = X[rand_index]
y = y[rand_index]
label_num = list(set(y))

#配列のラベルをシャッフルする
rand_index = np.random.permutation(np.arange(len(X)))
X = X[rand_index]
y = y[rand_index]

# データの分割
X_train = X[:int(len(X)*0.8)]
y_train = y[:int(len(y)*0.8)]
X_test = X[int(len(X)*0.8):]
y_test = y[int(len(y)*0.8):]
print(X_train.shape)
print(y_train.shape)
print(X_test.shape)
print(y_test.shape)

#正解ラベルをone-hotベクトルで求める
y_train = to_categorical(y_train)
y_test = to_categorical(y_test)

#転移学習のモデルとしてVGG16を使用
input_tensor = Input(shape=(50, 50, 3))
vgg16 = VGG16(include_top=False, weights='imagenet', input_tensor=input_tensor)

#モデルの定義~活性化関数シグモイド
top_model = Sequential()
top_model.add(Flatten(input_shape=vgg16.output_shape[1:]))
top_model.add(Dense(256, activation='relu'))
top_model.add(Dropout(0.5))
top_model.add(Dense(128, activation="relu"))
top_model.add(Dropout(0.5))
top_model.add(Dense(5, activation='softmax'))

model = Model(inputs=vgg16.input, outputs=top_model(vgg16.output))

for layer in model.layers[:19]:
  layer.trainable = False

model.compile(loss='categorical_crossentropy',
              optimizer=optimizers.SGD(learning_rate=1e-4,momentum=0.9),
              metrics=['accuracy'])
ー苦戦した点ー
アクティブ化関数の違いについて
アプリを作成する前に「男女識別」について学んだ際は「sigmoid関数」を使用していたため、最初はそのまま何も考えず「sigmoid関数」を使用してしまいました。
しかし再度アクティブ化関数について復習した結果、『2項目分類=sigmoidi、3項目以上の分類=softmaxを使用する』ということに気づきました。
男女識別別では2項目分類でしたが、今回は5種類の花の分類となるため「softmax関数」を使用することで、精度も向上しました。
■Step4.モデルの学習
#学習
history=model.fit(X_train, y_train, batch_size=15, epochs=15, validation_data=(X_test, y_test))
ー苦戦した点ー
最初はepochs数が多い方がよいと思い、100に設定してみましたが、あまりにも実行に時間がかかってしまいました。しかし、実際100でも10でも正解率に大きな変動はありませんでした。
最終的にはepochs数は15に落ち着きました。
■Step5.モデルの評価と予測
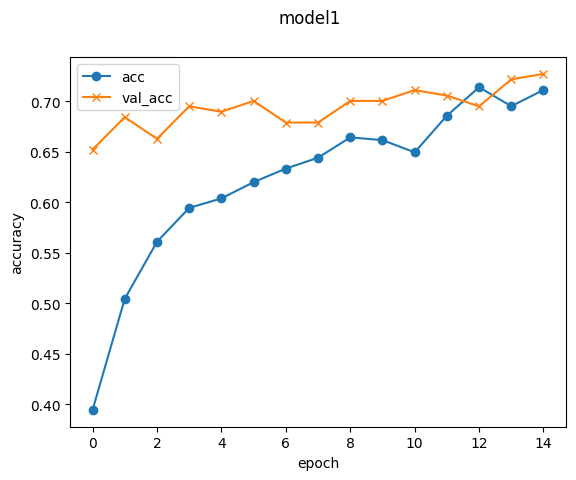
トレーニングデータに対する精度と検証データに対する精度をグラフで表します。
# 精度の評価
scores = model.evaluate(X_test, y_test, verbose=1)
print('Test loss:', scores[0])
print('Test accuracy:', scores[1])

# 可視化
plt.plot(history.history['accuracy'], label='acc', ls='-', marker='o')
plt.plot(history.history['val_accuracy'], label='val_acc', ls='-', marker='x')
plt.ylabel('accuracy')
plt.xlabel('epoch')
plt.suptitle('model1', fontsize=12)
plt.legend()
plt.show()
model.summary()
ー苦戦した点ー
検証データに対する精度がトレーニングデータに対する精度を下回ってしまうのを改善したく、いろいろと試行錯誤してみました。例えばバッチ数やepochs数を増やしてみたりしましたが、効果はありませんでした。
そこでレイヤーを下記の通り増やしてみました。
変更前
top_model.add(Flatten(input_shape=vgg16.output_shape[1:]))
top_model.add(Dense(256, activation='relu'))
top_model.add(Dropout(0.5))
top_model.add(Dense(5, activation='softmax'))
変更後
top_model.add(Flatten(input_shape=vgg16.output_shape[1:]))
top_model.add(Dense(256, activation='relu'))
top_model.add(Dropout(0.5))
top_model.add(Dense(128, activation="relu"))
top_model.add(Dropout(0.5))
top_model.add(Dense(5, activation='softmax'))
最終的にはトレーニングデータに対する精度より検証データに対する精度が高い形になりました。
accuracy: 0.72

■Step6.モデルの保存
検証データに対する精度がトレーニングデータに対する精度を上回り、正解率も7割を超えたので作成したモデルをドライブに保存します。
#モデルを保存
CDIR = os.getcwd()
model.save(os.path.join(CDIR, 'my_model.h5'))
4.アプリの実装
作成したアプリはこちらです。
https://flowerlang-app.onrender.com/
5.まとめ
機械学習を学ぶ前は「本当に無知な自分がアプリまで作成できるのか?」ととっても不安でした。実際最初から最後まで苦戦していましたが、何とか形にできて安心しました。
今回は花の種類を5種類にしましたが、花の色によって花言葉も変わるものもあるので、今後は種類を増やしたり色識別も組み込んだりして学びを深めていきたいと思います。
最後までご覧いただきありがとうございました。
(このブログはAidemy Premiumのカリキュラムの一環で、受講修了条件を満たすために公開しています)


