プリザンターの予定をAPIで取得して、トースト通知を表示させたいと思います。
.NET(C#)のWPFでつくります。
つくったものは以下にあります。
準備
- windows10か11 .NET9 vscode
- dotnet new console -n ToastNotificationsPleasanter
- cd ToastNotificationsPleasanter
- dotnet add package Mi
- crosoft.Toolkit.Uwp.Notifications
WPFをつくっていく
ユーザーインターフェイス
リマインダーを開始・終了するボタンと、その状況を表示するだけです。

MainWindow.xaml
    <StackPanel>
        <Button x:Name="AppButton" Content="リマインダーの開始・終了" />
        <TextBlock x:Name="AppTextBlock" Text="aaa" TextWrapping="Wrap" Padding="10" />
    </StackPanel>
起動時とボタンの処理
- MainWindow:ボタンへの登録など
- Button_Click:クリックでリマインダーの開始・停止をする
- MainWindow_Closing:閉じた時のToastも消す
- ToastNotificationManagerCompat_OnActivated:トーストをクリックした時にページを開く
MainWindow.xaml.cs
using System.ComponentModel;
using System.Configuration;
using System.Diagnostics;
using System.Windows;
using Microsoft.Toolkit.Uwp.Notifications;

namespace ToastNotificationsPleasanter;

public partial class MainWindow : Window
{
    public MainWindow()
    {
        InitializeComponent();
        _ = new ToastNotifications(300000);
        _ = new ScheduleAPI();
        Loaded += new RoutedEventHandler(Button_Click);
        AppButton.Click += Button_Click;
        Closing += new CancelEventHandler(MainWindow_Closing);
        ToastNotificationManagerCompat.OnActivated += ToastNotificationManagerCompat_OnActivated;
    }
    private void Button_Click(object sender, RoutedEventArgs e)
    {
        AppTextBlock.Text = ToastNotifications.ToastStateChange()
                            ? "リマインダーを起動しています"
                            : "リマインダーを停止しています";
    }
    private void MainWindow_Closing(object? sender, CancelEventArgs e)
    {
        ToastNotificationManagerCompat.Uninstall();
    }
    public static void ToastNotificationManagerCompat_OnActivated(ToastNotificationActivatedEventArgsCompat e)
    {
        var args = ToastArguments.Parse(e.Argument);
        if (args.Count is 0) return;
        Console.WriteLine("通知をクリック" + args["action"]);
        Process.Start(
            new ProcessStartInfo(ConfigurationManager.AppSettings["PageUrl"] + args["action"])
            { UseShellExecute = true }
        );
    }
}
スケジュールを取得する
プリザンターからAPIでスケジュールを取得します。
- CreateContent:問い合わせの時のbody部分をつくります
- targetStatus:100が未完了、afterMinute:15分後までを対象
- フィルター等についてはこちらのマニュアル
- var apiKey = "*************";へはAPIキー
- GetScheduleAsync:スケジュールを取得します
ScheduleAPI.cs
using System.Net.Http;
using System.Text.Json;
using System.Text;
using System.Configuration;

namespace ToastNotificationsPleasanter;

public class Schedule
{
    public int IssueId { get; set; }
    public string? Title { get; set; }
    public string? StartTime { get; set; }
}

public class ScheduleAPI
{
    public static List<Schedule>? ScheduleList { get; set; }
    public ScheduleAPI()
    {
        ScheduleList = new();
    }
    public static StringContent CreateContent(int targetStatus, int afterMinute)
    {
        var requestBody = new
        {
            ApiVersion = 1.1,
            ApiKey = ConfigurationManager.AppSettings["ApiKey"],
            View = new
            {
                ColumnFilterHash = new
                {
                    Status = targetStatus,
                    StartTime = $"[\"{DateTime.Now},{DateTime.Now.AddMinutes(afterMinute)}\"]"
                },
                ColumnSorterHash = new { StartTime = "asc" },
            }
        };
        return new StringContent(
            JsonSerializer.Serialize(requestBody),
            Encoding.UTF8, @"application/json"); ;
    }
    public static async Task<List<Schedule>?> GetScheduleAsync(StringContent content)
    {
        using var client = new HttpClient();
        var response = await client.PostAsync(
                        ConfigurationManager.AppSettings["ApiUrl"], content);
        if (!response.IsSuccessStatusCode) return null;
        var responseBody = await response.Content.ReadAsStringAsync();
        using JsonDocument doc = JsonDocument.Parse(responseBody);
        JsonElement root = doc.RootElement;
        var elements = root.GetProperty("Response").GetProperty("Data");
        var NewScheduleList = new List<Schedule>();
        for (int i = 0; i < elements.GetArrayLength(); i++)
        {
            if (ScheduleList is null) continue;
            if (ScheduleList.Any(x => x.IssueId ==
                elements[i].GetProperty("IssueId").GetInt32())) continue;
            ScheduleList.Add(new Schedule()
            {
                IssueId = elements[i].GetProperty("IssueId").GetInt32(),
            });
            NewScheduleList.Add(new Schedule()
            {
                IssueId = elements[i].GetProperty("IssueId").GetInt32(),
                Title = elements[i].GetProperty("Title").GetString(),
                StartTime = elements[i].GetProperty("StartTime").GetDateTime().ToString()
            });
        }
        return NewScheduleList;
    }
}
トースト通知の設定
通知したい内容を設定します。
- ToastNotifications:タイマー設定
- timerInterval:実行する間隔
- SetToastAsync:トースト通知の内容
-
.SetToastScenario(ToastScenario.Reminder)でリマインダーにすると、複数であっても表示してくれます。していないと一つだけ順番に表示されていく - ToastStateChange:トーストをクリックした時に呼び出される処理
- MainWindowにToastNotificationManagerCompat.OnActivated += ToastNotificationManagerCompat_OnActivatedを入れている

ToastNotifications.cs
using Microsoft.Toolkit.Uwp.Notifications;

namespace ToastNotificationsPleasanter;

public class ToastNotifications
{
    public static System.Timers.Timer? ToastTimer { get; set; }
    public ToastNotifications(int timerInterval)
    {
        ToastTimer = new(timerInterval);
        ToastTimer.Elapsed += async (sender, e) => await SetToastAsync();
    }
    private static async Task SetToastAsync()
    {
        var scheduleList = await ScheduleAPI.GetScheduleAsync(
                            ScheduleAPI.CreateContent(100, 15));
        if (scheduleList is null) return;
        foreach (var li in scheduleList)
        {
            new ToastContentBuilder()
            .AddText(li.Title)
            .AddText(li.StartTime)
            .AddButton(new ToastButton()
                .SetContent("ページを開く")
                .AddArgument("action", li.IssueId.ToString())
            )
            .SetToastScenario(ToastScenario.Reminder)
            .AddToastInput(new ToastSelectionBox("snoozeTime")
            {
                DefaultSelectionBoxItemId = "1",
                Items =
                {
                    new ToastSelectionBoxItem("1", "1分後"),
                    new ToastSelectionBoxItem("5", "5分後"),
                    new ToastSelectionBoxItem("10", "10分後"),
                    new ToastSelectionBoxItem("15", "15分後"),
                }
            })
            .AddButton(new ToastButtonSnooze() { SelectionBoxId = "snoozeTime" })
            .Show();
        }
    }
    public static bool ToastStateChange()
    {
        if (ToastTimer is null) return false;
        Action action = ToastTimer.Enabled
            ? new Action(ToastTimer.Stop)
            : new Action(async () =>
            {
                ToastTimer.Start();
                await SetToastAsync();
            });
        action();
        return ToastTimer.Enabled;
    }
}
ApiKeyなど
ApiKeyなどはApp.configで設定しています。
<?xml version="1.0"?>
<configuration>
  <appSettings>
    <add key="ApiKey" value="***********"/>
    <add key="ApiUrl" value="http://localhost/api/items/1/get"/>
    <add key="PageUrl" value="http://localhost/items/"/>
  </appSettings>
</configuration>
その他
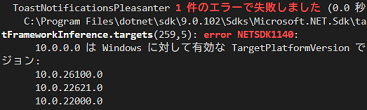
ターゲットフレームワーク
<TargetFramework>net9.0-windows10.0.20348.0</TargetFramework>のように指定しないとShowの所でエラーになります。
間違ってたら使える番号を列挙してくれました。
net9.0-windows10.0.0000としてビルドしたら以下のようにでるので、それをnet9.0-windows10.0.26100.0使います。
再通知・スヌーズ
単純に、再通知の時間指定する方法が分からなかったので、このページのままで、ボックス選択にしています。
内容と関係ないけど
pcによってvscodeでおかしくなることがありました。
現在のコンテキストに 'InitializeComponent' という名前は存在しませんとなる。
拡張機能のC# Dev Kitを有効にしているとダメみたいでした。
C#という方の拡張機能が働いてくれている。