前回は、はじめの一歩で Splunk のカスタムサーチコマンド (Custom Search Command) として、引数を取らずにイベントをひとつだけ生成するコマンドを作成しました。
今回は、引数を取り、引数で指定した個数のイベントを生成するようにコマンドをブラシアップします。
前回までのおさらい
前回: 「Splunk カスタムサーチコマンド (custom search command) 作成 ― はじめの一歩 ― - Qiita」
Generating commands タイプのカスタムサーチコマンド generatehello を作成しました。
# !/usr/bin/env python

import sys
import os
import time

sys.path.insert(0, os.path.join(os.path.dirname(__file__), "..", "lib"))
from splunklib.searchcommands import \
    dispatch, GeneratingCommand, Configuration, Option, validators

@Configuration()
class HelloWorldCommand(GeneratingCommand):
    """ %(synopsis)

    ##Syntax

    %(syntax)

    ##Description

    %(description)

    """
    def generate(self):
        return [{"_time": time.time(), "greeting": "hello, world"}]


dispatch(HelloWorldCommand, sys.argv, sys.stdin, sys.stdout, __name__)
このプログラムには、次のような課題があります。
- イベントは一つのみです。
- 「イベント」には表示されず、明示的にフィールドを参照しなければ "hello, world" が表示されません。
今回は、これを解消していきます。
Splunk 公式ブログ "Building custom search commands in Python part I – A simple Generating command" をベースとしています。(少し変更しています)
一つめの課題: イベント個数の指定
イベントの個数を指定できるようにします。
引数の指定方法 (受け取り方法)
引数は、デコレータ Option で指定します。
ここでは、簡単に Option をクラスとして呼び出して指定する方法で利用することにします。
作成した class HelloWorldCommand の中で、下のようにして呼び出します。
from splunklib.searchcommands import Option

@Configuration()
class HelloWorldCommand(GeneratingCommand):
    count = Option()
単に count という変数に値を格納するだけでなく、SPL 文のコマンドの引数として count を使用することも Option() によって同時に設定されています。SPL 文では、 | generatehello count=3 というように指定します。
Option クラスは、"Module structure - Python classes | Documentation | Splunk Developer Program" に記載があり、その API の説明が "splunklib.searchcommands — Splunk SDK for Python API Reference" の参照となっていますが、なかなか解読が難しいドキュメントです。
- class splunklib.searchcommands.Option(fget=None, fset=None, fdel=None, doc=None, name=None, default=None, require=None, validate=None)
Represents a search command option.
Required options must be specified on the search command line.
Example:
Short form (recommended). When you are satisfied with built-in or custom validation behaviors.
1
2
3
4
5
6
7
8
from splunklib.searchcommands.decorators import Option from splunklib.searchcommands.validators import Fieldname total = Option( doc=''' Syntax: total=<fieldname> Description: Name of the field that will hold the computed sum''', require=True, validate=Fieldname())
Option() の引数は class splunklib.searchcommands.Option(fget=None, fset=None, fdel=None, doc=None, name=None, default=None, require=None, validate=None) となっています。
fget、fset、fdel は、Option() 内部において Python built-in 関数 (デコレータ) の property に渡される引数で、それぞれ、参照、代入、解放 (del) のための関数を指定しますが、ここでは頭の片隅に留めておけばよいでしょう。
(Python property の使い方に慣れた方なら、ご存知のことと思います)
doc、name、default、require、validate は覚えておくべき引数です。
| 引数 | 説明 |
|---|---|
| doc | 引数の説明を書きます。 |
| name | 引数の名前を指定します。省略時は代入先の変数名と同じ名前が設定されます。 |
| default | 引数省略時のデフォルト値を設定します。 |
| require | 引数が必須かどうかを設定します。boolean型 (True/False) |
| validate | 引数の型を設定します。 |
name は、省略すると、代入先の変数名と同じ名前がサーチコマンドの引数名になりますが、逆に言えば、name を指定することで、変数名とは別な引数名を設定することができます。
validate は、splunklib.searchcommands.validators で定義されているものですが、SDK を覗くしかないようです。(説明は省略)
-
Boolean()..... * -
Code()..... * -
Duration()..... * Fieldname()-
File()..... * -
Integer()..... * -
List()..... * -
Map()..... * Match()OptionName()-
RegularExpression()..... * -
Set()..... *
が定義されています。
(import * で読み出した場合は、Boolean, Code, Duration, File, Integer, List, Map, RegularExpression, Set のみ)
参照先のブログのサンプルから少し変えて、require=False で、整数値、default=1 としてみましょう。
count = Option(require=False, validate=validators.Integer(), default=1)
繰り返し出力
count が引数として与えられます (省略時は 1) ので、これに合わせて繰り返し出力を行います。
前回は
return [{"_time": time.time(), "greeting": "hello, world"}]
としましたが、今回はすべての処理を待たずに値を返したいので、return でリストを返すのではなく、yield で個々のイベントを返すようにします。
        for i in range(0, self.count):
            yield {"_time": time.time(), "greeting": "hello, world"}
全体
ここまでを統合すると、プログラムは次のようになります。名前を変えて HelloWorld2.py とします。
# !/usr/bin/env python

import sys
import os
import time

sys.path.insert(0, os.path.join(os.path.dirname(__file__), "..", "lib"))
from splunklib.searchcommands import \
    dispatch, GeneratingCommand, Configuration, Option, validators

@Configuration()
class HelloWorldCommand(GeneratingCommand):
    """ %(synopsis)

    ##Syntax

    %(syntax)

    ##Description

    %(description)

    """
    count = Option(require=False, validate=validators.Integer(), default=1)

    def generate(self):

        for i in range(0, self.count):
            yield {"_time": time.time(), "greeting": "hello, world"}


dispatch(HelloWorldCommand, sys.argv, sys.stdin, sys.stdout, __name__)
動作テスト
開発環境内で動作テストを行います。
$ python3 HelloWorld2.py __EXECUTE__ count=3 < /dev/null

_time,__mv__time,greeting,__mv_greeting
1584952340.0804844,,"hello, world",
1584952340.0816362,,"hello, world",
1584952340.0816433,,"hello, world",
Splunk 環境への導入と動作確認
Splunk 環境での App 登録は前回行ったので、修正した HelloWorld2.py を helloword/bin にコピーします。
前回同様、オーナやグループ、パーミッションに気をつけてください。
cp HelloWorld2.py /opt/splunk/etc/apps/helloworld/bin/
名前を変えたので default/commands.conf も修正します。カスタムサーチコマンド名は generatehello2 とします。
# [commands.conf]($SPLUNK_HOME/etc/system/README/commands.conf.spec)
# Configuration for Search Commands Protocol version 2

[generatehello]
filename = HelloWorld.py
chunked = true
python.version = python3

[generatehello2]
filename = HelloWorld2.py
chunked = true
python.version = python3
btool でのチェックを行った後、debug/refresh か Splunk の再起動を行います。
Splunk 上での動作確認
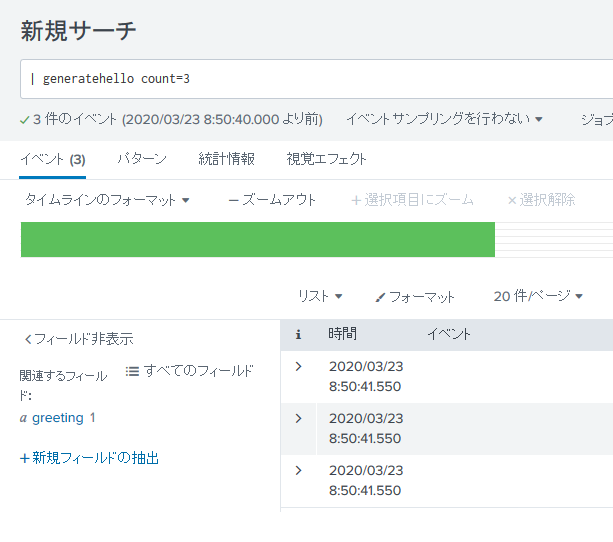
サーチで | generatehello count=3 と入力してみます。
3イベントの出力ができました。
二つめの課題: "hello, world" のイベント出力
ここまでのところ、左側の「関連するフィールド」の部分には greeting があり、そこをクリックすると "hello, world" の文字が出てきますが、イベントの表示には出てきません。
これは、_raw フィールドを明示的に指定することで表示できるようになります。
ここでは、単純に、greeting と同じものを _raw に入れて出力させます。
        greeting_msg = "hello, world"
        for i in range(0, self.count):
            yield {"_time": time.time(), "greeting": greeting_msg, "_raw": greeting_msg}
全体は以下の通り。
# !/usr/bin/env python

import sys
import os
import time

sys.path.insert(0, os.path.join(os.path.dirname(__file__), "..", "lib"))
from splunklib.searchcommands import \
    dispatch, GeneratingCommand, Configuration, Option, validators

@Configuration()
class HelloWorldCommand(GeneratingCommand):
    """ %(synopsis)

    ##Syntax

    %(syntax)

    ##Description

    %(description)

    """
    count = Option(require=False, validate=validators.Integer(), default=1)

    def generate(self):

        greeting_msg = "hello, world"
        for i in range(0, self.count):
            yield {"_time": time.time(), "greeting": greeting_msg, "_raw": greeting_msg}


dispatch(HelloWorldCommand, sys.argv, sys.stdin, sys.stdout, __name__)
一つめの時と同様、開発環境で動作確認 → Splunk 環境へコピー → btool によるチェック → Splunk のサーチで確認します。
$ python3 HelloWorld2.py __EXECUTE__ count=3 < /dev/null

_time,__mv__time,greeting,__mv_greeting,_raw,__mv__raw
1584954369.7098827,,"hello, world",,"hello, world",
1584954369.7099497,,"hello, world",,"hello, world",
1584954369.7099597,,"hello, world",,"hello, world",
_raw フィールドが増えていることを確認します。
cp HelloWorld2.py /opt/splunk/etc/apps/helloworld/bin/
($SPLUNK_HOME = /opt/splunk です)
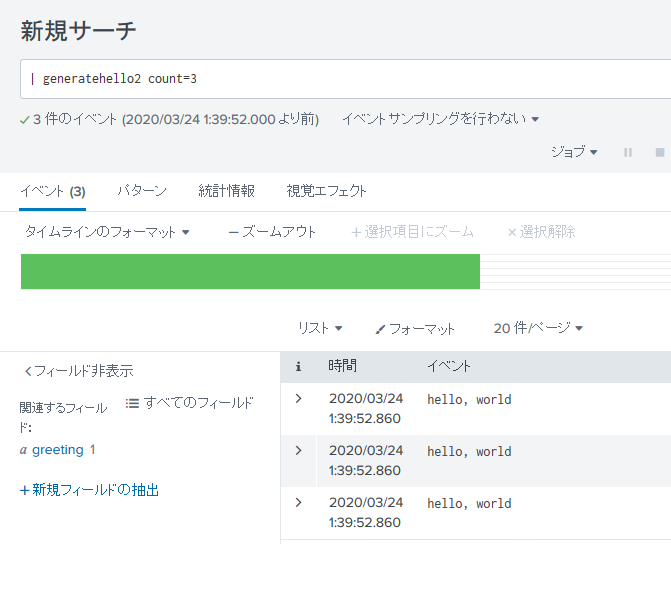
Splunk のサーチで動作を確認します。 ("| generatehello2 count=3")
「イベント」フィールドに表示されるようになりました。
まとめ
前回の「Splunk カスタムサーチコマンド (custom search command) 作成 ― はじめの一歩 ― - Qiita」で作成した Generating commands 型のカスタムサーチコマンドをブラシアップしました。
-
count引数で、出力するイベント数を指定できるようにしました。 -
_rawフィールドを出力し、サーチ結果に「イベント」が表示されるようにしました。
ここまでできると、Eventing commands に進むのも楽になるのではないでしょうか。
- 【2020/05/04 追記】GitHub でサンプルコードを公開しました → Splunk-CustomSearchCommand-FirstStep at step1-2

