この記事ではリアルタイム・ビジュアルフィードバック技術で制御するロボットシステムの「目」となるカメラの調整について、前回記事の補足として書きます。
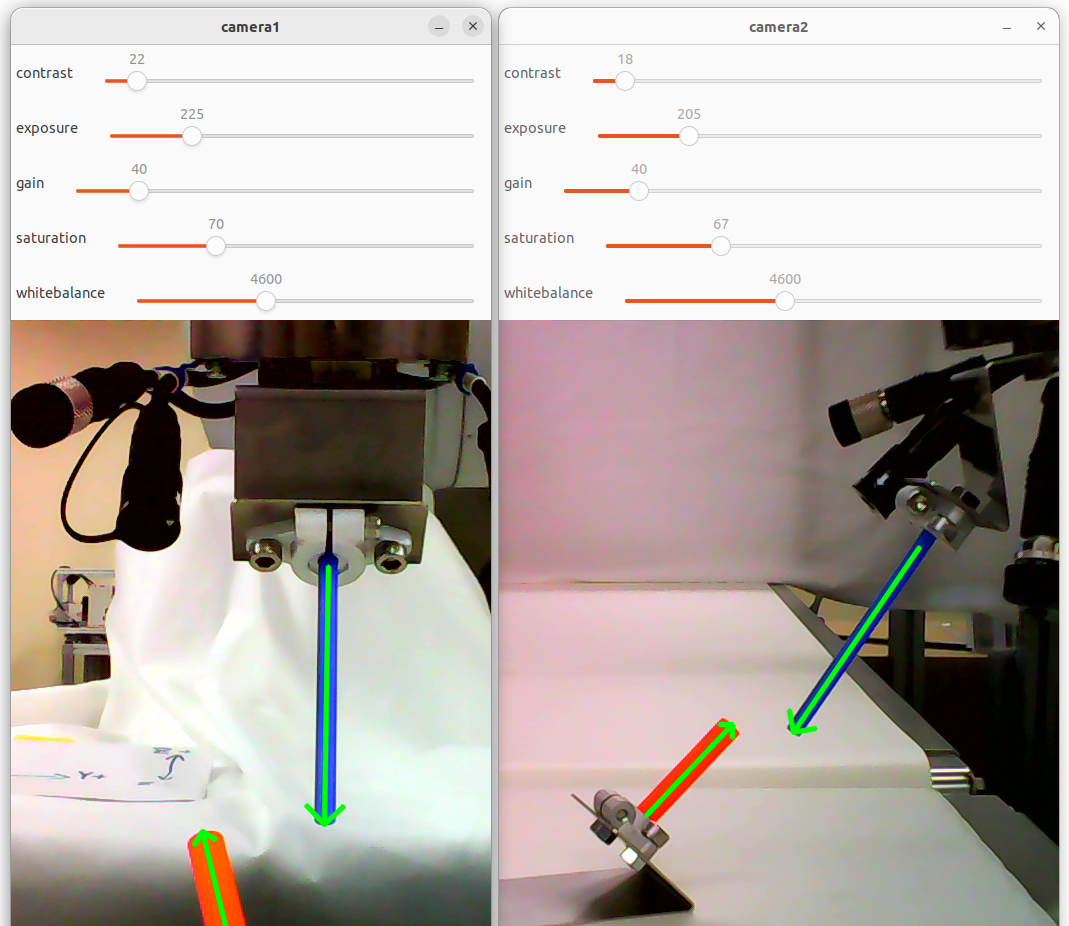
画像認識で使用するカメラの画像を見ながら各種パラメータの調整を行うトラックバーが用意されているのですが、使用するカメラの機種によってコントロールできる項目が異なるため、カメラごとに設定可能な項目を調べてトラックバーの内容を入れ替え、調整ができるように変更します。
動作環境
環境はチトセロボティクス社の「クルーボ (Crewbo)」です。
Ubuntu22上でロボット制御用ライブラリを含むCPPの開発環境が用意されており、OpenCVを使って画像を取り扱っています。
Crewbo環境以外でも同様のことは可能ですが、ここでは「クルーボ」のTutorialを進める上でのWebカメラの調整としてCrewbo環境での内容を記述します。
クルーボではIntel社のDepthカメラで深度画像を扱うRealSenseクラスも用意されていますが、ここではUVCでWebカメラを扱うUsbCameraクラスを使用しています。
クルーボについて
チトセロボティクス社の製品「クルーボ」は、産業用として利用されている6軸アームを動かすロボットのビジュアルフィードバック制御のコントローラです。製品の詳細は下記のチトセロボティクス社のサイトで見ることができます。
■内容物の写真やTutorialで提供されているソフトウェアの掲載、内容の改変、改変したソフトウェアの掲載はチトセロボティクス社から了解を得ています。
この記事の元になった前回の記事はこちらです。2台のWebカメラを使用してキャリブレーションや位置決めなしでロボットアーム先端のピンをワークのパイプにインサートする作業です。
第一回の記事はこちらです。ロボットアームにマーカーを取り付け、カメラで検出したマーカーの位置をカメラ画像上でクリックした位置に動かしました。全体の構成、ロボットやカメラの接続、クルーボを使った基本的な開発の進め方についてはこちらの記事を参照してください。
Tutorialの構成
メーカーのチトセロボティクス社で用意しているTutorialの構成では、前回記事で紹介したインサートタスクが5-2として紹介されており、これに先立つ5-1でWebカメラを接続して撮影画角やターゲットとなる対象物を認識する調整を行います。調整した内容が接続したカメラに反映されている状態で5-2のタスクを実行します。
キットとは異なるカメラを接続した場合の挙動
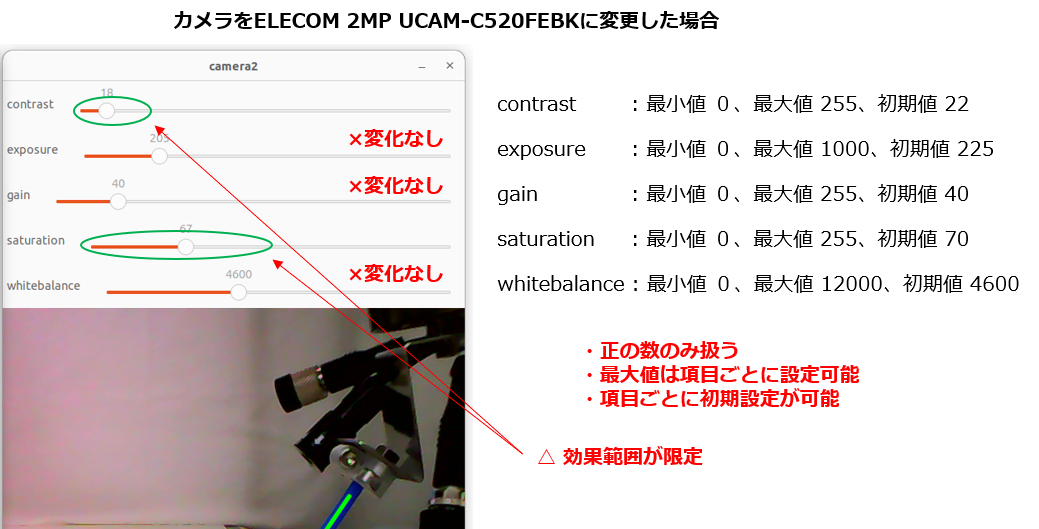
今回は訳あってクルーボのキットに含まれているWebカメラではなく、別のカメラを使用します。例としてELECOM社の2MピクセルWebCamera UCAM-C520FEBKを接続すると、次のような状態になります。このようにカメラのモデルを変更した場合に発生するミスマッチをそれに合わせて調整していきます。
接続するカメラの設定可能な項目を調べる
ほとんどのWebカメラはUSB Video Class(UVC)でPCに接続して利用できるようになりますが、メーカーやモデルごとにユーザーがコントロール可能な内容は異なります。対象のカメラをクルーボのPCに接続してその内容を調べます。
クルーボPCにインストールされているv4l2-ctlを使用します。
v4l2-ctlはv4l2-utils(Video4Linux utils)に含まれている、カメラの設定ツールです。ターミナルを開いて次のコマンドを実行します。
$ v4l2-ctl --list-ctrls
ELECOM UCAM-C520FEBKでは、次の内容が表示されました。
調整可能な項目と、調整範囲、デフォルト値、現在の値を確認することができます。
User Controls

                     brightness 0x00980900 (int)    : min=-255 max=255 step=1 default=10 value=5
                       contrast 0x00980901 (int)    : min=0 max=30 step=1 default=15 value=30
                     saturation 0x00980902 (int)    : min=0 max=127 step=1 default=36 value=127
                            hue 0x00980903 (int)    : min=-16000 max=16000 step=1 default=0 value=0
        white_balance_automatic 0x0098090c (bool)   : default=1 value=0
                          gamma 0x00980910 (int)    : min=20 max=250 step=10 default=80 value=80
           power_line_frequency 0x00980918 (menu)   : min=0 max=2 default=1 value=1 (50 Hz)
      white_balance_temperature 0x0098091a (int)    : min=2500 max=7000 step=1 default=5000 value=7000
                      sharpness 0x0098091b (int)    : min=0 max=3 step=1 default=2 value=2
         backlight_compensation 0x0098091c (int)    : min=0 max=2 step=1 default=1 value=1
変更の方針
この中で、bool(真偽値)やmenu(選択肢)の項目、そしてint(整数値)の項目の中でもステップ数が少なく、menu的に使用されているものはトラックバーでの調整よりもコード内でセットしたほうが良さそうなのでトラックバーの項目から除外します。
このカメラの注意点として、exposureを可変する項目やauto_exposureのON/OFFを設定する項目がリスト上では見当たらないことです。
カメラの挙動を見ると、デフォルトでauto_exposureは有効なようで、撮影した映像は明るさの変化に追従しています。auto_exposureが有効な状態でもbrightnessやgammaの調整は可能のようなので、一旦このままで進めます。
white_balance_temperatureを手動で可変するにはwhite_balance_automaticの操作が必要なように見えます。ところが、試したところwhite_balance_automaticを操作してもwhite_balance_temperatureが可変できませんでした。White Balanceの設定は継続検討として、今回の調整項目からは一旦除外しておきます。
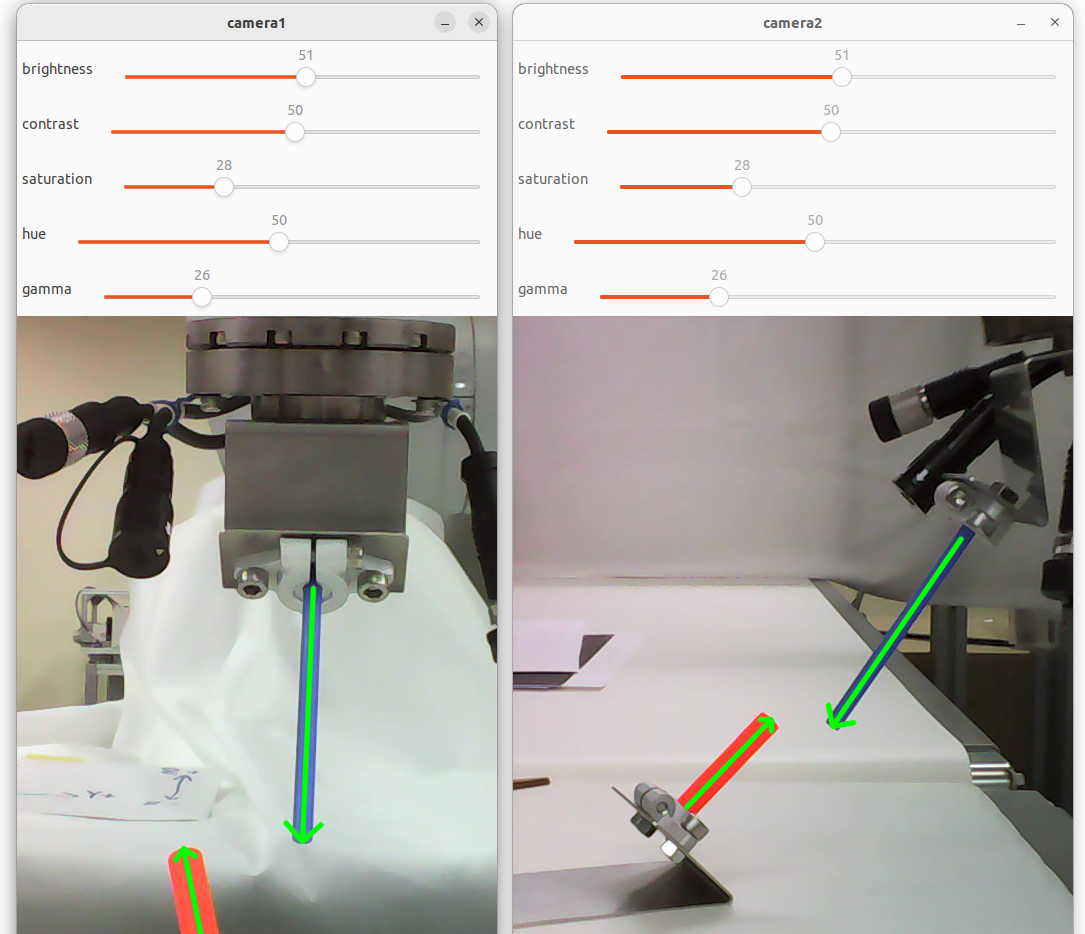
トラックバーに組み込むアイテムとしては、以下の項目に絞ります。
                     brightness 0x00980900 (int)    : min=-255 max=255 step=1 default=10 value=5
                       contrast 0x00980901 (int)    : min=0 max=30 step=1 default=15 value=30
                     saturation 0x00980902 (int)    : min=0 max=127 step=1 default=36 value=127
                            hue 0x00980903 (int)    : min=-16000 max=16000 step=1 default=0 value=0
                          gamma 0x00980910 (int)    : min=20 max=250 step=10 default=80 value=80
次に、設定値の範囲を見るとbrightnessとhueの項目では設定範囲に負の数も含まれます。gammaのように最小値は0ではなく20となっているものもあります。元のTutorialのコードではOpenCVのTrackbarを使用しているため、そのままでは負の数の取り扱いができません。
この課題の対応として、今回はトラックバー自体の調整値としては「0~100」に固定し、その値を取得したのちに各調整項目の[min~max]の可変範囲をマッピングしてカメラに設定するように進めます。こうすることで負の値の取り扱いや、今回のgammaのように可変範囲が[0]からでなくても対応することができます。
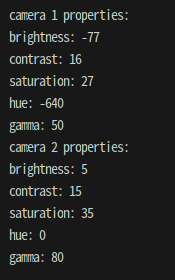
この方法ではトラックバーを操作したときの数値と実際の設定値は異なりますので、実際の設定値を確認するため、「p」キーを押したときにカメラへの実際の設定値を表示するようにします。
現状のコードの確認と変更
変更対象とするTutorialの中のファイル:
melfa_5_1_detect_sample_hand_and_work.cpp
の該当部分を確認します。
createTrackbars()でトラックバーの項目と最大値、デフォルト値をセットしています。
この内容を、先ほど調べた使用するカメラに合わせた項目に変更します。この各項目に設定する実際の可変範囲には、項目ごとの最小値もセットしておきます。
// (note: 実際に使用するカメラのUser Controlsを確認してトラックバーで調整する項目をセットする。)
// (note: menuやboolで設定している項目はトラックバーを使わずコード内でセットしたほうがよい。)
std::vector<std::shared_ptr<Trackbar>> createTrackbars(const cv::String& window_name) {
    std::vector<std::shared_ptr<Trackbar>> trackbars;
    trackbars.push_back(std::make_shared<Trackbar>("brightness", window_name, cv::CAP_PROP_BRIGHTNESS, -255, 255, 10));
    trackbars.push_back(std::make_shared<Trackbar>("contrast", window_name, cv::CAP_PROP_CONTRAST, 0, 30, 15));
    trackbars.push_back(std::make_shared<Trackbar>("saturation", window_name, cv::CAP_PROP_SATURATION, 0, 127, 36));
    trackbars.push_back(std::make_shared<Trackbar>("hue", window_name, cv::CAP_PROP_HUE, -16000, 16000, 0));
    trackbars.push_back(std::make_shared<Trackbar>("gamma", window_name, cv::CAP_PROP_GAMMA, 20, 250, 80));

    return trackbars;
}
この中で、引数にあるcv::CAP_PROP_BRIGHTNESSやcv::CAP_PROP_CONTRASTなどは、各設定項目の名称とOpenCVに含まれるvideoio.hppの定義を見くらべて適切なものを設定します。
/** @brief cv::VideoCapture generic properties identifier.

 Reading / writing properties involves many layers. Some unexpected result might happens along this chain.
 Effective behaviour depends from device hardware, driver and API Backend.
 @sa videoio_flags_others, VideoCapture::get(), VideoCapture::set()
*/
enum VideoCaptureProperties {
       CAP_PROP_POS_MSEC       =0, //!< Current position of the video file in milliseconds.
       CAP_PROP_POS_FRAMES     =1, //!< 0-based index of the frame to be decoded/captured next.
       CAP_PROP_POS_AVI_RATIO  =2, //!< Relative position of the video file: 0=start of the film, 1=end of the film.
       CAP_PROP_FRAME_WIDTH    =3, //!< Width of the frames in the video stream.
       CAP_PROP_FRAME_HEIGHT   =4, //!< Height of the frames in the video stream.
       CAP_PROP_FPS            =5, //!< Frame rate.
       CAP_PROP_FOURCC         =6, //!< 4-character code of codec. see VideoWriter::fourcc .
       CAP_PROP_FRAME_COUNT    =7, //!< Number of frames in the video file.
       CAP_PROP_FORMAT         =8, //!< Format of the %Mat objects (see Mat::type()) returned by VideoCapture::retrieve().
                                   //!< Set value -1 to fetch undecoded RAW video streams (as Mat 8UC1).
       CAP_PROP_MODE           =9, //!< Backend-specific value indicating the current capture mode.
       CAP_PROP_BRIGHTNESS    =10, //!< Brightness of the image (only for those cameras that support).
       CAP_PROP_CONTRAST      =11, //!< Contrast of the image (only for cameras).
       CAP_PROP_SATURATION    =12, //!< Saturation of the image (only for cameras).
       CAP_PROP_HUE           =13, //!< Hue of the image (only for cameras).
       CAP_PROP_GAIN          =14, //!< Gain of the image (only for those cameras that support).
       CAP_PROP_EXPOSURE      =15, //!< Exposure (only for those cameras that support).
       CAP_PROP_CONVERT_RGB   =16, //!< Boolean flags indicating whether images should be converted to RGB. <br/>
                                   //!< *GStreamer note*: The flag is ignored in case if custom pipeline is used. It's user responsibility to interpret pipeline output.
       CAP_PROP_WHITE_BALANCE_BLUE_U =17, //!< Currently unsupported.
       CAP_PROP_RECTIFICATION =18, //!< Rectification flag for stereo cameras (note: only supported by DC1394 v 2.x backend currently).
       CAP_PROP_MONOCHROME    =19,
       CAP_PROP_SHARPNESS     =20,
       CAP_PROP_AUTO_EXPOSURE =21, //!< DC1394: exposure control done by camera, user can adjust reference level using this feature.
       CAP_PROP_GAMMA         =22,
       CAP_PROP_TEMPERATURE   =23,
       CAP_PROP_TRIGGER       =24,
       CAP_PROP_TRIGGER_DELAY =25,
       CAP_PROP_WHITE_BALANCE_RED_V =26,
       CAP_PROP_ZOOM          =27,
       CAP_PROP_FOCUS         =28,
       CAP_PROP_GUID          =29,
       CAP_PROP_ISO_SPEED     =30,
       CAP_PROP_BACKLIGHT     =32,
       CAP_PROP_PAN           =33,
       CAP_PROP_TILT          =34,
       CAP_PROP_ROLL          =35,
       CAP_PROP_IRIS          =36,
       CAP_PROP_SETTINGS      =37, //!< Pop up video/camera filter dialog (note: only supported by DSHOW backend currently. The property value is ignored)
       CAP_PROP_BUFFERSIZE    =38,
       CAP_PROP_AUTOFOCUS     =39,
       CAP_PROP_SAR_NUM       =40, //!< Sample aspect ratio: num/den (num)
       CAP_PROP_SAR_DEN       =41, //!< Sample aspect ratio: num/den (den)
       CAP_PROP_BACKEND       =42, //!< Current backend (enum VideoCaptureAPIs). Read-only property
       CAP_PROP_CHANNEL       =43, //!< Video input or Channel Number (only for those cameras that support)
       CAP_PROP_AUTO_WB       =44, //!< enable/ disable auto white-balance
       CAP_PROP_WB_TEMPERATURE=45, //!< white-balance color temperature
       CAP_PROP_CODEC_PIXEL_FORMAT =46,    //!< (read-only) codec's pixel format. 4-character code - see VideoWriter::fourcc . Subset of [AV_PIX_FMT_*](https://github.com/FFmpeg/FFmpeg/blob/master/libavcodec/raw.c) or -1 if unknown
       CAP_PROP_BITRATE       =47, //!< (read-only) Video bitrate in kbits/s
       CAP_PROP_ORIENTATION_META=48, //!< (read-only) Frame rotation defined by stream meta (applicable for FFmpeg back-end only)
       CAP_PROP_ORIENTATION_AUTO=49, //!< if true - rotates output frames of CvCapture considering video file's metadata  (applicable for FFmpeg back-end only) (https://github.com/opencv/opencv/issues/15499)
       CAP_PROP_HW_ACCELERATION=50, //!< (**open-only**) Hardware acceleration type (see #VideoAccelerationType). Setting supported only via `params` parameter in cv::VideoCapture constructor / .open() method. Default value is backend-specific.
       CAP_PROP_HW_DEVICE      =51, //!< (**open-only**) Hardware device index (select GPU if multiple available). Device enumeration is acceleration type specific.
       CAP_PROP_HW_ACCELERATION_USE_OPENCL=52, //!< (**open-only**) If non-zero, create new OpenCL context and bind it to current thread. The OpenCL context created with Video Acceleration context attached it (if not attached yet) for optimized GPU data copy between HW accelerated decoder and cv::UMat.
       CAP_PROP_OPEN_TIMEOUT_MSEC=53, //!< (**open-only**) timeout in milliseconds for opening a video capture (applicable for FFmpeg back-end only)
       CAP_PROP_READ_TIMEOUT_MSEC=54, //!< (**open-only**) timeout in milliseconds for reading from a video capture (applicable for FFmpeg back-end only)
       CAP_PROP_STREAM_OPEN_TIME_USEC =55, //<! (read-only) time in microseconds since Jan 1 1970 when stream was opened. Applicable for FFmpeg backend only. Useful for RTSP and other live streams
#ifndef CV_DOXYGEN
       CV__CAP_PROP_LATEST
#endif
     };
次に、Tutorialの中のファイル:
melfa_5_1_detect_sample_hand_and_work.cpp
のTrackbarクラスを確認します。
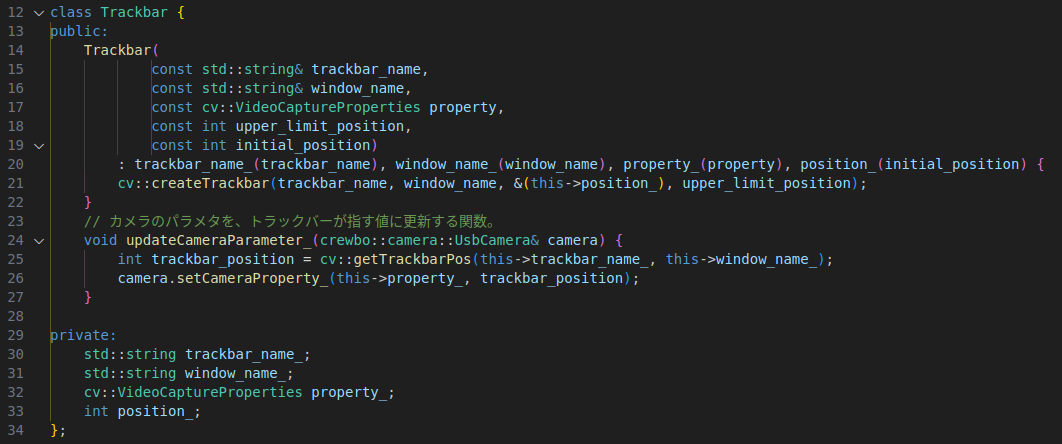
これを、新しいコードに置き換えます。
トラックバーの値を[0~100]に固定して、項目ごとの最小値~最大値をマッピングして実際の設定範囲に該当する値を抽出してカメラに設定します。
class Trackbar {
public:
    Trackbar(
            const std::string& trackbar_name,
            const std::string& window_name,
            const cv::VideoCaptureProperties property,
            const int min_value,  // 実際の設定値の最小値
            const int max_value,  // 実際の設定値の最大値
            const int initial_value)  // 初期値
        : trackbar_name_(trackbar_name),
          window_name_(window_name),
          property_(property),
          min_value_(min_value),
          max_value_(max_value),
          position_(static_cast<int>((initial_value - min_value) * 100 / (max_value - min_value))) {
        cv::createTrackbar(trackbar_name, window_name, &(this->position_), 100);  // トラックバーの範囲は0-100に固定
        cv::setTrackbarPos(trackbar_name, window_name, position_);  // 初期位置を設定
    }

    // カメラのパラメタを、トラックバーが指す値に更新する関数。
    void updateCameraParameter_(crewbo::camera::UsbCamera& camera) {
        int trackbar_position = cv::getTrackbarPos(this->trackbar_name_, this->window_name_);
        // トラックバーから取得した0-100の値を実際の設定値の範囲にマッピング
        int camera_value = min_value_ + (max_value_ - min_value_) * trackbar_position / 100;
        camera.setCameraProperty_(this->property_, camera_value);
    }

    // 現在の設定値を取得
    int getCurrentProperty(const crewbo::camera::UsbCamera& camera) const {
        return camera.getCameraProperty_(this->property_);
    }

    // トラックバーの名前を取得
    std::string getTrackbarName() const { return trackbar_name_; }

private:
    std::string trackbar_name_;
    std::string window_name_;
    cv::VideoCaptureProperties property_;
    int min_value_;  // 実際の設定値の最小値
    int max_value_;  // 実際の設定値の最大値
    int position_;  // 0-100のトラックバーポジション
};
トラックバーの動作確認
この変更により、ビルドして実行すると新たに設定した調整項目で画像の調整ができるようになりました。画像もキレイに調整できます。
実際の調整値の確認
次に、トラックバーの[0~100]の値にマッピングした「実際にカメラに設定する値」をコンソールに表示する部分を作成します。
melfa_5_1_detect_sample_hand_and_work.cpp
のmain()を確認します。
この部分を、次の内容に置き換えます。
int main(void) {
    // カメラオブジェクトを生成する。
    const int image_width = 1280;
    const int image_height = 720;
    crewbo::camera::UsbCamera camera1(0, image_width, image_height);
    crewbo::camera::UsbCamera camera2(2, image_width, image_height);

    disableCameraAutoAdjustment(camera1);
    disableCameraAutoAdjustment(camera2);

    // 各カメラの注目矩形領域(始点のu座標, 始点のv座標, 矩形の横幅, 矩形の縦幅)を設定する。
    const cv::Rect roi1(400, 0, 480, 720);
    const cv::Rect roi2(360, 0, 560, 720);

    // 画像確認用のウィンドウを作成する。
    const std::vector<cv::String> window_names = {"camera1", "camera2"};
    for (const auto& window_name : window_names) {
        cv::namedWindow(window_name);
    }

    // カメラプロパティ調整用のトラックバーを作成する。
    std::vector<std::shared_ptr<Trackbar>> trackbars_window1 = createTrackbars(window_names[0]);
    std::vector<std::shared_ptr<Trackbar>> trackbars_window2 = createTrackbars(window_names[1]);

    std::cout << "q キー押下で終了します。 " << std::endl;
    bool kPressed = false;  // キーが押されているかを管理するフラグ
    bool drawArrow = true;  // 認識したツールとワークに矢印を表示するフラグ

    while (true) {
        int key = cv::waitKey(1);
        if (key == 'q') break;  // 'q'が押されたら終了

        const cv::Mat camera1_image = camera1.fetchSingleFrame_();
        const cv::Mat camera2_image = camera2.fetchSingleFrame_();

        const cv::Mat roied_image1(camera1_image, roi1);
        const cv::Mat roied_image2(camera2_image, roi2);

        const std::vector<cv::Mat> images = {roied_image1, roied_image2};

        for (size_t i = 0; i < trackbars_window1.size(); i++) {
            trackbars_window1[i]->updateCameraParameter_(camera1);
            trackbars_window2[i]->updateCameraParameter_(camera2);
        }

        //  現在のカメラの設定値を表示する
        if (key == 'p' && !kPressed) {
            // Camera1 の各トラックバーの現在の設定値を表示
            std::cout << "camera 1 properties: " << std::endl;
            for (const auto& trackbar : trackbars_window1) {
                int current_property = trackbar->getCurrentProperty(camera1);
                std::cout << trackbar->getTrackbarName() << ": " << current_property << std::endl;
            }
            // Camera2 の各トラックバーの現在の設定値を表示
            std::cout << "camera 2 properties: " << std::endl;
            for (const auto& trackbar : trackbars_window2) {
                int current_property = trackbar->getCurrentProperty(camera2);
                std::cout << trackbar->getTrackbarName() << ": " << current_property << std::endl;
            }
            std::cout << std::endl;
            kPressed = true;
        } else if (key == 'a' && !kPressed) {
            drawArrow = !drawArrow;
            std::cout << "drawArrow: " << drawArrow << std::endl;
            kPressed = true;
        } else if (key == -1 && kPressed) {
            kPressed = false;
        }
        for (size_t i = 0; i < images.size(); i++) {
            // ペグとホールの位置と姿勢を検出する。
            const cv::Mat& image_i = images[i];
            if (drawArrow == true) {
                const std::optional<DirectedLineSegment> maybe_hole_work =
                        detectWorkDirectedLineSegment(image_i, cv::Scalar(0, 170, 170), cv::Scalar(30, 255, 255), true);
                const std::optional<DirectedLineSegment> maybe_peg_work = detectWorkDirectedLineSegment(
                        image_i, cv::Scalar(90, 100, 100), cv::Scalar(120, 255, 255), false);

                // 検出できた場合は、ペグとホールの有向線分を描画する。
                if (maybe_hole_work) {
                    const DirectedLineSegment hole_segment = maybe_hole_work.value();
                    drawDirectedLineSegment(image_i, hole_segment);
                }
                if (maybe_peg_work) {
                    const DirectedLineSegment peg_segment = maybe_peg_work.value();
                    drawDirectedLineSegment(image_i, peg_segment);
                }
            }
            cv::imshow(window_names[i], image_i);
        }
    }
    return 0;
}
これで、カメラ画像を見ながら調整した後に「p」キーを押すと、コンソールにCamera1の実際の設定値と、Camera2の実際の設定値が表示されます。
ついでに、「a」キーを押すごとに画像からツールとワークを認識して描画する「矢印」の表示[ON/OFF]を切り替えられるようにもしています。
さいごに
Tutorialとしては5_1でカメラの調整をしてそのまま5_2のタスクを実行する想定ですので、このカメラの設定値は特に控えておく必要はありません。
クルーボを使って実際の作業をロボットに実行させる場合には、作業プログラムを起動したときにビジュアルフィードバック用のカメラの設定を読み込むなどの工夫が必要となりますので、今回のような設定値を取得してファイルに保存しておくことも必要となるでしょう。アプリケーションに応じて検討してみてください。
今回のようにキットに含まれるカメラ以外でも正しく調整して利用できるようになると、小型カメラや近接撮影カメラなど、接続するカメラのバリエーションを広げることができます。これによってロボットの活用範囲が更に広くなるとよいですね。
今後の予定
この記事ではカメラを変更したときの調整項目の入れ替えについて記事にしましたが、実際の活用ではターゲットの色をセットして認識対象とするために、カラーピッカーもあると便利です。インサートタスクの元記事に対する補足記事の2番目として、次はカラーピッカーについても記事にしたいと思います。
また、実際にNode-REDと連動してネットワーク経由で動作した事例、Node-RED MCUで周辺機器制御をやった事例なども紹介できればと思います。
クルーボやビジュアルフィードバックにご興味ある方、Node-RED、Node-RED MCUと組み合わせている方、コメント等いただけますと嬉しいです。
