概要
この記事では、Boxアプリの統合機能を使用してフォルダ内のすべてのファイルを一括で以前のバージョンに戻す方法を紹介します。
Boxは、ファイルバージョン履歴機能によって、過去の状態にファイルを復元することができます。
この機能は、操作ミスにより誤ったバージョンがアップロードされてしまった場合だけでなく、ランサムウェア対策でも役立ちます。
例えば、Box Driveを利用しているユーザー端末がランサムウェア攻撃を受けて暗号化されたファイルが同期されてしまった場合でも、バージョン履歴機能を使って暗号化前のバージョンに戻し、ファイルを回復することが可能です。
ただし、現時点では、ファイルごとにバージョンを戻す必要があります。複数のファイルがある場合は時間がかかる可能性もあります。その際には、Box APIを使用してバッチ処理で復旧することが推奨されています。この記事では、その処理を実現するアプリ統合方法を紹介します。
フォルダ内のすべてのファイルを以前のバージョンに戻すためには、Google Cloud FunctionsでBox APIを呼び出し、バージョンを戻す処理を行います。この操作はGoogle Cloud Functions以外でも実行可能です。
手順は以下の通りです:
- ユーザーはBox上でフォルダを選択し、右クリックで出るアプリ統合メニューからバージョン戻し処理を開始します。
- Box Web統合で設定されたコールバックURL(Google Cloud Functions関数のHTTPトリガーURL)にリクエストが送信されます。
- Google Cloud Functions関数ではパラメータ選択ページが返され、Boxはそのページをユーザーに表示します。ユーザーは暗号化されたファイルの拡張子と攻撃期間(回復したい期間範囲)を選択し、その情報とフォルダIDを再度Google Cloud Functions関数に送信します。
- Google Cloud Functions関数では指定されたフォルダのIDを利用し、Box API経由で該当フォルダにファイルおよびそのバージョン情報を取得します。
- Google Cloud Functions関数では拡張子と攻撃期間を確認しながら、バージョンを復元します(具体的には、ファイルが暗号化された前のバージョンを昇格します)。
- ランサムウェア攻撃で暗号化されたファイルの名も変更され場合が多いですので、Google Cloud Functions関数ではその拡張子を削除する処理も行います。

このサンプルアプリは第一階層のファイルしか対応しません。サブフォルダ内のファイルのバージョンを戻す場合、再帰処理を利用して第2階層以降のファイルも含めることができます。ただし、効率的な処理を行うためには、事前にBoxのイベントストリームで攻撃されたファイルだけを取得し、処理する方が良いと考えられます。詳細については、Boxガイドを参照にしてください:https://support.box.com/hc/ja/articles/360043694054-%E3%83%A9%E3%83%B3%E3%82%B5%E3%83%A0%E3%82%A6%E3%82%A7%E3%82%A2
この記事では、なるべくわかりやすくするため、コードを極力省いています。
セキュリティ面での行うべき考慮を省略し、エラーハンドリングなども実装されていません。
具体的な実装時には非機能面の考慮と実装方法を開発者が行う必要があります。
準備
Google Cloud Platform (GCP)とBox上の必要な準備をここで説明します。
Google Cloud Platform (GCP)
Google Cloud Functionsを利用するためには、まずGoogle Cloud Platformのプロジェクトを作成または選択する必要があります。そして、コマンドラインで関数をデプロイするために、必要なAPIを有効化し、Google Cloud CLIもインストールしておく必要があります。詳細な手順については、Google Cloud Platformの設定ページを参考にしてください。
また、注意点として、Google Cloud Functionsの利用料金が発生する場合があります。詳細な料金情報はGoogle Cloud Functionsの料金ページで確認できます。
Box
オフィシャル設定ガイドに従って、BoxのWebアプリ統合を作ることができますが、このデモで使用される設定を説明します。
まずは、開発者コンソールでOAuth 2.0認証を利用するカスタムアプリを作成します。そして、必要な変更箇所は以下の通りです。
- アプリの「構成」タブの「アプリケーションスコープ」セクションで、「Boxに格納されているすべてのファイルとフォルダへの書き込み」をチェックします。すると自動的に、「Boxに格納されているすべてのファイルとフォルダの読み取り」もチェックされます。他の項目はチェックせずに、そのまま「変更を保存」ボタンをクリックします。これでWebアプリ統合がファイルバージョンを昇格させるようになります。

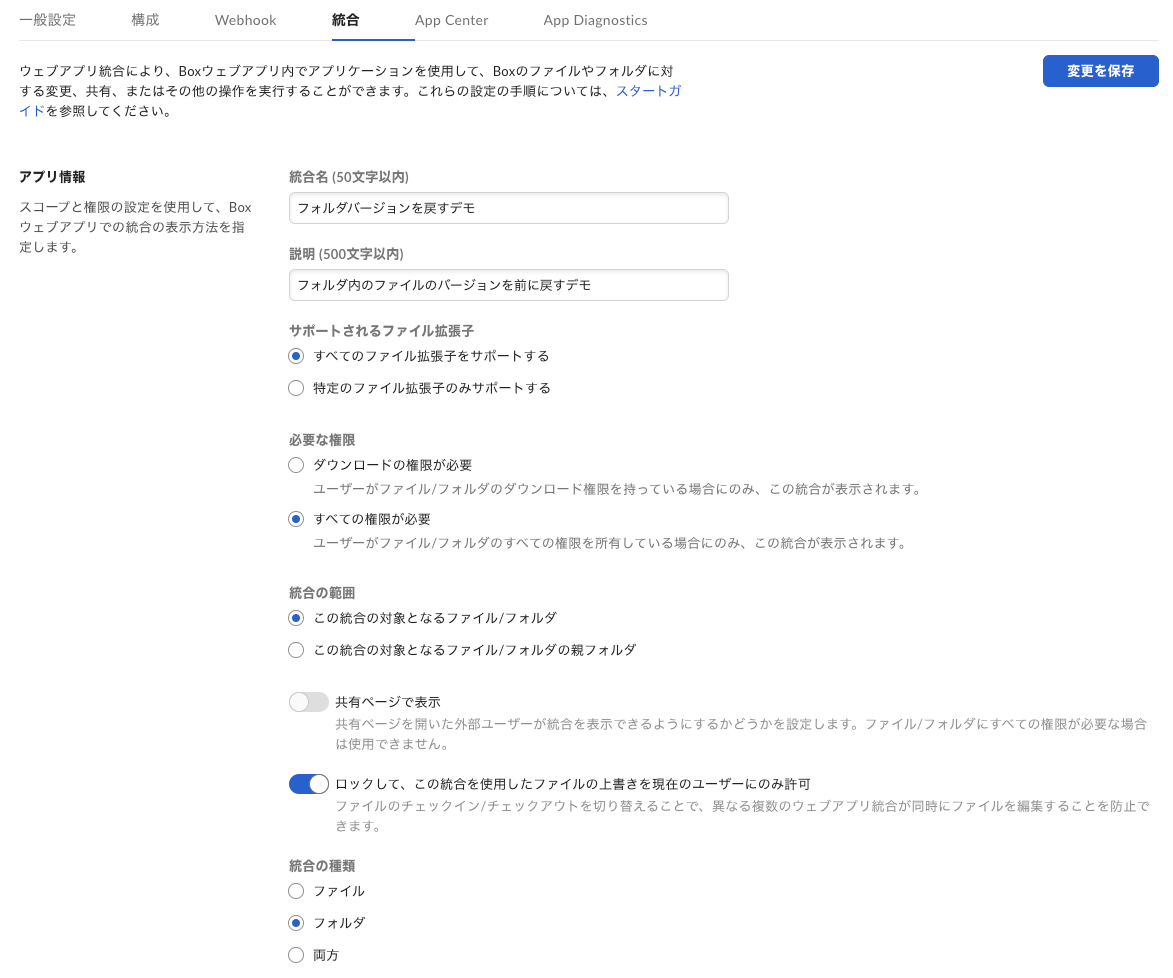
- アプリの「統合」タブで、「新しいウェブアプリ統合を作成」ボタンをクリックすると、アプリ統合が作成されます。作成されたWebアプリ統合の設定を次のようにします:
- フォルダ内の全てのファイルを対応するため、「サポートされるファイル拡張子」で「すべててのファイル拡張子のみサポートする」を選択します。
- ファイルバージョン管理が必要ですから、「必要な権限」で「すべての権限が必要」を選択します。
- 指定するフォルダだけが処理対象になりますので、「統合の範囲」で「この統合の対象となるファイル/フォルダ」を選択します。そして、バージョン戻し処理中でファイルが編集されないように「ロックして、この統合を使用したファイルの上書きを現在のユーザーにのみ許可」を有効化します。
- 指定するフォルダの全てのファイルを処理しますので、「統合の種類」を「フォルダ」を選択します。

- 「コールバック構成」セクションで「クライアントコールバックのURL」をGoogle Cloud Functionsの関数のHTTPトリガーURLを入力します。現時点で、そのURLのフォーマットはhttps://[リージョン]-[GCPプロジェクトID].cloudfunctions.net/[関数名]です。Cloud Functionsの関数をデプロイしたら、関数のHTTPトリガーURLがGCPコンソールで確認できますが、一旦作成したGCPプロジェクト名だけを置換し、https://us-central1-my-project-id.cloudfunctions.net/box_revert_folder_version_web_app_integration のように設定します。
- 「コールバックパラメータ」セクションで、BoxからGoogle Cloud Functions関数に送信されるデータを設定します:
| メソッド | パラメータ名 | パラメータ値 | 説明 |
|---|---|---|---|
| Get | folderId | #file_id# | フォルダIDはファイル一覧を取得するために使います。 |
| Get | authCode | #auth_code# | 承認コードはBox APIとの接続に必要なアクセスコードを発行するために使います。 |
#folder_id#パラメータ値はありませんので、フォルダIDパラメータの値は#file_id#にします。

設定ができたら、「変更を保存」ボタンをクリックします。
実装
このデモをNode.jsで実装しますので、プロジェクトの初期化とパッケージのインストールをします:
# デモプロジェクトフォルダを作成する
mkdir box_revert_folder_version_web_app_integration
cd box_revert_folder_version_web_app_integration

# プロジェクトを初期化する
npm init -y

# 必要なパッケージをインストールする
npm install @google-cloud/functions-framework box-node-sdk

# 実際のソースコードファイルを作成する
touch index.js
touch revertConfirmationPageTemplate.html
ソースコードは以下のように分かれています:
- 暗号化されたファイル拡張子がHTTPクエリのパラメータとして存在する場合、revertFolderVersion関数が呼び出されます。この関数はフォルダ内のファイル一覧を取得し、各ファイルごとにバージョン情報を取得しながら攻撃期間を確認し、1つ前のバージョンに戻します。
- 暗号化されたファイル拡張子がHTTPクエリのパラメータとして存在しない場合は、revertConfirmation関数が呼び出されます。この関数ではパラメータ選択用のHTMLページテンプレートを読み込み、そのページから関数を呼び出すためにいくつか値を置換した後、HTML形式でHTTPレスポンスとして返します。
const BoxSDK = require("box-node-sdk");
const fs = require("fs");

// このデモはあまり複雑ならないように、1つのエントリーポイントでパラメータ入力とバージョン復元を対応する
exports.box_revert_folder_version_web_app_integration = async function (
  req,
  res
) {
  if (req.query.encryptedFileExtension) {
    revertFolderVersion(req, res);
  } else {
    revertConfirmation(req, res);
  }
};

// Boxからパラメータを使い、言語選択ページを用意し、HTMLを返す
async function revertConfirmation(req, res) {
  try {
    const revertConfirmationPageTemplate = fs
      .readFileSync("revertConfirmationPageTemplate.html")
      .toString();
    const revertConfirmationPage = revertConfirmationPageTemplate
      .replaceAll("FOLDER_ID", req.query.folderId)
      .replaceAll("AUTH_CODE", req.query.authCode)
      .replaceAll("FUNCTION_LOCATION", process.env.FUNCTION_LOCATION)
      .replaceAll("PROJECT_ID", process.env.PROJECT_ID)
      .replaceAll("FUNCTION_NAME", process.env.FUNCTION_NAME);

    res.status(200).send(revertConfirmationPage);
  } catch (error) {
    res
      .status(500)
      .send("パラメータ選択ページを表示することができませんでした。");
    throw error;
  }
}

// フォルダ内のファイル情報を取得し、前のバージョンに戻す
async function revertFolderVersion(req, res) {
  try {
    const folderId = req.query.folderId;
    const authCode = req.query.authCode;
    const encryptedFileExtension = req.query.encryptedFileExtension;
    const periodStart = new Date(req.query.periodStart).toISOString();
    const periodEnd = new Date(req.query.periodEnd).toISOString();

    // Box APIクライアント初期化
    const sdk = new BoxSDK({
      clientID: process.env.CLIENT_ID,
      clientSecret: process.env.CLIENT_SECRET,
    });
    const tokenInfo = await sdk.getTokensAuthorizationCodeGrant(authCode);
    const client = sdk.getBasicClient(tokenInfo.accessToken);

    // フォルダ内のアイテム(ファイルとサブフォルダ)を取得
    const folderItems = await client.folders.getItems(folderId);
    for (const item of folderItems.entries) {
      // サブフォルダを対応しないので、スキップ
      if (
        item.type == "folder" ||
        !item.name.endsWith(encryptedFileExtension)
      ) {
        continue;
      }

      // バージョン数は1であれば、スキップ
      const fileVersions = await client.files.getVersions(item.id);
      if (fileVersions.entries.length < 1) {
        continue;
      }

      // 最新バージョンの編集時間は攻撃期間外であれば、スキップ
      const previousVersion =
        fileVersions.entries[fileVersions.entries.length - 1];
      if (
        previousVersion.modified_at < periodStart ||
        previousVersion.modified_at > periodEnd
      ) {
        continue;
      }

      // 前のバージョンを昇格
      await client.files.promoteVersion(item.id, previousVersion.id);

      // 暗号化されたファイルの拡張子を削除
      await client.files.update(item.id, {
        name: item.name.replace(new RegExp(`\.${encryptedFileExtension}`), ""),
        fields: "name",
      });
    }

    res
      .status(200)
      .send(`フォルダ内のファイルを前のバージョンに戻した。`);
  } catch (error) {
    res
      .status(500)
      .send(
        `指定されたフォルダ内のファイルを前のバージョンに戻すことができませんでした。`
      );
    throw error;
  }
}
<!DOCTYPE html>
<html>
  <head>
    <base target="_top" />
    <link
      rel="stylesheet"
      href="https://cdnjs.cloudflare.com/ajax/libs/materialize/1.0.0/css/materialize.min.css"
    />
    <style>
      .container {
        width: 55%;
      }
    </style>
  </head>

  <body>
    <div id="container" class="container">
      <div id="section" class="section center-align">
        <h5>Boxアプリ統合デモ - フォルダバージョン復元</h5>
        <p>
          対象ファイルの拡張子と最新バージョンの編集期間を入力してください。
        </p>
      </div>
      <div class="row">
        <form
          id="form"
          onsubmit="event.preventDefault(); submitForm(this)"
          class="col s12"
        >
          <div class="row">
            <div class="input-field col s6">
              <input placeholder="gg" id="encryptedFileExtension" type="text" />
              <label for="encryptedFileExtension"
                >ファイル拡張子</label
              >
            </div>
          </div>
          <div class="row">
            <div class="input-field col s6">
              <label class="active" for="periodStart">開始</label>
              <input type="text" id="periodStart" name="periodStart" />
            </div>
            <div class="input-field col s6">
              <label class="active" for="periodEnd">終了</label>
              <input type="text" id="periodEnd" name="periodEnd" />
            </div>
          </div>
          <div class="row">
            <div class="center-align">
              <button class="btn" type="submit">OK</button>
            </div>
          </div>
        </form>
      </div>
    </div>
    <script src="https://ajax.googleapis.com/ajax/libs/jquery/3.5.1/jquery.min.js"></script>
    <script src="https://code.jquery.com/ui/1.13.0/jquery-ui.js"></script>
    <script src="https://cdnjs.cloudflare.com/ajax/libs/materialize/1.0.0/js/materialize.min.js"></script>
    <script>
      /*!
       * Fawad Tariq (http://github.com/fawadtariq)
       * Materialize Date Time Picker v0.1.1-beta
       * Based on Materialize (http://materializecss.com)
       */
      var MaterialDateTimePicker = {
        control: null,
        dateRange: null,
        pickerOptions: null,
        create: function (element) {
          this.control =
            element == undefined
              ? $("#" + localStorage.getItem("element"))
              : element;
          element = this.control;
          if (this.control.is("input[type='text']")) {
            var defaultDate = new Date();
            element.off("click");
            element.datepicker({
              format: "yyyy/mm/dd",
              selectMonths: true,
              dismissable: false,
              autoClose: true,
              onClose: function () {
                element.datepicker("destroy");
                element.timepicker({
                  dismissable: false,
                  onSelect: function (hr, min) {
                    element.attr("selectedTime", (hr + ":" + min).toString());
                  },
                  onCloseEnd: function () {
                    element.blur();
                  },
                });
                $("button.btn-flat.timepicker-close.waves-effect")[0].remove();

                if (element.val() != "") {
                  element.attr("selectedDate", element.val().toString());
                } else {
                  element.val(
                    defaultDate.getFullYear().toString() +
                      "/" +
                      (defaultDate.getMonth() + 1).toString() +
                      "/" +
                      defaultDate.getDate().toString()
                  );
                  element.attr("selectedDate", element.val().toString());
                }
                element.timepicker("open");
              },
            });
            element.unbind("change");
            element.off("change");
            element.on("change", function () {
              if (element.val().indexOf(":") > -1) {
                element.attr("selectedTime", element.val().toString());
                element.val(
                  element.attr("selectedDate") +
                    " " +
                    element.attr("selectedTime")
                );
                element.timepicker("destroy");
                element.unbind("click");
                element.off("click");
                element.on("click", function (e) {
                  element.val("");
                  element.removeAttr("selectedDate");
                  element.removeAttr("selectedTime");
                  localStorage.setItem("element", element.attr("id"));
                  MaterialDateTimePicker.create.call(element);
                  element.trigger("click");
                });
              }
            });
            $(
              "button.btn-flat.datepicker-cancel.waves-effect, button.btn-flat.datepicker-done.waves-effect"
            ).remove();
            this.addCSSRules();
            return element;
          } else {
            console.error(
              "The HTML Control provided is not a valid Input Text type."
            );
          }
        },
        addCSSRules: function () {
          $("html > head").append(
            $("<style>div.modal-overlay { pointer-events:none; }</style>")
          );
        },
      };

      let periodStart;
      let periodEnd;
      $(document).ready(function () {
        M.AutoInit();
        $("select").formSelect();
        periodStart = MaterialDateTimePicker.create($("#periodStart"));
        periodEnd = MaterialDateTimePicker.create($("#periodEnd"));
      });

      function submitForm(form) {
        $.post(
          "https://FUNCTION_LOCATION-PROJECT_ID.cloudfunctions.net/FUNCTION_NAME?" +
            "encryptedFileExtension=" +
            $("#encryptedFileExtension").val() +
            "&periodStart=" +
            periodStart.val() +
            "&periodEnd=" +
            periodEnd.val() +
            "&folderId=FOLDER_ID" +
            "&authCode=AUTH_CODE"
        );
        window.top.close();
      }
    </script>
  </body>
</html>
デプロイ
関数をデプロイするにはCLIまたはGoogle Cloud Consoleが使えます。
運用を簡単にするため、ソースコードでは環境変数(例:process.env.CLIENT_ID)を使用していますので、デプロイ時に環境変数の設定が必要です。以下はソースコードで参照される変数の一覧です:
- CLIENT_ID: BoxアプリのクライアントID
- CLIENT_SECRET: Boxアプリのクライアントシークレット
- FUNCTION_LOCATION: 使用するリージョン(今回はus-central1にします)
- FUNCTION_NAME: 関数の名前で、ソースコードで定義する関数名(box_revert_folder_version_web_app_integration)と一致させる必要があります。
- PROJECT_ID: GCPのプロジェクトID
Box APIへ接続する際には、Box開発者コンソールで作成したカスタムアプリのクライアントIDとクライアントシークレットを使用します。これらの情報を保護するためにSecrets Managerが推奨されていますが、このデモでは複雑さを避けるため、Google Cloud Functionsの環境変数として設定します。
環境変数はCloud Functionの設定で定義できます:

CLIを使う場合は、.env.yamlファイルを作成し、環境変数を定義することもできます:
CLIENT_ID: abc123
CLIENT_SECRET: xyz456
PROJECT_ID: my-project-id
FUNCTION_LOCATION: us-central1
FUNCTION_NAME: box_revert_folder_version_web_app_integration
そして、次のコマンドでデプロイができます:
gcloud functions deploy box_revert_folder_version_web_app_integration --trigger-http --runtime nodejs16 --allow-unauthenticated --region us-central1 --env-vars-file .env.yaml
まとめ
Box上で選択したフォルダ内のファイルを一括で前のバージョンに戻す方法を紹介しました。誤って間違ったバージョンをアップロードしてしまった場合はもちろん、ランサムウェア対策としても役立ちます。
今回はGoogle Cloud Functionsを使い実装しましたが、同じ仕組みで他のクラウドプロバイダー(例えば、AWS LambdaやMicrosoft Azure Functions)または通常のWebアプリケーションでも利用することが可能です。その場合は、Box開発者コンソールで統合のクライアントコールバックのURLだけを変更すればWebアプリ統合が動作します。
このように、Box APIを使用して業務自動化を実現することで、Box上で行える操作範囲が広がります。
