CentOS7に TeX Live 2016 をインストールして簡単な動作確認をする迄のメモです。
元の目的としてはSphinxのPDF生成でTeX(pLaTeX)を使ってるとのことで、それを試すためにTeXを入れてみようと調べてみると、2016年現在だと TeX Live 2016だな、という次第です。
-
TeX Live - TeX Users Group
- https://www.tug.org/texlive/
- TeX環境に必要なパッケージを詰め合わせたインストーラ付きのisoを提供してくれてる。
環境:
CentOS7 (x86_64), 2016-09-16 に yum update したばかり。
後述の通りインストーラ付きISOイメージが2.9GBで、3252個のパッケージをインストールします。インストール先のディスクには数GB以上の空き容量を余裕を持って確保した状態で臨んでください。
下準備 : IPA/VLGothicフォントのインストール
下準備として、便利な日本語フォントをインストールしました。
IPAフォント
IPAのサイトか、窓の杜ライブラリから最新版をDLします。
※OSDNのサイトのファイルは古いバージョンで止まってました。
インストールします。ユーザ $HOME ディレクトリにインストールするなら以下の方法:
システムグローバルにインストールするなら以下の方法:今回はこちらで行きました。
wget http://ossipedia.ipa.go.jp/ipafont/IPAfont00303.php
unzip IPAfont00303.zip
mkdir /usr/share/fonts/japanese
mkdir /usr/share/fonts/japanese/TrueType
mv IPAfont00303/*.ttf /usr/share/fonts/japanese/TrueType/

wget http://ossipedia.ipa.go.jp/ipafont/ipaexfont/IPAexfont00201.php
unzip IPAexfont00201.zip
mv IPAexfont00201/*.ttf /usr/share/fonts/japanese/TrueType/
fc-cache -fv
via : http://d.hatena.ne.jp/addition/20130410/1365530641
VLGothicフォント
yum install vlgothic-fonts
yum install vlgothic-p-fonts
TeX Live 2016 のインストール
TeXの世界では、よく使われるソフトウェアをパッケージとして管理している CTAN (Comprehensive TeX Archive Network : https://ctan.org/ ) というリポジトリシステムがあります。TeX Live はこの中から、DVDに収まる範囲でよく使われるパッケージのスナップショットをまとめて、インストーラ付きで提供してくれてます。
インストール方法は、インターネット経由でCTANリポジトリから直接パッケージをDLしてインストールする方法と、パッケージのスナップショットを収めたDVD/ISOイメージからインストールする方法の二種類があります。
-
Installing TeX Live over the Internet - TeX Users Group
- https://www.tug.org/texlive/acquire-netinstall.html
- 軽量なインストールプログラムだけローカルにDLしたら、あとはパッケージリポジトリからインターネット経由でインストール。
-
TeX Live on DVD - TeX Users Group
- https://www.tug.org/texlive/acquire-dvd.html
- DVDに入る範囲でパッケージを詰め込んだインストーラ入りDVDを入手してインストール。
-
Acquiring TeX Live as an ISO image - TeX Users Group
- https://www.tug.org/texlive/acquire-iso.html
- 上記DVDのISOイメージをDLして、DVDに焼くなり、ISOイメージをマウントしてインストール。 -> 今回はこちらの方法で行きました。
"Acquiring TeX Live as an ISO image" の "download from a nearby CTAN mirror" のリンクをクリックするなどして、日本のミラーサイトからDVDのISOイメージをDLします。今回は texlive2016-20160523.iso をDLしました。サイズは 2.9GB となります。
その後、ISOファイルをCentOS7に読み込ませます。今回はVirtualBoxのゲストOSとして動かしてたので、光学ドライブにisoファイルをセットしてあげれば、あとは sudo mount /dev/cdrom /mnt/cdrom でマウントできました。
実際のインストール手順は以下を参照:
インストーラからはインストール先を設定できます。デフォルトではシステムグローバルに /usr/local にインストールしますが、変更することもできます。TeX Liveで提供されてるパッケージはLinuxディストリビューションで提供されてるケースもあり、ディストリビューション側のバージョンと異なってたりもしますが、まずは /usr/local であればディストリビューション側のパッケージと衝突することは無いでしょう。他にも /usr/local に入れてるソフトがあり、また将来のアップデートなどでの無用な衝突を避けたい、となれば、念のためユーザのホームディレクトリ以下などにインストール先を変更できます。
Linuxディストリビューション側から提供されてるパッケージと、TeX Live から手動でインストールしたパッケージとの違いや共存については、以下に説明されてますので、気になる方は参照してください:
では実際にインストーラを起動してみたら、以下のように Can't locate Digest/MD5.pm in @INC と怒られました。
[msakamoto@localhost ~]$ /mnt/cdrom/install-tl
Can't locate Digest/MD5.pm in @INC (@INC contains: /mnt/cdrom/tlpkg /usr/local/lib64/perl5 /usr/local/share/perl5 /usr/lib64/perl5/vendor_perl /usr/share/perl5/vendor_perl /usr/lib64/perl5 /usr/share/perl5 .) at /mnt/cdrom/tlpkg/TeXLive/TLCrypto.pm line 9.
BEGIN failed--compilation aborted at /mnt/cdrom/tlpkg/TeXLive/TLCrypto.pm line 9.
Compilation failed in require at /mnt/cdrom/tlpkg/TeXLive/TLPOBJ.pm line 16.
BEGIN failed--compilation aborted at /mnt/cdrom/tlpkg/TeXLive/TLPOBJ.pm line 16.
Compilation failed in require at /mnt/cdrom/install-tl line 54.
BEGIN failed--compilation aborted at /mnt/cdrom/install-tl line 54.
perl-Digest-MD5 パッケージをインストールします。
# yum install perl-Digest-MD5
もう一度インストーラを起動すると、今度は正常に起動しました。以下のようにインストールオプションのデフォルト値が表示されます。
[msakamoto@localhost ~]$ /mnt/cdrom/install-tl
Loading /mnt/cdrom/tlpkg/texlive.tlpdb
Installing TeX Live 2016 from: /mnt/cdrom (verified)
Platform: x86_64-linux => 'GNU/Linux on x86_64'
Distribution: inst (compressed)
Directory for temporary files: /tmp/4WHGm_ZKqC
======================> TeX Live installation procedure <=====================

======>   Letters/digits in <angle brackets> indicate   <=======
======>   menu items for commands or options            <=======

 Detected platform: GNU/Linux on x86_64

 <B> binary platforms: 1 out of 14

 <S> set installation scheme (scheme-full)

 <C> customizing installation collections
     47 collections out of 48, disk space required: 4389 MB

 <D> directories:
   TEXDIR (the main TeX directory):
     !! default location: /usr/local/texlive/2016
     !! is not writable or not allowed, please select a different one!
   TEXMFLOCAL (directory for site-wide local files):
     /usr/local/texlive/texmf-local
   TEXMFSYSVAR (directory for variable and automatically generated data):
     /usr/local/texlive/2016/texmf-var
   TEXMFSYSCONFIG (directory for local config):
     /usr/local/texlive/2016/texmf-config
   TEXMFVAR (personal directory for variable and automatically generated data):
     ~/.texlive2016/texmf-var
   TEXMFCONFIG (personal directory for local config):
     ~/.texlive2016/texmf-config
   TEXMFHOME (directory for user-specific files):
     ~/texmf

 <O> options:
   [ ] use letter size instead of A4 by default
   [X] allow execution of restricted list of programs via \write18
   [X] create all format files
   [X] install macro/font doc tree
   [X] install macro/font source tree
   [ ] create symlinks to standard directories
   [X] after install, use tlnet on CTAN for package updates

 <V> set up for portable installation

Actions:
 <I> start installation to hard disk
 <H> help
 <Q> quit

Enter command:
ここから、< ... > で囲まれてるアルファベットを入力してENTERを押すと、対話的にインストールオプションを変更することができます。今回はインストール先の TEXDIR を /home/msakamoto/texlive/2016 に変更しました。他はデフォルトのままにしておき、Enter command: に戻ってきたら I を入力し、インストールを開始します。
Enter command: I
Installing to: /home/msakamoto/texlive/2016
Installing [0001/3252, time/total: ??:??/??:??]: 12many [376k]
Installing [0002/3252, time/total: 00:00/00:00]: 2up [66k]
Installing [0003/3252, time/total: 00:00/00:00]: Asana-Math [482k]
(...)
Installing [3252/3252, time/total: 18:03/18:03]: zxjatype [142k]
(...)
finished with package-specific postactions

 See
   /home/msakamoto/texlive/2016/index.html
 for links to documentation.  The TeX Live web site
 contains updates and corrections: http://tug.org/texlive.

 TeX Live is a joint project of the TeX user groups around the world;
 please consider supporting it by joining the group best for you. The
 list of user groups is on the web at http://tug.org/usergroups.html.

 Add /home/msakamoto/texlive/2016/texmf-dist/doc/info to INFOPATH.
 Add /home/msakamoto/texlive/2016/texmf-dist/doc/man to MANPATH
   (if not dynamically found).

 Most importantly, add /home/msakamoto/texlive/2016/bin/x86_64-linux
 to your PATH for current and future sessions.

 Welcome to TeX Live!
Logfile: /home/msakamoto/texlive/2016/install-tl.log
3252ものパッケージをインストールします。インストールが完了すると、INFOPATH, MANPATH, PATH 環境変数の設定内容が表示されますので、 .bashrc などに追記します。
export INFOPATH=/home/msakamoto/texlive/2016/texmf-dist/doc/info:$INFOPATH
export MANPATH=/home/msakamoto/texlive/2016/texmf-dist/doc/man:$MANPATH
export PATH=/home/msakamoto/texlive/2016/bin/x86_64-linux:$PATH
.bashrc を source コマンドで読み直すか再ログインすると、各種TeXコマンドが使えるようになりました。
参考:TeX Live 2015年版のインストール記事ですが、2016年版でも同様でしたので、大変参考になりました。
tlmgr によるパッケージ更新
TeX Liveでインストールされるパッケージは、CTAN (Comprehensive TeX Archive Network : https://ctan.org/ ) で管理されてます。このパッケージ管理を行うのが tlmgr コマンドで、TeX Live のインストールに成功したらパッケージを更新しておきます。
msakamoto@localhost ~]$ tlmgr update --all
tlmgr: package repository http://ftp.jaist.ac.jp/pub/CTAN/systems/texlive/tlnet (verified)
===============================================================================
tlmgr itself needs to be updated.
Please do this via either
  tlmgr update --self
or by getting the latest updater for Unix-ish systems:
  http://mirror.ctan.org/systems/texlive/tlnet/update-tlmgr-latest.sh
and/or Windows systems:
  http://mirror.ctan.org/systems/texlive/tlnet/update-tlmgr-latest.exe
Then continue with other updates as usual.
===============================================================================
tlmgr: An error has occurred. See above messages. Exiting.
tlmgr コマンド自身が古いので、 tlmgr update --self で自分自身を更新します。
[msakamoto@localhost ~]$ tlmgr update --self
tlmgr: package repository ftp://ftp.kddilabs.jp/CTAN/systems/texlive/tlnet (verified)
tlmgr: saving backups to /home/msakamoto/texlive/2016/tlpkg/backups
[1/1, ??:??/??:??] update: texlive.infra [355k] (41280 -> 41476) ... done
tlmgr: package log updated: /home/msakamoto/texlive/2016/texmf-var/web2c/tlmgr.log
running mktexlsr ...
done running mktexlsr.
running mtxrun --generate ...
done running mtxrun --generate.
もう一度全て更新してみます。
[msakamoto@localhost ~]$ tlmgr update --all
tlmgr: package repository http://ftp.jaist.ac.jp/pub/CTAN/systems/texlive/tlnet (verified)
tlmgr: saving backups to /home/msakamoto/texlive/2016/tlpkg/backups
[  1/332] auto-remove: xetex-def ... done
[  2/332] auto-remove: dvisvgm-def ... done
(...)
[332/332, 50:05/50:05] update: scheme-xml [1k] (40631 -> 41452) ... done
tlmgr: package log updated: /home/msakamoto/texlive/2016/texmf-var/web2c/tlmgr.log
running mktexlsr ...
done running mktexlsr.
running mtxrun --generate ...
done running mtxrun --generate.
running updmap-sys ...
done running updmap-sys.
regenerating fmtutil.cnf in /home/msakamoto/texlive/2016/texmf-dist
running fmtutil-sys --no-error-if-no-engine=luajittex,mfluajit --no-error-if-no-format --byengine ptex ...
done running fmtutil-sys --no-error-if-no-engine=luajittex,mfluajit --no-error-if-no-format --byengine ptex.
(...)
running fmtutil-sys --no-error-if-no-engine=luajittex,mfluajit --byfmt cslatex ...
done running fmtutil-sys --no-error-if-no-engine=luajittex,mfluajit --byfmt cslatex.
これで更新成功です。
pLaTeX の動作確認
Sphinx では TeX経由の日本語PDF出力に pLaTeX を使ってるようでしたので、pLaTeX の簡単な動作確認をしておきます。
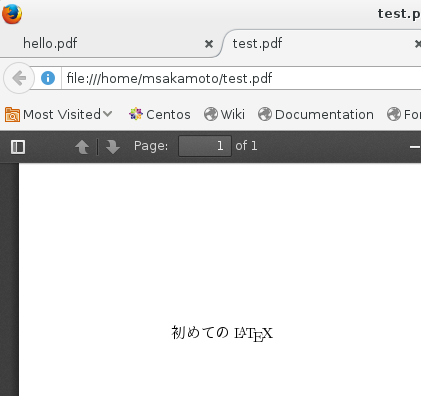
UTF-8で以下の test.tex を作成します。
\documentclass[a4j]{jarticle}
\begin{document}
初めての\LaTeX
\end{document}
platex コマンドで .dvi ファイルを作成します。
[msakamoto@localhost ~]$ platex test.tex
This is e-pTeX, Version 3.14159265-p3.7-160201-2.6 (utf8.euc) (TeX Live 2016) (preloaded format=platex)
 restricted \write18 enabled.
entering extended mode
(./test.tex
pLaTeX2e <2016/09/08> (based on LaTeX2e <2016/03/31> patch level 3)
Babel <3.9r> and hyphenation patterns for 83 language(s) loaded.
(/home/msakamoto/texlive/2016/texmf-dist/tex/platex/base/jarticle.cls
Document Class: jarticle 2006/06/27 v1.6 Standard pLaTeX class
(/home/msakamoto/texlive/2016/texmf-dist/tex/platex/base/jsize10.clo))
No file test.aux.
[1] (./test.aux) )
Output written on test.dvi (1 page, 348 bytes).
Transcript written on test.log.
dvipdfmx でPDF化します。
[msakamoto@localhost ~]$ dvipdfmx test.dvi
test.dvi -> test.pdf
[1]
5439 bytes written
test.pdf として日本語のPDFが生成されました。
参考:
XeTeX の動作確認
XeTeX ( http://scripts.sil.org/xetex ) というのはUTF-8ベースで、システムが認識するOpenTypeフォントをそのまま使えます。texからpdfを1コマンドで生成できるのが便利そうでしたので、試してみました。
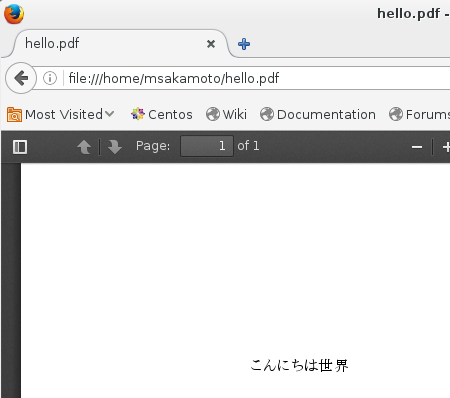
UTF-8で hello.tex を以下の内容で作成します。
\documentclass{article}

\usepackage{xltxtra}
\setmainfont{IPAPMincho}
\setsansfont{IPAPGothic}
\setmonofont{IPAGothic}
\XeTeXlinebreaklocale "ja"

\begin{document}
こんにちは世界
\end{document}
以下のコマンド一発でPDFが生成されます。
[msakamoto@localhost ~]$ xelatex hello.tex
This is XeTeX, Version 3.14159265-2.6-0.99996 (TeX Live 2016) (preloaded format=xelatex)
 restricted \write18 enabled.
entering extended mode
(./hello.tex
LaTeX2e <2016/03/31> patch level 3
Babel <3.9r> and hyphenation patterns for 83 language(s) loaded.
(/home/msakamoto/texlive/2016/texmf-dist/tex/latex/base/article.cls
Document Class: article 2014/09/29 v1.4h Standard LaTeX document class
(/home/msakamoto/texlive/2016/texmf-dist/tex/latex/base/size10.clo))
(...)
(/home/msakamoto/texlive/2016/texmf-dist/tex/latex/tipa/t3cmr.fd) [1]
(./hello.aux) )
Output written on hello.pdf (1 page).
Transcript written on hello.log.
日本語のPDFとして hello.pdf が生成されました。
参考:
2016年の今のTeX参考資料
TeXは2002~3年ごろ、大学時代に興味本位で少し触っただけでしたが、10年以上の月日が経つとインストールもずっと簡単になったようです。根強いファンが沢山いるし、ネット上の情報も新旧整理が進んでいるようで昔より簡単になった気もします。
-
TeX/LaTeX の心構え:入門者から上級者まで - Acetaminophen’s diary
- http://acetaminophen.hatenablog.com/entry/2015/04/26/062419
- 2015年の今、TeX/LaTexエコシステムとどう付き合ってくかわかりやすくまとめられてる。
-
TeX Wiki
- https://texwiki.texjp.org/
- コンテンツの整理が進行中ではあるようですが、様々な処理系の比較や解説ページなどは初心者には大変助かります。
- 整理中とはいえ、最も日本語情報が集約されてるところはここではないでしょうか。
今回は TeX Live 2016 を使いましたが、毎年更新されていることもあり、変更内容には気を使う必要がありそうです。ただ全体的にはより便利な方向で、パッチなども積極的に受け入れてる様子があり、2000年代初頭と比べればずっと使いやすくなってる感じです。
- TeX Live 2016 の先へ:今後の注目ポイントまとめ - Acetaminophen’s diary
- TeX Live 2016 で変わったところ - TeX Alchemist Online
やはり2016年の今も、モダンにTeXを活用してる人たちのブログは参考になります: