TL;DR
GitLabにjupyter notebookをpushすると、エクスポートされたhtmlが自動でMerge Requestのコメントとしてアップロードされるようにしました。


背景
私が所属する分析チームでは、jupyter notebookで分析を行い、GitLabで管理しています。
GitHub/GitLabではpushしたjupyter notebookのプレビューが表示されて便利なのですが、以下のような課題があります。
- ノートブックの出力を含めるとdiffを見るときに邪魔
- JavaScriptを使ったようなグラフ(plotly/bokeh)はプレビューで表示されない
2点目については各自がgit pullしてjupyterを立ち上げて実行すればよいのですが、そもそもjupyterの環境がないと準備がめんどくさいし、あっても立ち上げるのがめんどくさいです。
というわけで、今までは以下のようなhtmlエクスポートを用いたフローにしていました。
- notebookが完成したら、clear outputしてからpushし、GitLabのMerge Request(MR)を作成
- MRを作った人がnotebookをhtmlとしてエクスポートし、MRのコメントに貼る
- レビュアーがhtmlを見てレビューする。修正があれば2に戻る
- MRをマージする
ただ、このフローの2.では、htmlをエクスポートしてコメントとしてアップロードする手順がめんどくさいし、そもそもアップロードを忘れがちという課題があります。
そこで、GitLab CIでこれらの作業を自動化することにします。
自動化スクリプト
はじめに、notebookからhtmlへの変換とアップロードとGitLabへのアップロードを行うpythonスクリプトを示します。(importと各種エラー処理は省略します)
別に言語は何でも良いのですが、我々はjupyterのkernelとしてpythonを利用しているので、スクリプトもpythonです。
def get_diff_file_from_master(repo: git.Repo) -> List[Path]:
    latest_master_commit = [b.commit for b in repo.branches if b.name == 'master'][0]
    return [Path(str(d.b_path)) for d
            in latest_master_commit.diff(repo.head, create_patch=True)
            if d.b_blob.name.endswith('.ipynb')]

def generate_notebook_html(file_path: Path) -> str:
    cmd = f'jupyter nbconvert --execute --to html ' + file_path.as_posix()
    return subprocess.check_output(cmd, shell=True).decode()


def upload_file_to_mr(project, file_path: Path):
    return project.upload(filename=file_path.name, filepath=file_path.as_posix())


if __name__ == '__main__':
    repo_url = '.'
    token = os.environ['GITLAB_TOKEN']

    repo = git.Repo(repo_url)
    current_branch = repo.active_branch
    origin_url = urlparse(repo.remotes.origin.url)
    gitlab_url = f'{origin_url.scheme}://{origin_url.netloc}'
    pid = origin_url.path.strip('/').replace('.git', '')
    diff_files = get_diff_file_from_parent(repo)

    [generate_notebook_html(diff_file) for diff_file in diff_files]

    html_files = [diff_file.parent / (diff_file.stem + '.html') for diff_file in diff_files]

    gl = gitlab.Gitlab(gitlab_url, token)
    project = gl.projects.get(pid)
    uploaded_files = [upload_file_to_mr(project, html_file) for html_file in html_files]

    merge_request = project.mergerequests.list(state='opened', source_branch=current_branch.name)[0]
    latest_commit = project.commits.list(ref_name=current_branch.name)[0]
    commit_message = f'{latest_commit.title}: {latest_commit.id}'

    message = {'body': f'{commit_message}<br><br>{"<br>".join([u["markdown"] for u in uploaded_files])}'}
    merge_request.notes.create(message)
各処理について解説します。
GitLabのURL/pid取得
はじめに、カレントディレクトリのgit remote URLを確認し、GitLabのhostnameやリポジトリ名を取得します。
repo = git.Repo(repo_url)
current_branch = repo.active_branch
origin_url = urlparse(repo.remotes.origin.url)
gitlab_url = f'{origin_url.scheme}://{origin_url.netloc}'
pid = origin_url.path.strip('/').replace('.git', '')
対象となるnotebookの絞り込み
get_diff_file_from_masterでは、ビルドすべきnotebookを絞り込むために、現在のfeature branchで追加/変更された、拡張子が*.ipynbであるファイル一覧を取得しています。
リポジトリ内にある*.ipynbを全部ビルドしてもよいのですが、notebookが増えてくるとビルド時間がどんどん伸びてしまうので、このような処理を行なっています。
def get_diff_file_from_master(repo: git.Repo) -> List[Path]:
    latest_master_commit = [b.commit for b in repo.branches if b.name == 'master'][0]
    return [Path(str(d.b_path)) for d
            in latest_master_commit.diff(repo.head, create_patch=True)
            if d.b_blob.name.endswith('.ipynb')]
# ...
diff_files = get_diff_file_from_master(repo)
notebookからhtmlへのエクスポート
htmlへのエクスポートはFile→Download as→HTMLから行えます。
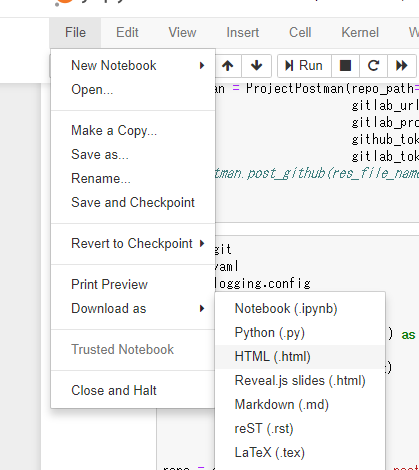
が、jupyterのnbconvertコマンドを利用すると、CLIで生成することもできるので、今回はこちらを利用します。
def generate_notebook_html(file_path: Path) -> str:
    cmd = f'jupyter nbconvert --execute --to html ' + file_path.as_posix()
    return subprocess.check_output(cmd, shell=True).decode()
生成したhtmlをMRにアップロード
生成したhtmlをMRにコメントとしてアップロードします。
project.uploadメソッドでアップロードしたいファイルのパスを渡すと、アップロード結果が以下のようなdictionaryとして返ってきます。
uploaded_file = project.upload(filename, filepath)
print(uploaded_file)
# => {'alt': 'alternate text', 'url': 'アップロードしたファイルへのURL', 'markdown': 'アップロードしたファイルへのmarkdown形式のURL'}
markdownというkeyのvalueには、アップロードされたファイルを参照するmarkdown形式のリンクが含まれているので、あとでこちらを利用します。
アップロード対象のMerge Requestを取得
生成したhtmlを貼り付けるためのMRを取得します。
project.mergerequests.listでMerge Requestの一覧が取得できるのですが、引数により、様々なフィルタ条件を設定できます。ここでは現在のブランチがsource branchであるMRだけを、source_branchを利用して取得しています。
merge_request = project.mergerequests.list(state='opened', source_branch=current_branch.name)[0]
MRのコメントとしてhtmlをアップロード
merge_request.notes.createを呼び出して、書き込む内容を渡せばOKです。
今回は生成したHTMLと、生成元のコミットIDを書き込むことにします。
先程アップロードしたファイルのmarkdown URLを含めることで、htmlファイルへのリンクを貼ることができます。
latest_commit = project.commits.list(ref_name=current_branch.name)[0]
commit_message = f'{latest_commit.title}: {latest_commit.id}'

message = {'body': f'{commit_message}<br><br>{"<br>".join([u["markdown"] for u in uploaded_files])}'}
merge_request.notes.create(message)
GitLab CIの設定
スクリプトが完成したので、次はnotebookがpushされたら自動で実行するために、以下の内容でrequirements.txtとgitlab-ci.ymlを作成しましょう。
jupyter
python-gitlab
gitpython
image: python:stretch

stages:
  - upload

upload:
  stage: upload
  script:
    - pip install -r scripts/requirements.txt
    - git checkout -b $CI_BUILD_REF_NAME || git checkout $CI_BUILD_REF_NAME
    - python scripts/upload_notebook_to_mr.py
scripts/requirements.txtでは、今回のスクリプトを実行するために必要なライブラリの一覧が記述されています。
gitlab-ci.ymlでは、scripts/requirements.txtのライブラリをpip install -rでインストールした後、作成したスクリプトを実行しています。ただし、GitLab CIのコンテナ内では、detached headになっているので、あらかじめMRのsource branchにcheckokutしておく必要があります。GitLab CIでは自動的に設定される環境変数がいくつかあり、そのうちの一つである$CI_BUILD_REF_NAMEでsource branchを取得できます。
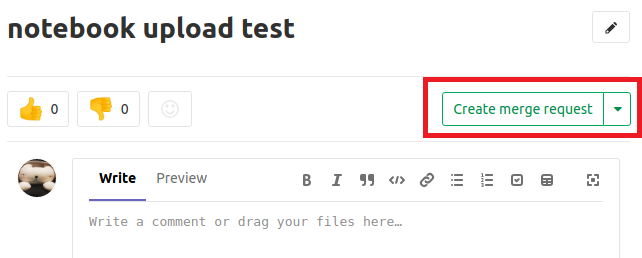
使い方
まずは新たな分析を行うためのIssueを作成し、Create Merge Requestボタンを押して、MRと対応するブランチを作成します。
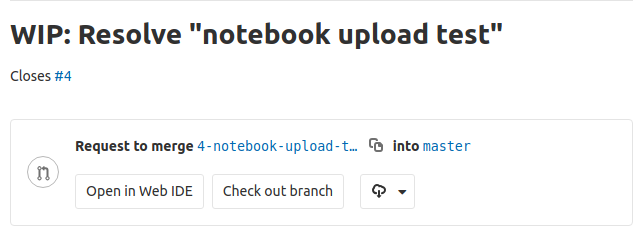
作成されたブランチに切り替えてnotebookを作成し、pushします。
$ git fetch
$ git checkout -t origin/4-notebook-upload-test
# notebookを作成/変更
$ git add .
$ git commit -m "add awesome notebook"
$ git push origin 4-notebook-upload-test
すると、GitLab CIのPipelineが走り始めます。

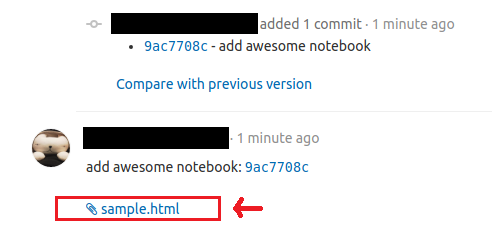
Pipelineが終わると、MRにhtmlがアップロードされます。
ファイル名をクリックすると、エクスポートされたhtmlを閲覧することができます。

おわり
これで、notebookをpushするとhtmlに変換した結果が勝手にコメントとしてアップロードされるようになりました。
雑務はどんどん自動化して、価値のある分析をガンガンできるようにしましょう!