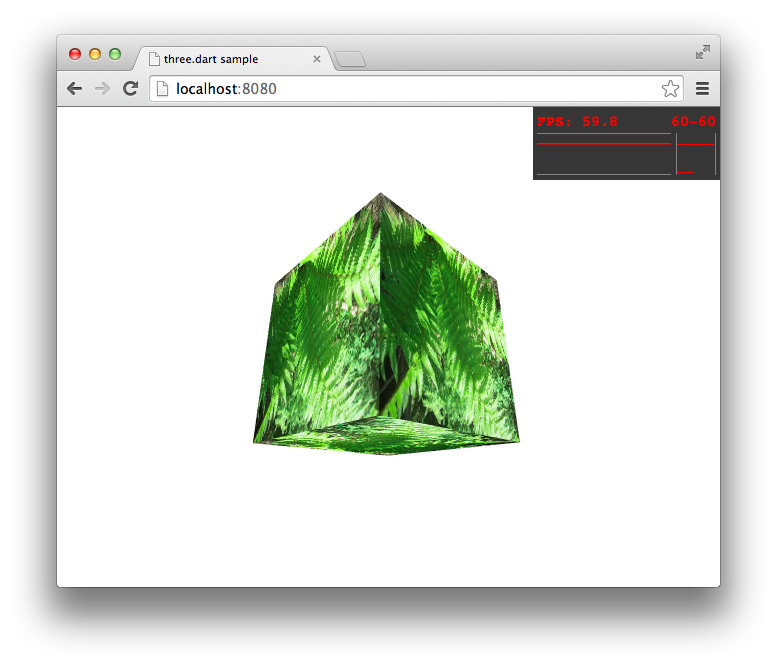
JavaScript向けの3Dライブラリとしてthree.jsというものがありますが、このライブラリのDart向けのPortとしてthree.dartがあります。
このthree.dartを使ったプログラミングの始め方を紹介します。
今回、以下のthree.dartのサンプルを参考にします。
three.dart/web_gl_geometry_cube.dart at master · threeDart/three.dart
pubspec.yaml
適当にディレクトリを作成し、その中にpubspec.yamlファイルを作成します。
name: threedartsample
dependencies:
  browser: any
  three: any
依存ライブラリとしてthreeを指定し、バージョンはanyを指定することで最新バージョンを取得することができますが、2014年10月26日現在の最新バージョンが0.2.5+1で、こちらが最新のDartの仕様に合ってない記述があるので、Githubから最新のものを取得するように設定します。
name: threedartsample
dependencies:
  browser: any
  three:
    git: git://github.com/threeDart/three.dart.git
pubspec.yamlを作成したらpub getします。
$ pub get
web/index.html
webディレクトリを切って、その中にindex.htmlを作成します。
<!DOCTYPE html>
<html>
<head>
    <meta charset="UTF-8">
    <title>three.dart sample</title>
</head>
<body>
    <div id="threedartsample"></div>
    <script type="application/dart" src="main.dart"></script>
    <script src="packages/browser/dart.js"></script>
</body>
</html>
Dartのプログラムとして、main.dartファイルを読み込むように指定します。
上記の例では、<div id="threedartsample"></div>の中にthree.dartの<canvas>が追加される想定で作成しましたが、この<div>の作成は必須ではありません。
web/main.dart
まずはthree.dartのライブラリをimportします。
library threedartsample;

final CANVAS_WIDTH = 640;
final CANVAS_HEIGHT = 480;

import 'dart:html';
import 'package:three/three.dart';

main() {
  init();
}

init() {
  // ここに初期化処理を書く
}
CANVAS_WIDTHとCANVAS_HEIGHTで、<canvas>のサイズを定義しておきます。
今回、init関数に初期化処理を書いていく事とします。
Sceneを作成する
three.dartにおける3D空間の定義は、Sceneが基準となります。レンダリングは、このSceneの単位で行います。
1つだけSceneを作成するので、Sceneクラスのオブジェクトを生成します。
Scene scene;

init() {
  scene = new Scene();
}
Cameraを作成する
次にCameraを作成します。three.dartにおけるCameraには種類がありますが、今回は遠近感を感じられるPerspectiveCameraを作成します。
...
PerspectiveCamera camera;

init() {
  ...
  camera = new PerspectiveCamera(70.0, CANVAS_WIDTH / CANVAS_HEIGHT, 1.0, 1000.0);
}
PerspectiveCameraのコンストラクタの宣言は以下のようになっています。
PerspectiveCamera( [this.fov = 50.0, this.aspect = 1.0, near = 0.1, far = 2000.0] )
fovはField of Viewの略で、画角の指定になります。詳しい説明はここでは省きます。
aspectはアスペクト比と呼ばれるもので、ここでは「幅 / 高さ」で計算したものを指定します。実際にレンダリングするスクリーンの幅と高さで計算すれば、レンダリング時に見える映像が伸縮無しで映しだされます。
nearとfarは、奥方向(Z軸座標)のクリッピングの領域になります。3Dレンダリングでは、奥方向を無限に計算せず「奥方向どの範囲でレンダリングを行うか」を指定します。ここの値はカメラの位置と方向が基準となるビュー座標系におけるZ軸座標になります。
次に、カメラの位置のZ座標を400.0に設定します。
init() {
  ...
  camera.position.z = 400.0;
}
WebGLの座標系は右手座標系で、手前に向かう方向がZ軸のプラスとなるので、手前に400.0の位置にCameraを移動させています。
wgld.org | WebGL: 3D 描画の基礎知識 |
そして、CameraをSceneに追加します。
init() {
  ...
  scene.add(camera);
}
ここまでで、init関数の内容は以下のようになっています。
...
Scene scene;
PerspectiveCamera camera;

init() {
  scene = new Scene();

  camera = new PerspectiveCamera(70.0, CANVAS_WIDTH / CANVAS_HEIGHT, 1.0, 1000.0);
  camera.z = 400.0;
  scene.add(camera);
}
Mesh
次に3D空間に物体を配置します。今回はMeshを配置します。
Meshとは、直訳すると「網目」のことで、3Dプログラミングにおいては「色味などの質感を持った立体図形の1つの単位」と考えるとわかりやすいです。
このMeshは、先ほどの説明にあったように「質感」と「立体図形」の情報を持っており、Three.dartでは、それぞれMaterialとGeometryとして定義されます。
このへんの概念はThree.dartに限ったものではなく、たいていの3Dライブラリでは持っている概念になります。これらの概念はあくまで3Dライブラリが持っているもので、WebGLや、そのベースとなっているOpenGLの仕様には存在していません。「CPUは基本的にクラスや関数という概念を持っていない」という説明に似ています。
Geometry
まずは立体図形としてGeometryを作成します。
init() {
  ...
  var geometry = new CubeGeometry(200.0, 200.0, 200.0);
}
今回は、単純に立方体を作ります。Three.dartにはプリセットとしてよく使われるGeometryが用意されており、その中でCubeGeometryという箱型のGeometryを利用します。
このCubeGeometryのコンストラクタの宣言は以下のようになっています。
CubeGeometry( double width, double height, double depth, [this.segmentsWidth = 1,
                                                   this.segmentsHeight = 1,
                                                   this.segmentsDepth = 1,
                                                   materialOrList,
                                                   List sides] )
色々ありますが、今回はwidth, height, depthだけを利用します。それぞれ幅、高さ、奥行きのサイズなので、すべて200.0を設定して、立方体にしています。
その他の引数については、今回は説明しません。
Material
次に「質感」としてMaterialを作成します。ここでは少し凝って、テクスチャ画像をはりつけるMaterialを作成します。
画像は、シダ画像を用意しました。
単純にテクスチャを貼り付けるMaterialとしてMeshBasicMaterialを利用します。
...
import 'package:three/extras/image_utils.dart' as ImageUtils;
...
init() {
  ...
  var material = new MeshBasicMaterial( map: ImageUtils.loadTexture( 'assets/shida.jpg' ));
}
MeshBasicMaterialのコンストラクタに指定できる引数は非常にたくさんあり、今回は名前付き引数としてmapにTextureを指定しています。
Textureのオブジェクトの作成にはImageUtils.loadTextureを利用しており、そのために新たにimport 'package:three/extras/image_utils.dart' as ImageUtils;の文を追加しています。
GeometryとMaterialからMeshを作成
そして、作成したCubeGeometryとMeshBasicMaterialからMeshを作成します。
...
Mesh cube;

init() {
  ...
  cube = new Mesh(geometry, material);
}
そして、作成したMeshをSceneに追加します。
init() {
  ...
  scene.add(cube);
}
ここまでで、init関数の内容は以下のようになっています。
...
Scene scene;
PerspectiveCamera camera;

Mesh cube;

init() {
  scene = new Scene();

  camera = new PerspectiveCamera(70.0, CANVAS_WIDTH / CANVAS_HEIGHT, 1.0, 1000.0);
  camera.position.z = 400.0;
  scene.add(camera);

  var geometry = new CubeGeometry(200.0, 200.0, 200.0);
  var material = new MeshBasicMaterial( map: ImageUtils.loadTexture( 'assets/shida.jpg' ));

  cube = new Mesh(geometry, material);
  scene.add(cube);
}
Renderer
次にRendererというものを作成します。これがThree.dartにおけるレンダリングに関する機能を提供するものとなります。
内部的にどういった機能で3Dレンダリングを実現するかはRendererに依存しており、Three.dartではWebGL, Canvas, CSSによるレンダリングの機能が用意されています。
今回は目玉であるWebGLを用いたレンダリングを行いたいと思いますので、WebGLRendererを使います。
まず、WebGLRendererクラスのオブジェクトを作成します。
...
WebGLRenderer renderer;

init() {
  ...
  renderer = new WebGLRenderer();
}
次に、実際にレンダリングを行う画面サイズを設定します。
init() {
  ...
  renderer.setSize(CANVAS_WIDTH, CANVAS_HEIGHT);
}
WebGLでの描画は、HTML5の<canvas>に対して行われ、その<canvas>要素は、このWebGLRendererが内部で持っています。
そのため、その内部で持っている<canvas>を、document上に配置する必要があります。
まずは、事前に用意していた<canvas>を入れたい要素を取り出します。
...
Element container;

init() {
  ...
  container = document.querySelector('#threedartsample');
}
次に、WebGLRendererが持っている<canvas>を取り出し、追加したい要素に追加します。Rendererが持っている描画要素はRenderer.domElementで参照できます。
init() {
  ...
  container.nodes.add(renderer.domElement);
}
これで基本的な初期化処理は完了しました。
ここまでで、main.dartの全体は、以下のようになっています。
library threedartsample;

import 'dart:html';
import 'package:three/three.dart';
import 'package:three/extras/image_utils.dart' as ImageUtils;

Element container;

Scene scene;
PerspectiveCamera camera;
WebGLRenderer renderer;

Mesh cube;

main() {
  init();
}

init() {
  scene = new Scene();

  camera = new PerspectiveCamera(70.0, CANVAS_WIDTH / CANVAS_HEIGHT, 1.0, 1000.0);
  camera.position.z = 400.0;
  scene.add(camera);

  var geometry = new CubeGeometry(200.0, 200.0, 200.0);
  var material = new MeshBasicMaterial( map: ImageUtils.loadTexture( 'assets/shida.jpg' ));

  cube = new Mesh(geometry, material);
  scene.add(cube);

  renderer = new WebGLRenderer();
  renderer.setSize(CANVAS_WIDTH, CANVAS_HEIGHT);

  container = document.querySelector('#threedartsample');
  container.nodes.add(renderer.domElement);
}
レンダリング
実際に<canvas>に対してレンダリングを行います。
レンダリングを行うにはRendererに対してrenderメソッドを呼びます。
renderer.render(scene, camera);
renderメソッドの宣言は以下のようになっています。
void render( Scene scene, Camera camera );
sceneとcameraには、それぞれ初期化処理で作成したオブジェクトを渡します。
このメソッドを1回呼ぶと、Sceneに配置されたものと、Cameraの状態に応じて、そのレンダリング結果が1回だけ行われます。
アニメーション
requestAnimationFrame
実際に3Dプログラミングでゲーム等を開発する際は、1回だけのレンダリングではなく、連続して何度もレンダリングを行い、アニメーションを実現します。
昔は、DOM仕様のwindow.setIntervalを用いて何度も関数を呼んで描画処理を行っていた時代がありましたが、現在、最新のDOM仕様ではwindow.requestAnimationFrameという、まさにアニメーションのための関数呼び出しを目的とした機能が用意されました。
この機能は、毎フレーム関数が呼ばれるようになる機能ではなく、次回の描画が必要になるタイミングで1度だけ呼ばれる関数になります。なので、この中で呼ばれた関数の中で、さらにrequestAnimationFrameを呼ぶことで、毎フレーム処理を実現することができます。
ほとんどの環境でこの関数は60FPS相当で関数が呼ばれます。
Dartでのwindow.requestAnimationFrameは、以下の様な仕様になっています。
int requestAnimationFrame(RequestAnimationFrameCallback callback)
callbackの型であるRequestAnimationFrameCallbackは、以下の様な仕様になっています。
typedef void RequestAnimationFrameCallback (num highResTime)
numの引数を1つ受け取る関数になります。
こちらの機能を利用して、アニメーションのための処理を作成します。
アニメーション処理
まず、window.requestAnimationFrameから呼ばれるためのanimate関数を作成します。関数の名称は任意です。
RequestAnimationFrameCallbackの宣言に従い、numの引数を1つ受け取る関数とします。
animate(num time) {
}
次回以降も描画のタイミングでこの関数が呼ばれるようにするため、ここでrequestAnimationFrameを呼びます。
animate(num time) {
  window.requestAnimationFrame(animate);
}
レンダリング
この関数のなかで、実際のレンダリングを行います。レンダリングを行うには、先ほど説明したRendererのrenderメソッドを呼びます。
animate(num time) {
  ...
  renderer.render(scene, camera);
}
これで基本的には毎フレームの描画が行われるようになります。
Meshの回転
これだけでは実際にアニメーションの様子がわからないため、作成した立方体を回転させてみます。Meshを回転させるには、rotationプロパティを利用します。
animate(num time) {
  ...
  cube.rotation.x += 0.005;
  cube.rotation.y += 0.01;

  renderer.render(scene, camera);
}
これで立方体が回転するようになります。このrotationの単位は、three.jsの仕様に従いラジアンとなります。
.rotation
Object's local rotation (Euler angles), in radians.
最後に、main関数でこのanimate関数が、初期化処理完了後に一度だけ呼ばれるようにします。
main() {
  init();
  animate(0);
}
実行
Dartでは、pub serveを用いて簡易サーバーを立てて動作を確認するのが楽です。
$ pub serve
Loading source assets...
Serving threedartsample web on http://localhost:8080
Build completed successfully
標準でlocalhost:8080にアクセスすることで確認することができます。
通常のWebブラウザから確認することも出来ますが、その場合DartからJavaScriptの変換が行われて実行されるので、多少時間がかかります。
Dartiumから実行することで、素早く実行を確認することができますので、Dartiumで実行してみます。
シダ画像が貼り付けられた立方体が回転します。
右上に出ているグラフはChromeのパフォーマンス確認用の機能で、レンダリングのFPSを確認することができます。確認した環境では、安定して60FPS相当を維持しています。
main.dartの全体
最終的なmain.dartの全体の内容は以下のようになりました。
library threedartsample;

import 'dart:html';
import 'package:three/three.dart';
import 'package:three/extras/image_utils.dart' as ImageUtils;

final CANVAS_WIDTH = 640;
final CANVAS_HEIGHT = 480;

Element container;

PerspectiveCamera camera;
Scene scene;
WebGLRenderer renderer;

Mesh cube;

main() {
  init();
  animate(0);
}

init() {
  scene = new Scene();
  camera = new PerspectiveCamera(70.0, CANVAS_WIDTH / CANVAS_HEIGHT, 1.0, 1000.0);

  camera.position.z = 400.0;
  scene.add(camera);

  var geometry = new CubeGeometry(200.0, 200.0, 200.0);
  var material = new MeshBasicMaterial( map: ImageUtils.loadTexture( 'assets/shida.jpg' ));

  cube = new Mesh(geometry, material);
  scene.add(cube);

  renderer = new WebGLRenderer();
  renderer.setSize(CANVAS_WIDTH, CANVAS_HEIGHT);

  container = document.querySelector('#threedartsample');
  container.nodes.add(renderer.domElement);
}

animate(num time) {
  window.requestAnimationFrame(animate);

  cube.rotation.x += 0.005;
  cube.rotation.y += 0.01;

  renderer.render(scene, camera);
}

