はじめに
皆さん、こんにちは!Webシステム開発エンジニアの蘭です!
今日は【Vuex】について語りたいと思います。
Vuexって何?
Vuexはすべてのコンポーネントでデータを一元管理するための仕組みです。
何故Vuex?
Vueで足りるんじゃない?
アプリを構築している中、最初はコンポーネント内だけでdataを操作してたが、コンポネントが多くなってくると、コンポーネントで共有して使うデータが現れます。その時思いついたのが、Vueの$emitやpropsを使うことでコンポーネント間のデータ共有問題を解決してました。
しかしアプリが大きくなるに連れ、コンポーネントが更に多くなり、共有データが300以上に増加、もうこのコンポーネントのデータはどのコンポーネントから持ってきたのかが分からない!![]()
まさに開発に連れ、地獄の道へと進んでしまってたのです。
その時に、現れたのがVuexでした。
Vuexっていつ導入すべきなのか?
ここで想像してみましょう。
例えばコンポネントは一つの店だとします。
Aコンポーネントはバナナしか在庫がなく、Bコンポーネントはりんご、Cコンポーネントはスイカ等、それぞれ一種類の果物しか預かってません。
それで各コンポーネントがフルーツパフェを作りたい時に、コンポーネントAはBにりんごを買ってきたり、BはAからバナナを入荷してましたが、なにかややこしいですよね。
それでVuexの考え方はコンポネントで皆使う共有の果物は全部Storeという多きな倉庫に入れといて、他の果物が欲しいコンポネントは倉庫から入荷しましょうという改善方法が生まれました。
その倉庫がVuexでの「Store(ストア)」です。
めでたし、めでたし![]()
・Vuexでのデータ管理のイメージ
Vuexってどんな時に使うといいの?
・アプリケーション全体で使用されるデータ→Vuexで管理する
・コンポーネントの内部のみで使用されるデータ→dataオプションで管理する
実例:Vuexのシンプルなストア(倉庫)
・以下の例はVuexストア(倉庫)から変数countを取得します。
・コンポーネントからVuexストア共有変数countを
store.state.countで取得。
・VuexではStoreの共有変数countを直接変更できない為、
・対策:ストア共有変数を変更する関数increment()をストア内に準備し、コンポーネントではボタンを押した後、store.commit('increment')経由で共有変数countを間接的に更新する。
See the Pen Vuex_Simple_Store_Demo by Uramaya (@uramaya) on CodePen.
要するに:ストアと単純なグローバルオブジェクトの違い
・ストアの状態を直接変更することはできない。明示的にmutationsをコミットすることによってのみストアの状態を変更する。これによりすべての状態変更に追跡可能な記録を残すことが保証される。
Vuexをやってみよう!
Vuexのインストール
・通常開発ではnpmやyarnでインスタンスします。
※前提:Vueのインストール済み
npm install vuex --save
yarn add vuex
・npmやyarnでvuexをインストールの方、
以下のVuexを明示的に導入が必要。
import Vue from 'vue'
import Vuex from 'vuex'

Vue.use(Vuex)
・試しであれば、cdnでもOK
https://cdnjs.cloudflare.com/ajax/libs/vuex/2.0.0/vuex.js
Vuexの概念
以下の内容はこちらを参照しています。
Vuexのストアは構成要素として5つの概念を持つ
【state】, 【mutations】, 【getters】, 【actions】, 【modules】
以下は上記の5つの概念について説明します。
1.【state】
・ストアで管理する状態(共有変数、データ)。コンポーネントのdataみたいにデータを保存する場所。
・gettersから参照され、更新はmutationsで行う
ストアから状態を取り出す`一番シンプルな方法は、算出プロパティ (computed)で取得しまた返すことです。
・こちらは直接'store.state.count'でストア状態を持ってきてますが、
・開発で以下の欠点があります。
モジュールを使うとき、ストアの状態を使っている全てのコンポーネントをインポートしなければなりません。(ストア状態を共有してるモジュールが100個あった場合、地獄に落ちます。)
See the Pen Vuex_Store_Example by Uramaya (@uramaya) on CodePen.
・上記解決方法:ルートコンポーネントに store オプションを指定
これですべての子コンポーネントにストアを共有する事ができます。
new Vue({
  el: '#app',
   //ルートインスタンスに store オプションを渡す
   //★これをすることで、this.$store で各コンポーネントから参照することができます。
   store,
});
See the Pen gOOpGxN by Uramaya (@uramaya) on CodePen.
・mapState ヘルパー:算出プロパティ(Computed)で宣伝方法の改善
・以下を見るとわかりますが、算出プロパティを全て宣伝するのは冗長です。
const Counter = {
  template: `<div>{{ count }}</div>`,
  computed: {
    count () {
      return this.$store.state.count
    }
  count2 () {
      return this.$store.state.count2
    }
  count3 () {
      return this.$store.state.count3
    }
   ...
  }
}
computed: mapState({
    count:  'count',  // count: state => state.countと同義
    count2: 'count2', // count2: state => state.count2と同義
    count3: 'count3'  // count3: state => state.count3と同義
  })
・npmやyarnでvuexをインストールの方、魔法の言葉を忘れずに
import {mapState} from 'vuex'
2.【getters】
・state内の状態をもとに算出した値を返す関数が書かれる場所
・stateのデータを加工して表示
・state加工するので、最初の引数はstate
・状態をフィルタリング、カウントした値を返す
See the Pen Vuex_Store_Example_getters by Uramaya (@uramaya) on CodePen.
3.【mutations】
・stateを更新する関数が書かれる場所
・stateの更新はしない
・第一引数は必ずstate, それ以降の引数はpayload
・state状態を更新する際は必ずcommitを使用
See the Pen Vuex_Store_Example_mutations by Uramaya (@uramaya) on CodePen.
4.【actions】
・非同期処理や外部API通信する場所
・actionで非同期処理を開始→
実際stateの更新はmutationsをcommitで実行する
⇛actionでstateの更新は行わない
⇛最終的にmutationsにデータをコミットする関数
⇛commitは同期でなければならない
Actions処理
以下の例でActions処理の過程を見てみよう。
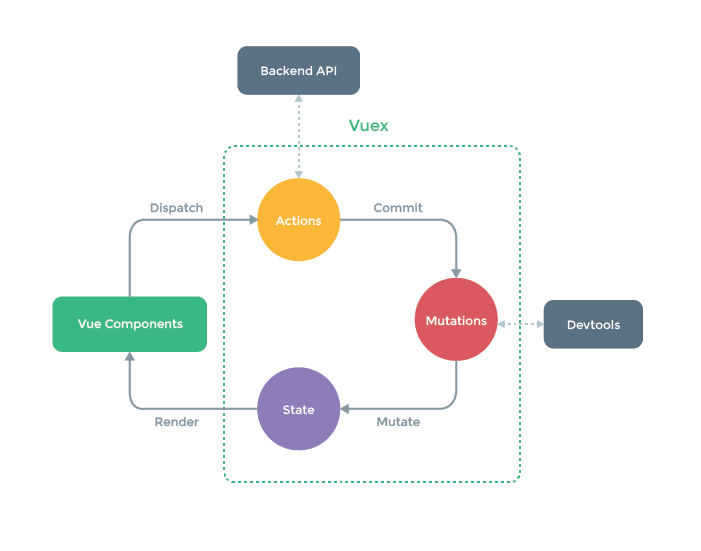
全体の処理の流れとしては、コンポーネントからdispatchでアクションを呼び出し、アクション内で外部APIなどからの非同期処理を行った後、commitでミューテーションを使いステートを更新するという流れとなります。
上記はこちらから引用。
・コンポーネントからストアの処理を呼び出すメモ:
MutationsはCommit / Actionsはdispatch
 methods: {
    increment(plus) {
   //plusは引数
      this.$store.dispatch('incrementAsync', plus);
      this.$store.dispatch('warningAsync');
    }
  },
  actions:{
    incrementAsync({ commit }, plus) {
      setTimeout(()=>{
        alert("これが非同期処理です。");
        commit('increment', plus)
      }, 5000) //非同期で五秒遅らせる事ができる。
    },
    warningAsync({ commit }) {
        commit('warning')
    }
  },
  mutations: {
    //★ここでstate状態を変更する関数を用意
    increment (state, plus) {
      state.total += plus
      state.warning_show = false
    },
    warning (state) {
      state.warning = "5秒お待ち下さい。"
      state.warning_show = true
    }
  },
それでは実装してみよう。
非同期処理
See the Pen Vuex_Store_Example_actions by Uramaya (@uramaya) on CodePen.
API通信
・今回非同期のAPI通信では、ライブラリ「axios」を使います。
・async関数を使ってみる(必須ではない):
async関数:
async関数・メソッドはメソッドの冒頭に async をつけることで、 await が使え、awaitは必ずaxios.get等通信処理が終了し、responseもしくはerrorが返ってきた後に、awaitの処理を実行します。
See the Pen ExxVjym by Uramaya (@uramaya) on CodePen.
【state】、【getters】、【mutations】、【actions】を使ってTodoListを作ってみよう!
ここまで読んでいただき、ありがとうございます!
ではモジュールを理解する前に、以下のコードで遊んでみてください。
See the Pen Vue + Vuex Demo by Arpit Gupta (@arpitg) on CodePen.
5.【modules】
・上記4つのストア構成要素を分割したもの。
・アプリケーションの肥大化に伴い大きくなるストアに対し、見通しをよく保つためにモジュールに分割する。
以下の記事を参考しました。
Vuex公式-モジュール
開発に連れ、コードが膨大する中、全て何百個のstate, getters, mutations, actionsを一つのファイルにまとめるのは事実上管理不可能です。
ここで解決法が【モジュール】です。
モジュールとは元々凄く膨大なstateやgetters等を小さなモジュール単位に分割して、管理することです。
もちろん、これで保守、修正、管理が便利になります。
モジュールの使い方を見てみよう!
・1.同一ファイルでモジュール分け
//モジュールA
const moduleA = {
  state: { ... },
  mutations: { ... },
  actions: { ... },
  getters: { ... }
}

//モジュールB
const moduleB = {
  state: { ... },
  mutations: { ... },
  actions: { ... }
}

const store = new Vuex.Store({
  modules: {
    module_a: moduleA,
    module_b: moduleB
  }
})

store.state.module_a // -> `moduleA` のステート
store.state.module_b // -> `moduleB` のステート
・2.違うファイルでモジュール分け(現場)
・モジュールの分け方について以下を参考しました。
Vuex の Modules 機能
vuexでmoduleを分ける方法と注意点
・(1)モジュール:「superFunction」と「header」を storeに登録
import Vue from "vue";
import Vuex from "vuex";

import superFunction from "./superFunction";
import header from "./header";

Vue.use(Vuex);

const store = new Vuex.Store({
  modules: {
    superFunction,
    header
  }
});

export default store;
・(2)モジュールの指定を明確にする為、 namespaced: true にすることを忘れずに
・namespacedについて以下を引用しました。
Vuexのストアをモジュールに分割する
・Vuex名前空間の概念:【namespaced: true】 とは
namespaced:オプションをtrueにすることで、それぞれのモジュールに名前空間を与えて呼び出し方を管理することができる。
ただstateについては、namespaced: trueの有無は関係なく一律で$store.state.(モジュール名).data.messageのように呼び出す。
その他のmutation, action, getterはnamespaced: trueを与えなかった場合はモジュールを使用せずグローバルに登録したときと同じように呼び出せる。
もしnamespaced: trueを与えていない複数のモジュール内で名前が被った場合、mutationとactionはそれぞれが同時に実行される。
getterは以下のようなエラーが発生する。
[vuex] duplicate getter key: greetingC.
>namespaced: trueを与えたmutation, action, getterは、名前の前にモジュール名/を付与して呼び出すことで、上記のエラーを避けられます。

>```
console.log(this.$store.getters['moduleA/greeting']
console.log(this.$store.commit('moduleA/greeting')
console.log(this.$store.dispatch('moduleA/greeting')
// getterは[], mutationとactionは()で囲むので注意
・モジュールを作ってみよう
const state = {
  appNumber: 0
};

const getters = {
  appNumber(state) {
    return state.appNumber;
  }
};

const actions = {
  changeNumber({ commit }, val) {
    commit("changeNumber", val);
  }
};

const mutations = {
  changeNumber(state, value) {
    state.appNumber = state.appNumber + value;
  }
};

const superFunction = {
  namespaced: true, // 忘れずに
  state,
  getters,
  actions,
  mutations
};

export default superFunction; //モジュールの名前
・(3)コンポネントでモジュール:superFunctionを使う
以下の注意点:
・getter と action の参照の仕方が変わる
・this.$store.getters["moduleName/getterName"]
・this.$store.dispatch("moduleName/actionName")
<template>
  <main>
    {{appNumber}}
    <Controller :changeNumber="changeNumber"/>
  </main>
</template>

<script>
import Controller from "./Controller";
export default {
  components: {
    Controller
  },
  computed: {
    appNumber() {
      return this.$store.getters["superFunction/appNumber"];
    }
  },
  methods: {
    changeNumber(val) {
      this.$store.dispatch("superFunction/changeNumber", val);
    }
  }
};
</script>
・上記の実際のソースコードを見て試してみよう【Codesandbox】
https://codesandbox.io/embed/w67wklz0pk?fontsize=14
おまけに
・npmやyarnでVuexをインストールした方は、必ずuseでVuexの参照をしてください。
import Vue from 'vue'
import Vuex from 'vuex'
import App from './App.vue'

Vue.use(Vuex); //忘れずに

const store = new Vuex.Store({
...略...
・Vuexで開発する際に、以下の記事も参考にできればと思います。
Vuexを用いた開発プロジェクト用にガイドラインを作成した話
メンテナンスしやすいVueComponentを設計するために気をつけていること
・VueとVuexの練習
30minくらいで学ぶVue.jsとVuex
簡単なTODOアプリで Vue + Vuex を学んでみよう
簡単なTODOアプリソースコード(Github)
・Vueの基本概念
10分で基礎がわからるVue.js-入門
最後に
今回はVuexについて基本の使い方を紹介しました。
自分のニーズに沿って、是非Vuexを開発で使って見てください!:D

