はじめに
初めまして、株式会社じげんの毛援援です。日本に来て3年目で、社会人も3年目です。主にrailsアプリケーションの開発をしてます。よろしくお願い致します。
機械学習を勉強しようと思い、今回初めてscikit-learn(sklearn)に挑戦してみました。
この記事では、インストール手順を含めて、一連の工程をお伝えします。
- インストールする
- sklearnの例(The Digit Dataset)を触ってみる
- sklearnを使ってデータセットをダウンロードする
- matplotlibで表示する
sklearnや機械学習に興味がある方や、私と同じく機械学習ビギナーの方は、是非コメントをお願いします。
-
機械学習:機械学習(きかいがくしゅう、英: machine learning)とは、経験からの学習により自動で改善するコンピューターアルゴリズムもしくはその研究領域で、人工知能の一種であるとみなされている。「訓練データ」もしくは「学習データ」と呼ばれるデータを使って学習し、学習結果を使って何らかのタスクをこなす。例えば過去のスパムメールを訓練データとして用いて学習し、スパムフィルタリングというタスクをこなす、といった事が可能となる。
(https://ja.wikipedia.org/wiki/機械学習 より引用) -
scikit-learn(sklearn):Pythonに基づく機械学習ツールです。
- 予測データ分析のためのシンプルで効率的なツール
- NumPy、SciPy、およびmatplotlib上に構築
- オープンソース、商用利用可能-BSDライセンス
(https://scikit-learn.org/stable より引用)
環境
MacBook Pro 11.6 (2.6 GHz 6コアIntel Core i7)
python 3.9
pip 21.3.1
sklearn 1.0.1
matplotlib 3.5.0
インストール
1. pipのインストール(pipがインストールされている場合は、ここを無視していいです)
curl https://bootstrap.pypa.io/get-pip.py -o get-pip.py
  % Total    % Received % Xferd  Average Speed   Time    Time     Time  Current
                                 Dload  Upload   Total   Spent    Left  Speed
100 2108k  100 2108k    0     0  7052k      0 --:--:-- --:--:-- --:--:-- 7076k
sudo python3 get-pip.py
WARNING: The directory '/Users/mao/Library/Caches/pip' or its parent directory is not owned or is not writable by the current user. The cache has been disabled. Check the permissions and owner of that directory. If executing pip with sudo, you should use sudo's -H flag.
DEPRECATION: Configuring installation scheme with distutils config files is deprecated and will no longer work in the near future. If you are using a Homebrew or Linuxbrew Python, please see discussion at https://github.com/Homebrew/homebrew-core/issues/76621
Collecting pip
  Downloading pip-21.3.1-py3-none-any.whl (1.7 MB)
     |████████████████████████████████| 1.7 MB 3.9 MB/s
Installing collected packages: pip
  Attempting uninstall: pip
    Found existing installation: pip 21.3.1
    Uninstalling pip-21.3.1:
      Successfully uninstalled pip-21.3.1
DEPRECATION: Configuring installation scheme with distutils config files is deprecated and will no longer work in the near future. If you are using a Homebrew or Linuxbrew Python, please see discussion at https://github.com/Homebrew/homebrew-core/issues/76621
Successfully installed pip-21.3.1
WARNING: Running pip as the 'root' user can result in broken permissions and conflicting behaviour with the system package manager. It is recommended to use a virtual environment instead: https://pip.pypa.io/warnings/venv
-
pip -Vorpip3 -Vで確認
pip 21.3.1 from /usr/local/lib/python3.9/site-packages/pip (python 3.9)
2. sklearnをインストール
-
pip install -U scikit-learn
注意:scikit-learnにはSciPyとNumPyが必須のパッケージとなります。まだインストールしていない方はSciPyとNumPyを事前にインストールしておきましょう。
DEPRECATION: Configuring installation scheme with distutils config files is deprecated and will no longer work in the near future. If you are using a Homebrew or Linuxbrew Python, please see discussion at https://github.com/Homebrew/homebrew-core/issues/76621
Collecting scikit-learn
  Using cached scikit_learn-1.0.1-cp39-cp39-macosx_10_13_x86_64.whl (8.0 MB)
Requirement already satisfied: scipy>=1.1.0 in /usr/local/lib/python3.9/site-packages (from scikit-learn) (1.7.2)
Requirement already satisfied: threadpoolctl>=2.0.0 in /usr/local/lib/python3.9/site-packages (from scikit-learn) (3.0.0)
Requirement already satisfied: joblib>=0.11 in /usr/local/lib/python3.9/site-packages (from scikit-learn) (1.1.0)
Requirement already satisfied: numpy>=1.14.6 in /usr/local/lib/python3.9/site-packages (from scikit-learn) (1.21.4)
Installing collected packages: scikit-learn
DEPRECATION: Configuring installation scheme with distutils config files is deprecated and will no longer work in the near future. If you are using a Homebrew or Linuxbrew Python, please see discussion at https://github.com/Homebrew/homebrew-core/issues/76621
Successfully installed scikit-learn-1.0.1
インストールしたsklearnを確認
-
python3 -m pip show scikit-learn: scikit-learnでインストールされているバージョンと場所を確認します。
Name: scikit-learn
Version: 1.0.1
Summary: A set of python modules for machine learning and data mining
Home-page: http://scikit-learn.org
Author:
Author-email:
License: new BSD
Location: /usr/local/lib/python3.9/site-packages
Requires: joblib, numpy, scipy, threadpoolctl
Required-by:
-
python3 -m pip freeze: 実行中の環境でインストールしたパッケージを表示させます。
fonttools==4.28.2
joblib==1.1.0
kiwisolver==1.3.2
matplotlib==3.5.0
numpy==1.21.4
packaging==21.3
pandas==1.3.4
Pillow==8.4.0
pyparsing==3.0.6
python-dateutil==2.8.2
pytz==2021.3
scikit-learn==1.0.1
scipy==1.7.2
setuptools-scm==6.3.2
six==1.16.0
threadpoolctl==3.0.0
tomli==1.2.2
-
python3 -c "import sklearn; sklearn.show_versions()": ちゃんと動いているかどうかを確認します。
System:
    python: 3.9.2 (default, Mar 15 2021, 17:37:51)  [Clang 12.0.0 (clang-1200.0.32.29)]
executable: /usr/local/opt/python@3.9/bin/python3.9
   machine: macOS-11.6-x86_64-i386-64bit

Python dependencies:
          pip: 21.3.1
   setuptools: 54.1.2
      sklearn: 1.0.1
        numpy: 1.21.4
        scipy: 1.7.2
       Cython: None
       pandas: 1.3.4
   matplotlib: 3.5.0
       joblib: 1.1.0
threadpoolctl: 3.0.0

Built with OpenMP: True
sklearnを触ってみる
今回はThe Digit Datasetをやってみます。
このデータセットは、1797枚8x8の0から9までの手書き数字の画像で構成されています。
下のソースコードは公式ページからの引用です。
数字画像をmatplotlibで表示しています。
# Code source: Gaël Varoquaux
# Modified for documentation by Jaques Grobler
# License: BSD 3 clause

from sklearn import datasets

import matplotlib.pyplot as plt

# Load the digits dataset
digits = datasets.load_digits()

# Display the first digit
plt.figure(1, figsize=(3, 3))
plt.imshow(digits.images[-1], cmap=plt.cm.gray_r, interpolation="nearest")
plt.show()

説明
先ほどのソースコードを詳しく見てみます。
-
from sklearn import datasets: sklearnからThe Digit Datasetを導入します。 -
import matplotlib.pyplot as plt: matplotlib.pyplotを導入して、pltという別名が使えます。-
matplotlib.pyplot:matplotlibのインターフェースです。 これはMATLABのような暗黙的なプロット方法を提供します。 画面上にフィギュアを開き、フィギュアGUIマネージャーとして機能します。
-
-
datasets.load_digits(): 数字のデータセットをロードして、Dictionary-likeオブジェクト(Bunch)を返します。 -
plt.figure(1, figsize=(3, 3)): idは1で、3x3インチの新しいフィギュアを作成します。-
plt.figure(num, figsize): 新しいフィギュアを作成するか、既存のフィギュアをアクティブにします。-
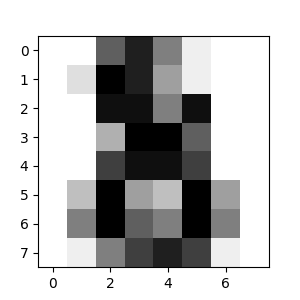
num(int or str or Figure, optional): フィギュアの唯一的な識別子です。1ならフィギュア名はFigure 1です。もし'test'にしたら、識別子とフィギュア名はtestになります。 -
figsize((float, float), default: rcParams["figure.figsize"] (default: [6.4, 4.8])): フィギュアの幅、高さ(インチ)です。
-
-
| num=1 | num='test' |
|---|---|
 |
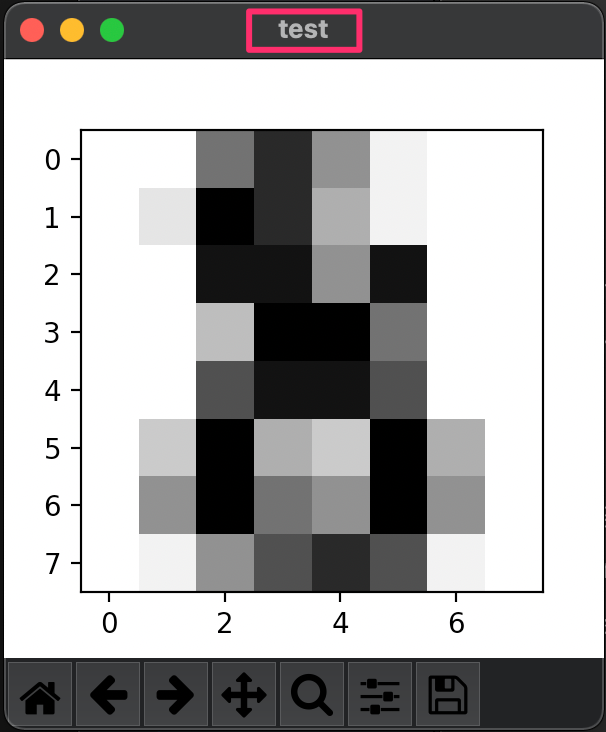 |
-
plt.imshow(digits.images[-1], cmap=plt.cm.gray_r, interpolation="nearest"): データセット最後の項目を最近傍補間(nearest)して、逆グレースケール画像を作ります。-
plt.imshow(X, cmap, interpolation): データを画像として、つまり2Dの通常のラスターに表示します。-
X(array-like or PIL image): 画像のデータです。digits.images[-1]はデータセットの最後の項目です。 -
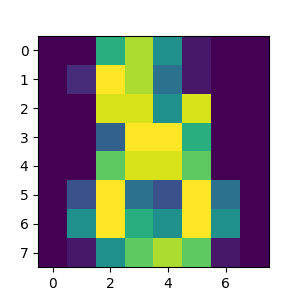
cmap(str or Colormap, default: rcParams["image.cmap"] (default: 'viridis')): Colormapインスタンスまたは登録済みカラーマップ名が入ります。これにより、スカラーデータと色を対応させます。plt.cm.gray_rはplt.cm.grayと逆です。値が0の時は白で、最大値(8ビットでは255、16ビットでは65,535)では黒です。 -
interpolation(str, default: rcParams["image.interpolation"] (default: 'antialiased')): 補間を設定します。'nearest'とは最近傍補間(ニアレストネイバー Nearest neighbor)で、最も近い位置にある画素の輝度値を参照します。
-
-
plt.cm.gray_r |
plt.cm.gray |
default: 'antialiased' |
|---|---|---|
 |
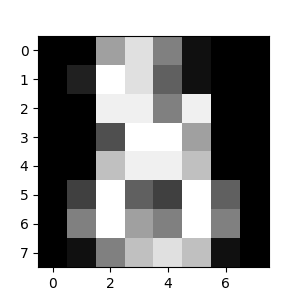 |
 |
'nearest' |
default: 'antialiased' |
'bilinear' |
'bicubic' |
|---|---|---|---|
|
 |
 |
 |
終わりに
今回は初めて簡単なsklearnの例を実行しました。Railsなどと全然違って、新鮮な体験でした。
今後も引き続き、機械学習の勉強を頑張ります。
記事は会社の皆さんが手伝ってくれたおかげで、完了しました。ありがとうございました!!!![]()
参考
-
matplotlib.pyplot:
matplotlib.pyplotライブラリの説明です。 -
sklearn.datasets.load_digits:
sklearn.datasets.load_digitsメソッドの説明です。 -
sklearn.utils.Bunch:
Bunchの説明です。 -
matplotlib.pyplot.figure:
matplotlib.pyplot.figureメソッドの説明です。 - Matplotlib plt.figure()を使う理由|FigureとAxesの関係を把握しよう: Figureの説明で、FigureとAxesの関係の説明です。
-
matplotlib.pyplot.imshow:
matplotlib.pyplot.imshowメソッドの説明です。 -
Interpolations for imshow:
matplotlib.pyplot.imshowの内挿の説明です。 - 画素の補間(Nearest neighbor,Bilinear,Bicubic)の計算方法: 最近傍補間などの説明です。