初めての投稿につき、お見苦しい点があったら申し訳ない。
基本は自分の学習用備忘録としての活用になるゆえ、ご容赦いただきたい。
1. はじめに
インフラエンジニアとしてプライベートクラウドの構築・運用に携わる身ではあるが、
それを利活用する上でプログラムの知識が無いと早々と限界が見えてくるだろうと感じた。
ネットワークやストレージは好きだが、それらをより深く知るため、新たな決意をもってプログラミングの世界に身を投じる。
インフラ的にも多く利用されているPythonをテーマとし、まずはその勉強環境を整えることから始めた。
2. 構築環境
-
クライアント:Mac Book Pro (スペックは2017年モデルのスタンダードなもの)
-
実行環境:Docker for Mac (Dockerがあればどこでも利用できるように)
-
IDE:JupyterLab
-
パッケージ:Anaconda3にTensorFlowを追加インストール (欲張った)
3. 事前準備
手元のMacにDocker for Macをインストールする。
クライアントにはAnacondaは入れていない。
なお、ここではこれらのインストール方法について言及しない。
4. コンテナの作成
4-1. 実行環境の準備
Pythonのソースコードやノートブック、コンテナのDockerfileの保存先を作成する
私の環境では以下のようなディレクトリ構成としている。
$HOME=/Users/<User>/docker/anaconda3/
  |-docker # コンテナイメージ関連のファイル置き場
  |  |-Dockerfile
  |  └-parameters # コンテナビルド時のパラメータファイル置き場
  |    |-apputils
  |    |-codemirror
  |    |-extensionmanager
  |    |-extensions
  |    └-notebook
  └-jupyter-notebook # JupyterLab関連のファイル置き場
     └-notebooks
       └-<notebook郡>
上記の情報に従い、ディレクトリを作成する。
$ pwd
/Users/mottai

# 保存先のホームとなる場所を作成
$ mkdir -p ~/docker/anaconda3

# ソースコード置き場を作成
$ mkdir -p ~/docker/anaconda3/jupyter-notebook/notebooks

# Dockerfile置き場とパラメータファイル置き場を作成
$ mkdir -p ~/docker/anaconda3/docker/parameters
4-2. コンテナの作成
コンテナのイメージは私のDockerHubに保存しているため、以下のコマンドでコンテナの作成は可能である。
# ホームへ移動
$ cd ~/docker/anaconda3

# DockerHubよりイメージをPullし、コンテナを起動。JupyterのListen Portは8888番とする。
# また、JupyterLabのノートブック保存先をコンテナ内では/dataとしており、それはMac上の~/docker/anaconda3/jupyter-notebookにマウントされることでソースコードをローカルに保存できる、
$ docker run -d -p 8888:8888 -v $(pwd)/jupyter-notebook:/data konakona191/tensor-flow:1.3
上記で使用しているkonakona191/tensor-flowで用いるDockerfileの内容は以下の通りである。
# continuumio/anaconda3の最新版をPullする。
FROM continuumio/anaconda3:latest

# ~/docker/anaconda3/docker/parameters以下のファイルをコンテナ内に複製する。
COPY parameters/* /tmp/

# Pullしたイメージに対し、Tensor-FlowのインストールやJupyterLabの設定を行う。
RUN set -x \
  && : "Conda Update" \
  && conda update -n base conda \
  && : "Virtual Environment Create" \
  && conda create -n tensorflow-env python=3.6 \
  && : "Switching Virtual Environment" \
  && . activate tensorflow-env \
  && : "TensorFlow Install" \
  && conda install tensorflow \
  && : "Create Directories" \
  && mkdir -p /root/.jupyter/lab/user-settings/@jupyterlab/apputils-extension \
  && mkdir -p /root/.jupyter/lab/user-settings/@jupyterlab/notebook-extension \
  && mkdir -p /root/.jupyter/lab/user-settings/@jupyterlab/codemirror-extension \
  && mkdir -p /root/.jupyter/lab/user-settings/@jupyterlab/extensionmanager-extension \
  && : "Create Setting Files" \
  && cat /tmp/apputils | tee /root/.jupyter/lab/user-settings/@jupyterlab/apputils-extension/themes.jupyterlab-settings \
  && cat /tmp/notebook | tee /root/.jupyter/lab/user-settings/@jupyterlab/notebook-extension/tracker.jupyterlab-settings \
  && cat /tmp/codemirror | tee /root/.jupyter/lab/user-settings/@jupyterlab/codemirror-extension/commands.jupyterlab-settings \
  && cat /tmp/extensionmanager | tee /root/.jupyter/lab/user-settings/@jupyterlab/extensionmanager-extension/plugin.jupyterlab-settings \
  && : "Nodejs Install" \
  && curl -sL https://deb.nodesource.com/setup_12.x | bash - \
  && apt install nodejs \
  && : "Extensions Install" \
  && pip install jupyter-tensorboard \
  && pip install black==18.9b0 \
  && pip install jupyterlab_code_formatter \
  && cat /tmp/extensions | xargs -I % jupyter labextension install % \
  && jupyter serverextension enable --py jupyterlab_code_formatter

# コンテナ内にディレクトリを作成する。
VOLUME /data

# 8888番ポートをコンテナ外に公開する。
EXPOSE 8888

# コンテナ起動時に実行されるコマンドを定義する。
CMD jupyter notebook --notebook-dir=/data/notebooks --ip=0.0.0.0 --port=8888 --no-browser --allow-root
その他、Dockerfile中のRUNで読み込んでいる各種パラメータファイルの内容は以下の通り。
# JupyterLabのテーマをDarkにする。
$ cat docker/parameters/apputils
{
    // Theme
    // @jupyterlab/apputils-extension:themes
    // Theme manager settings.
    // *************************************

    // Selected Theme
    // [missing schema description]
    "theme": "JupyterLab Dark"
}

# .pyファイル編集時のキーマップをviと同じにする、
$ cat docker/parameters/codemirror
{
    // CodeMirror
    // @jupyterlab/codemirror-extension:commands
    // Text editor settings for all CodeMirror editors.
    // ************************************************

    // Key Map
    // [missing schema description]
    "keyMap": "vim",

    // Theme
    // [missing schema description]
    "theme": "material"
}

# JupyterLabの拡張機能を使用可能にする。
$ cat docker/parameters/extensionmanager
{
    // Extension Manager
    // @jupyterlab/extensionmanager-extension:plugin
    // Extension manager settings.
    // *********************************************

    // Enabled Status
    // Enables extension manager (requires Node.js/npm).
    // WARNING: installing untrusted extensions may be unsafe.
    "enabled": true
}

# JupyterLabでNotebook編集時の表示形式を定義する。(行数表示の有効化のみデフォルトから変更)
$ cat docker/parameters/notebook
{
    // Notebook
    // @jupyterlab/notebook-extension:tracker
    // Notebook settings.
    // **************************************

    // Code Cell Configuration
    // The configuration for all code cells.
    "codeCellConfig": {
      "autoClosingBrackets": true,
      "fontFamily": null,
      "fontSize": null,
      "lineHeight": null,
      "lineNumbers": true,
      "lineWrap": "off",
      "matchBrackets": true,
      "readOnly": false,
      "insertSpaces": true,
      "tabSize": 4,
      "wordWrapColumn": 80
    },

    // Markdown Cell Configuration
    // The configuration for all markdown cells.
    "markdownCellConfig": {
      "autoClosingBrackets": false,
      "fontFamily": null,
      "fontSize": null,
      "lineHeight": null,
      "lineNumbers": false,
      "lineWrap": "on",
      "matchBrackets": false,
      "readOnly": false,
      "insertSpaces": true,
      "tabSize": 4,
      "wordWrapColumn": 80
    },

    // Raw Cell Configuration
    // The configuration for all raw cells.
    "rawCellConfig": {
      "autoClosingBrackets": false,
      "fontFamily": null,
      "fontSize": null,
      "lineHeight": null,
      "lineNumbers": false,
      "lineWrap": "on",
      "matchBrackets": false,
      "readOnly": false,
      "insertSpaces": true,
      "tabSize": 4,
      "wordWrapColumn": 80
    }
}

# インストールする拡張機能一覧を定義する、
$ cat docker/parameters/extensions
@jupyterlab/toc
@jupyterlab/git
jupyterlab_vim
jupyterlab_tensorboard
@lckr/jupyterlab_variableinspector
@ryantam626/jupyterlab_code_formatter
話は戻るが、PathやPortの指定等に誤りが無ければコンテナが立ち上がるはずである。
$ docker ps
CONTAINER ID        IMAGE                         COMMAND                  CREATED             STATUS              PORTS                    NAMES
1a872f3617cd        konakona191/tensor-flow:1.3   "/usr/bin/tini -- /b…"   8 hours ago         Up 8 hours          0.0.0.0:8888->8888/tcp   romantic_borg
5. JupyterLabの動作確認
5-1. JupyterLabへアクセス
以下の通り、実行したコンテナのログからJupyterのURL用のトークンを確認する。
# コンテナ名またはIDを用いてログを出力する。
$ docker logs romantic_borg
   :
   :
   :
    To access the notebook, open this file in a browser:
        file:///root/.local/share/jupyter/runtime/nbserver-7-open.html
    Or copy and paste one of these URLs:
        http://(1a872f3617cd or 127.0.0.1):8888/?token=4c4bbc1ae14f9155251ed1b52e667fde5a5b3350b3c7827c
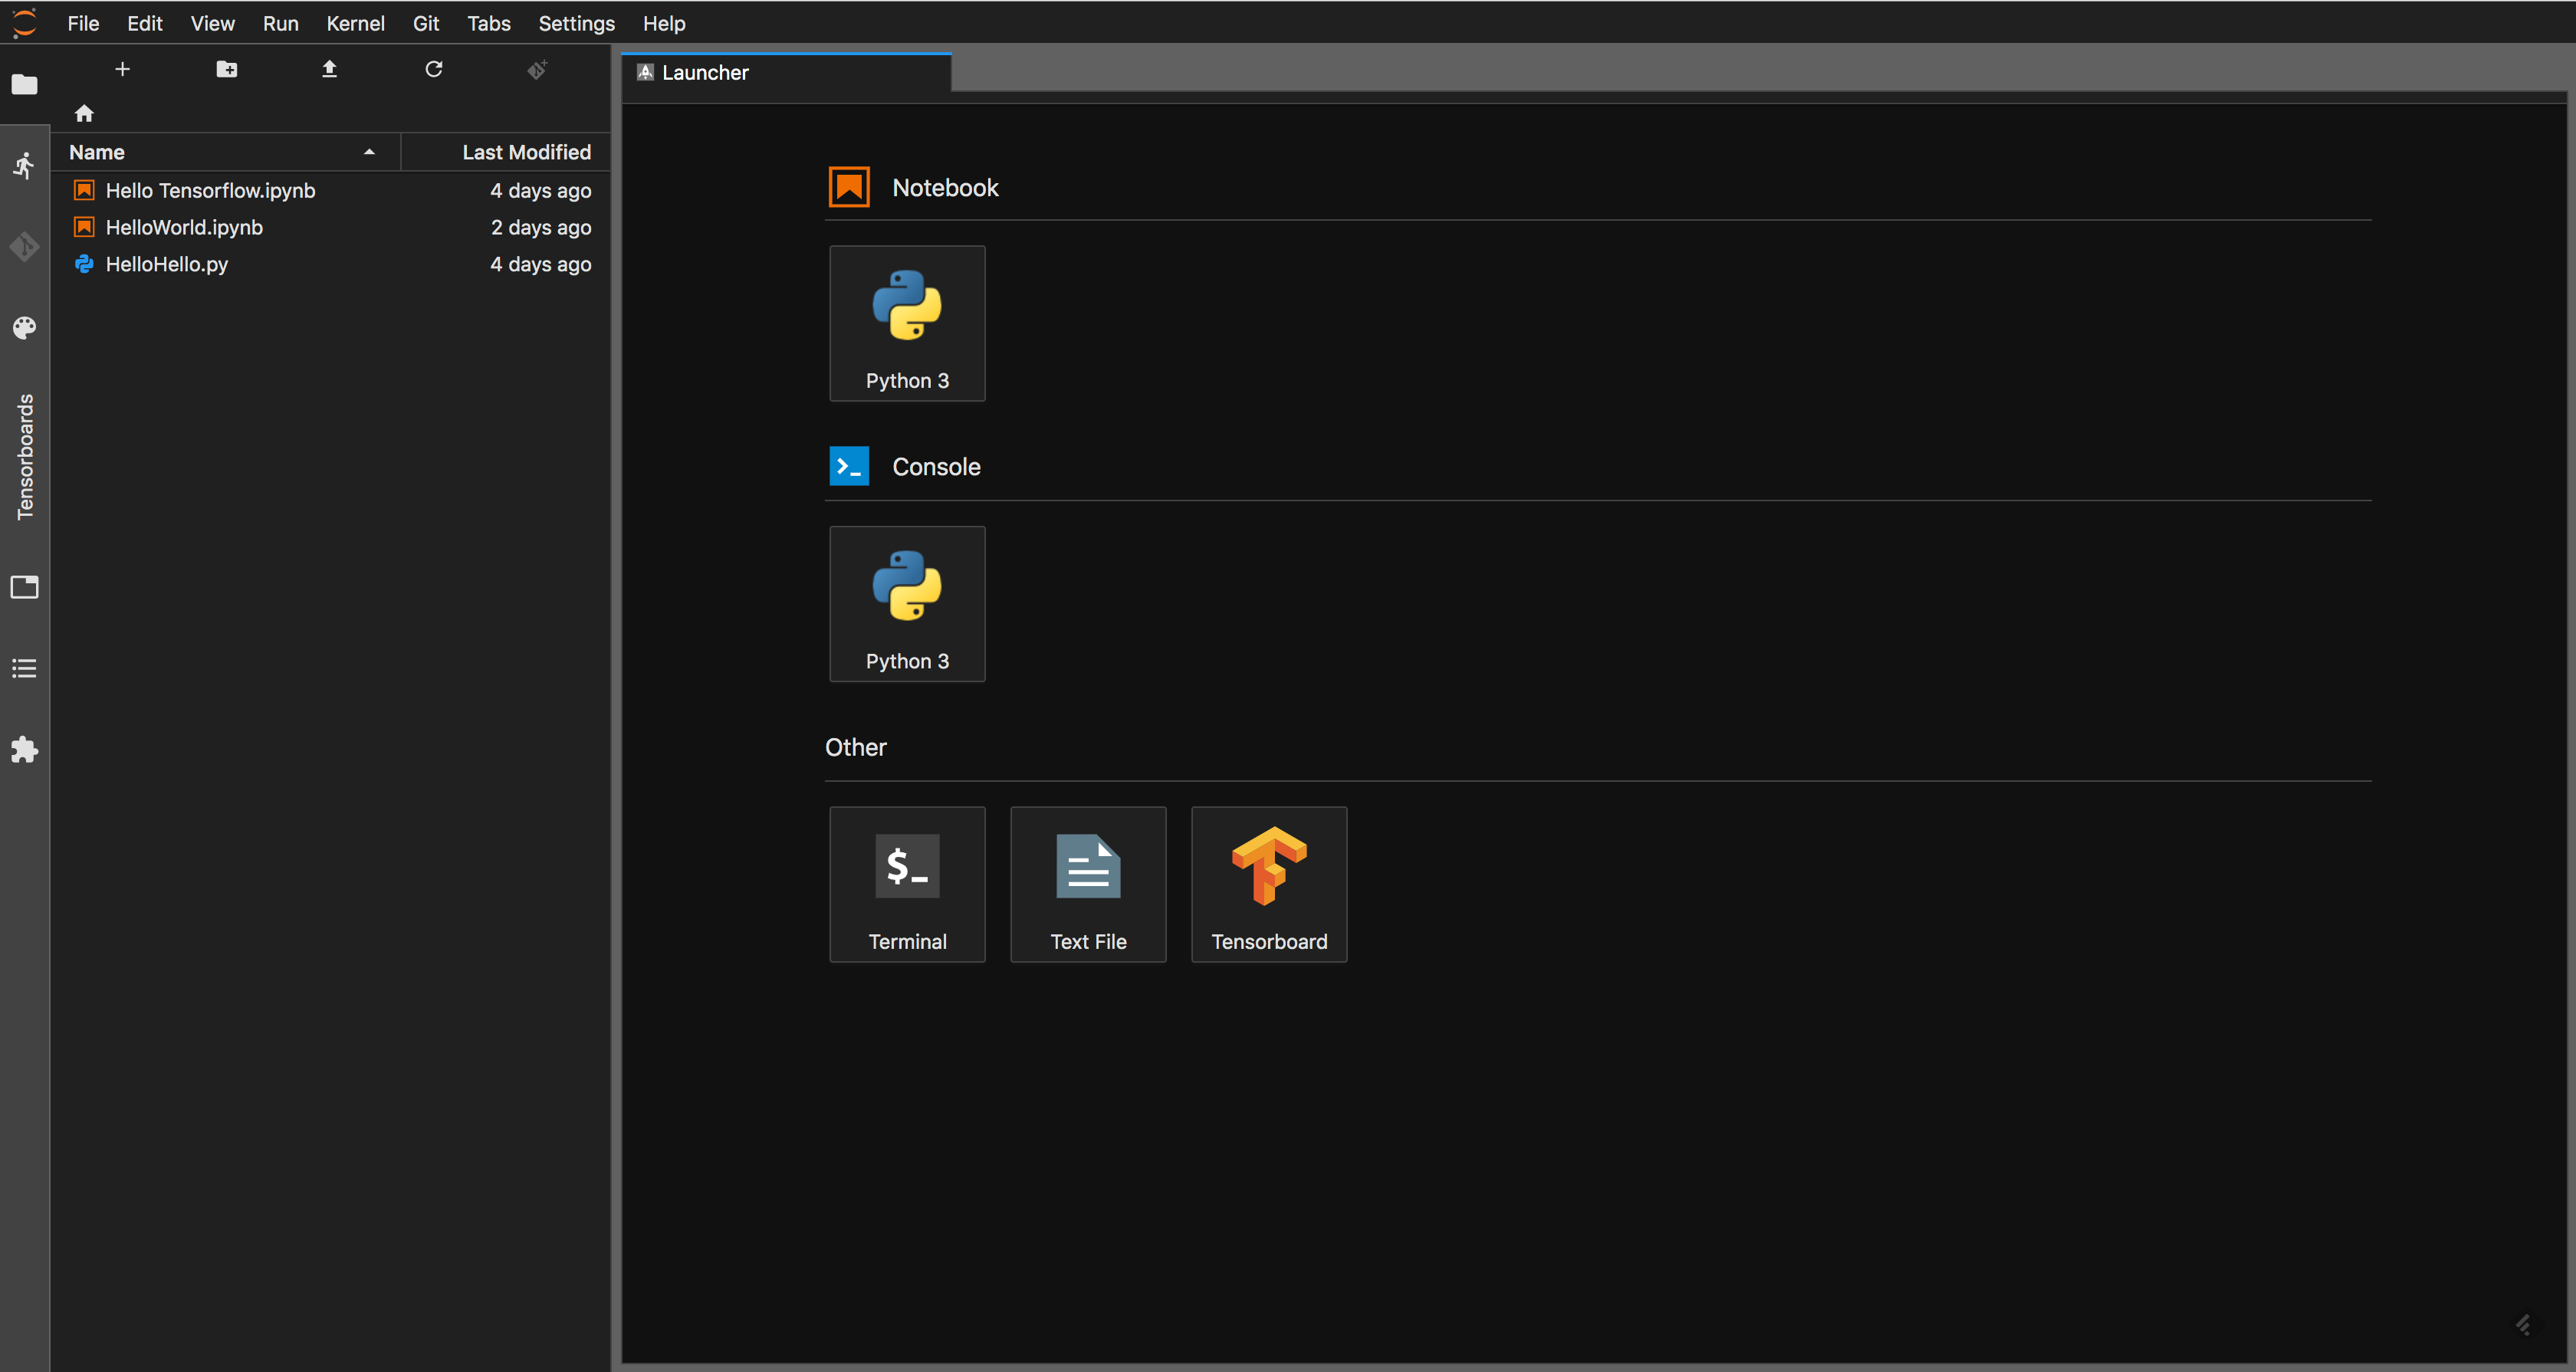
ブラウザを起動し、実際にアクセスを試みる。
http://localhost:8888/?token=xxxxx….でアクセスするとJupyter Notebookの画面になってしまうので、

5-2. JupyterからのPythonの実行
早速 適当にコードを書いてみると、問題無く実行できた。

5-3. JupyterからのTensorFlowの実行
TensorFlowをテストしてみると、同じように文字を出力することはできるようだ。

5-4. 拡張機能
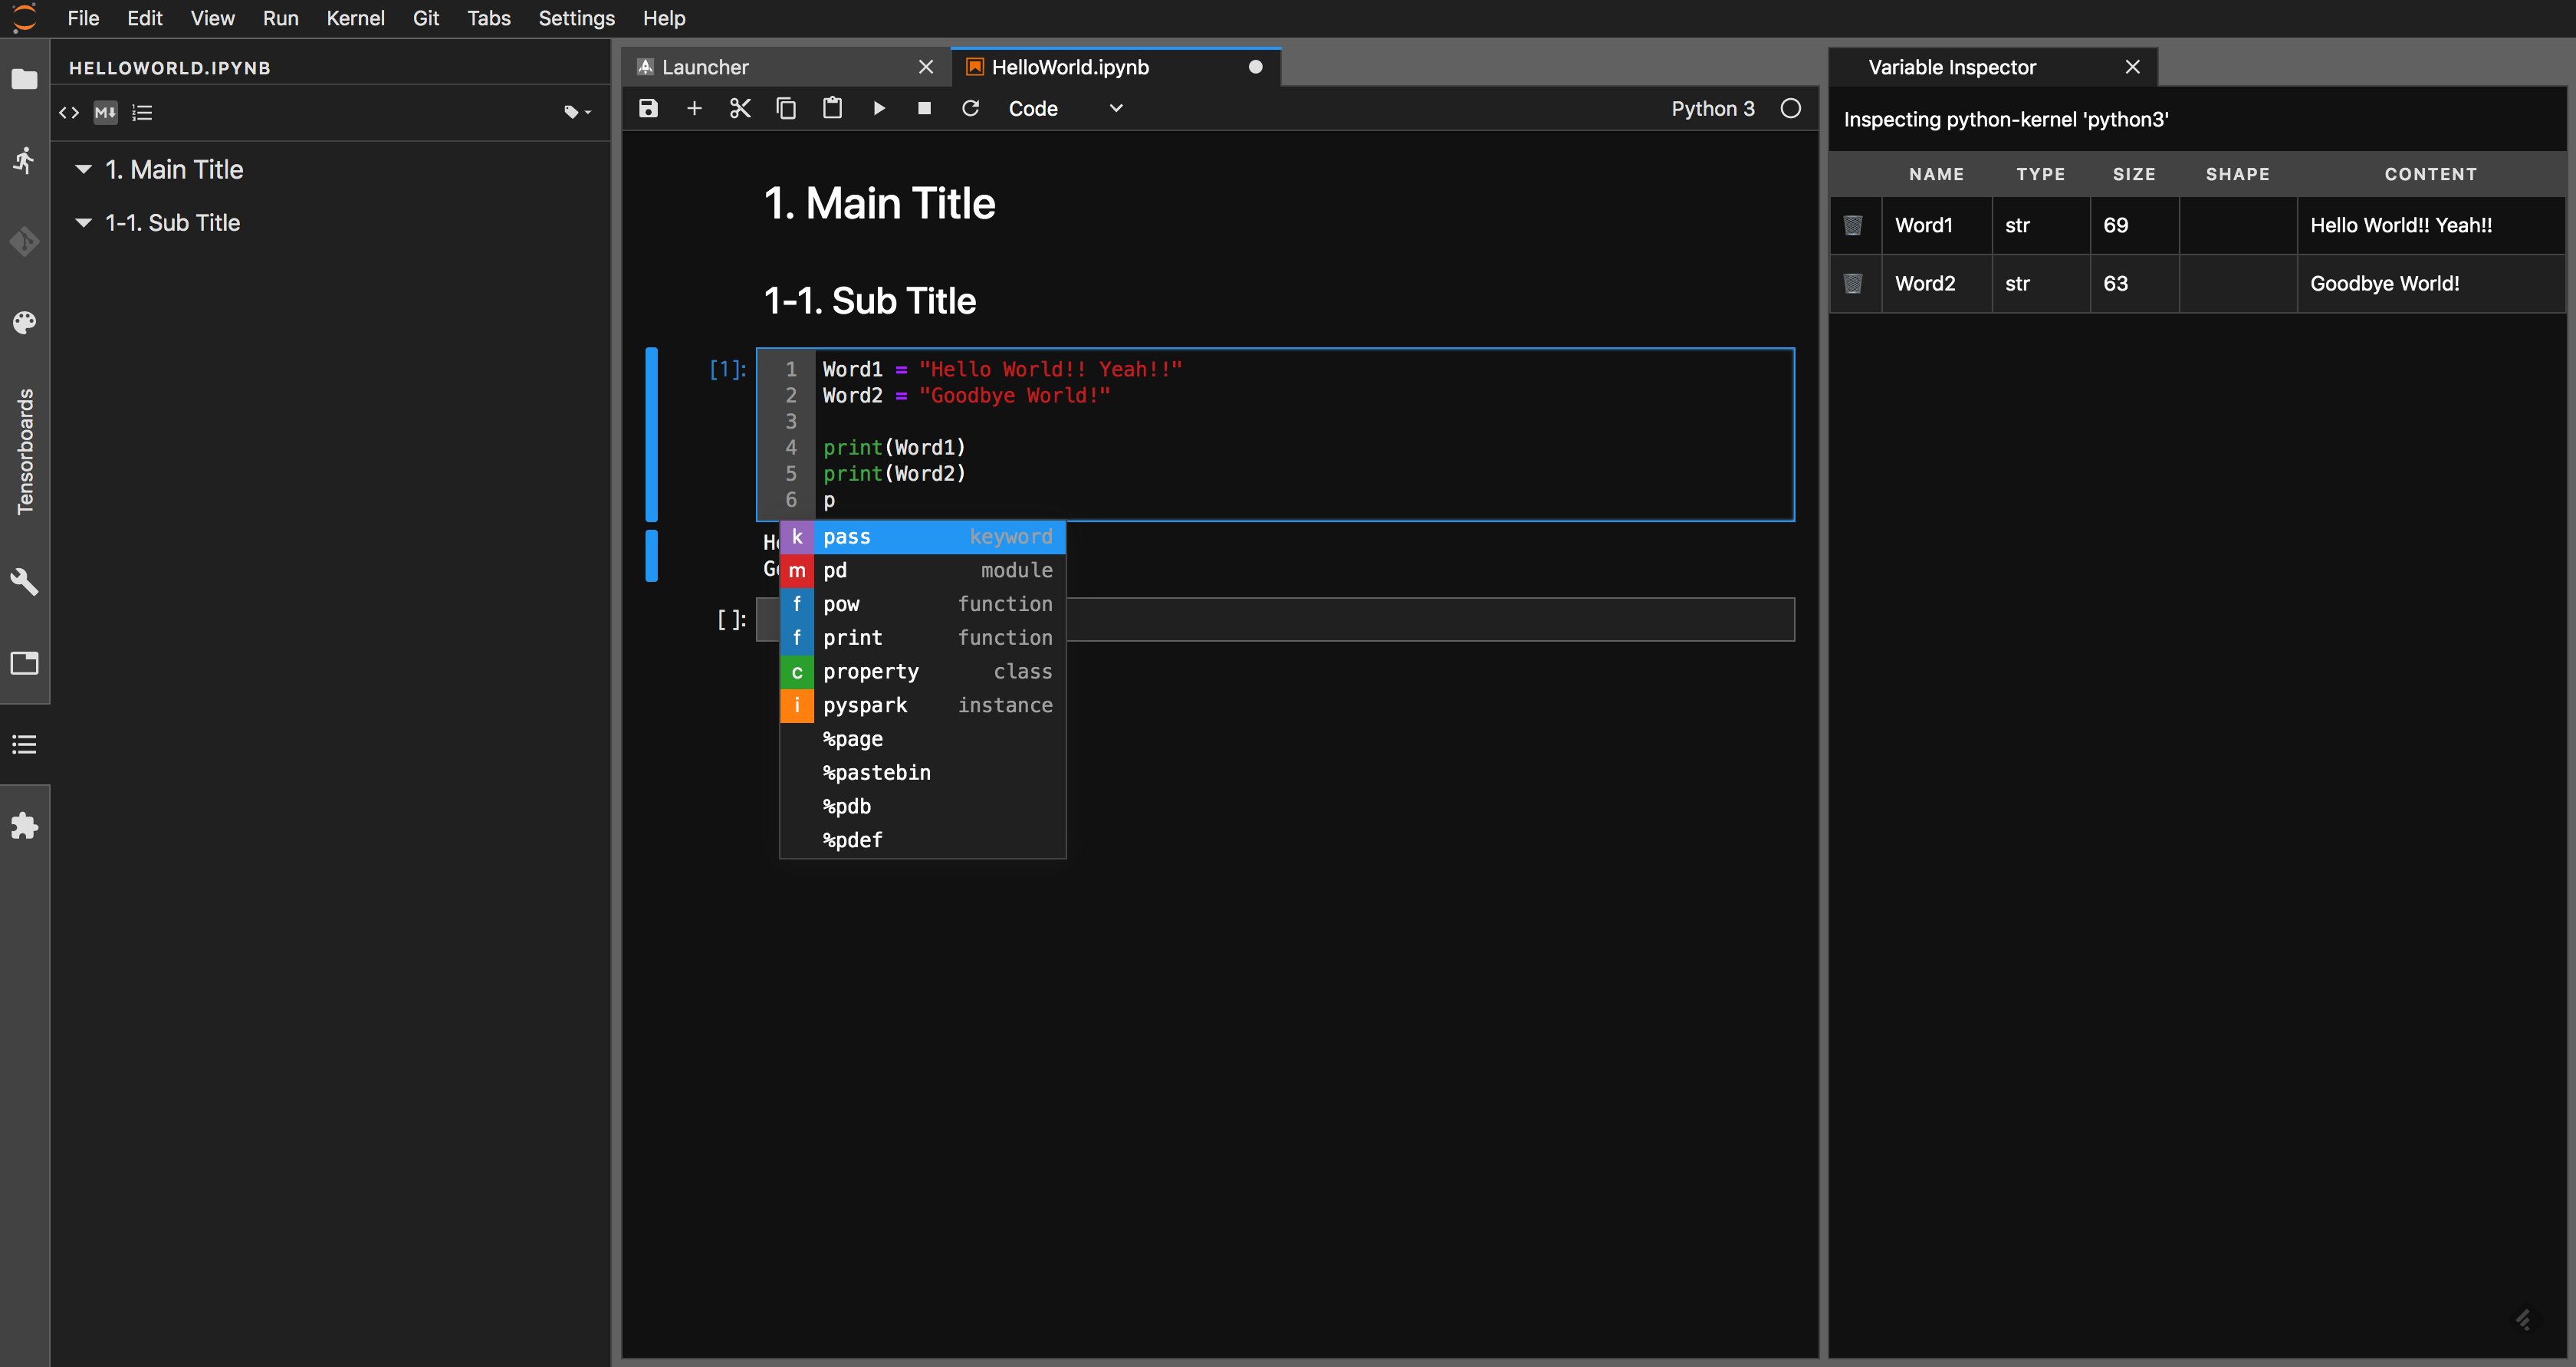
Dockerイメージ内でインストールしておいた拡張機能が使えることを確認する。
上記のイメージでは以下の機能を有効にしている。
- Markdown記法でタイトルを示し、ジャンプできるTable of Contents
- vimのキーバインドで.ipynbを編集
- TensorboardをJupyterLab内で起動・表示
- ノートブック内で定義した変数を一覧化
- ノートブック内のコードを自動整形
- 関数の補完

6. 小休止
ここまででどうにかPythonの実行環境を整えることができた。
Anaconda3をベースにTensor-Flowも入れられて、JupyterLabの使い勝手も多少良くして、あとはこれらで実践していくのみである。