最初に
このQiita記事は、RemoteConfig初級編の応用編として書かれているため、RemoteConfig初級編がまだの方はこちらからお読みください。
やりたいこと
応用編では、初級編でやったことを用いてLabelと画像の値を変更してモーダルで表示することをします。
完成形の画面はこんな感じだよ!

RemoteConfigの設定
画像を参考にしながら、FirebaseのRemoteConfigの画面から、任意のパラメータキー(card_key)デフォルト値に以下のjsonを入力します。
{
  "title": "企画のタイトル!!!",
  "image_url": "https://ocadweb.com/wp-content/uploads/2016/03/32.png",
  "details": "ここには、企画等の詳細情報を記入してください。",
  "url": "https://picable.co.jp",
  "identifier": "20200112"
}
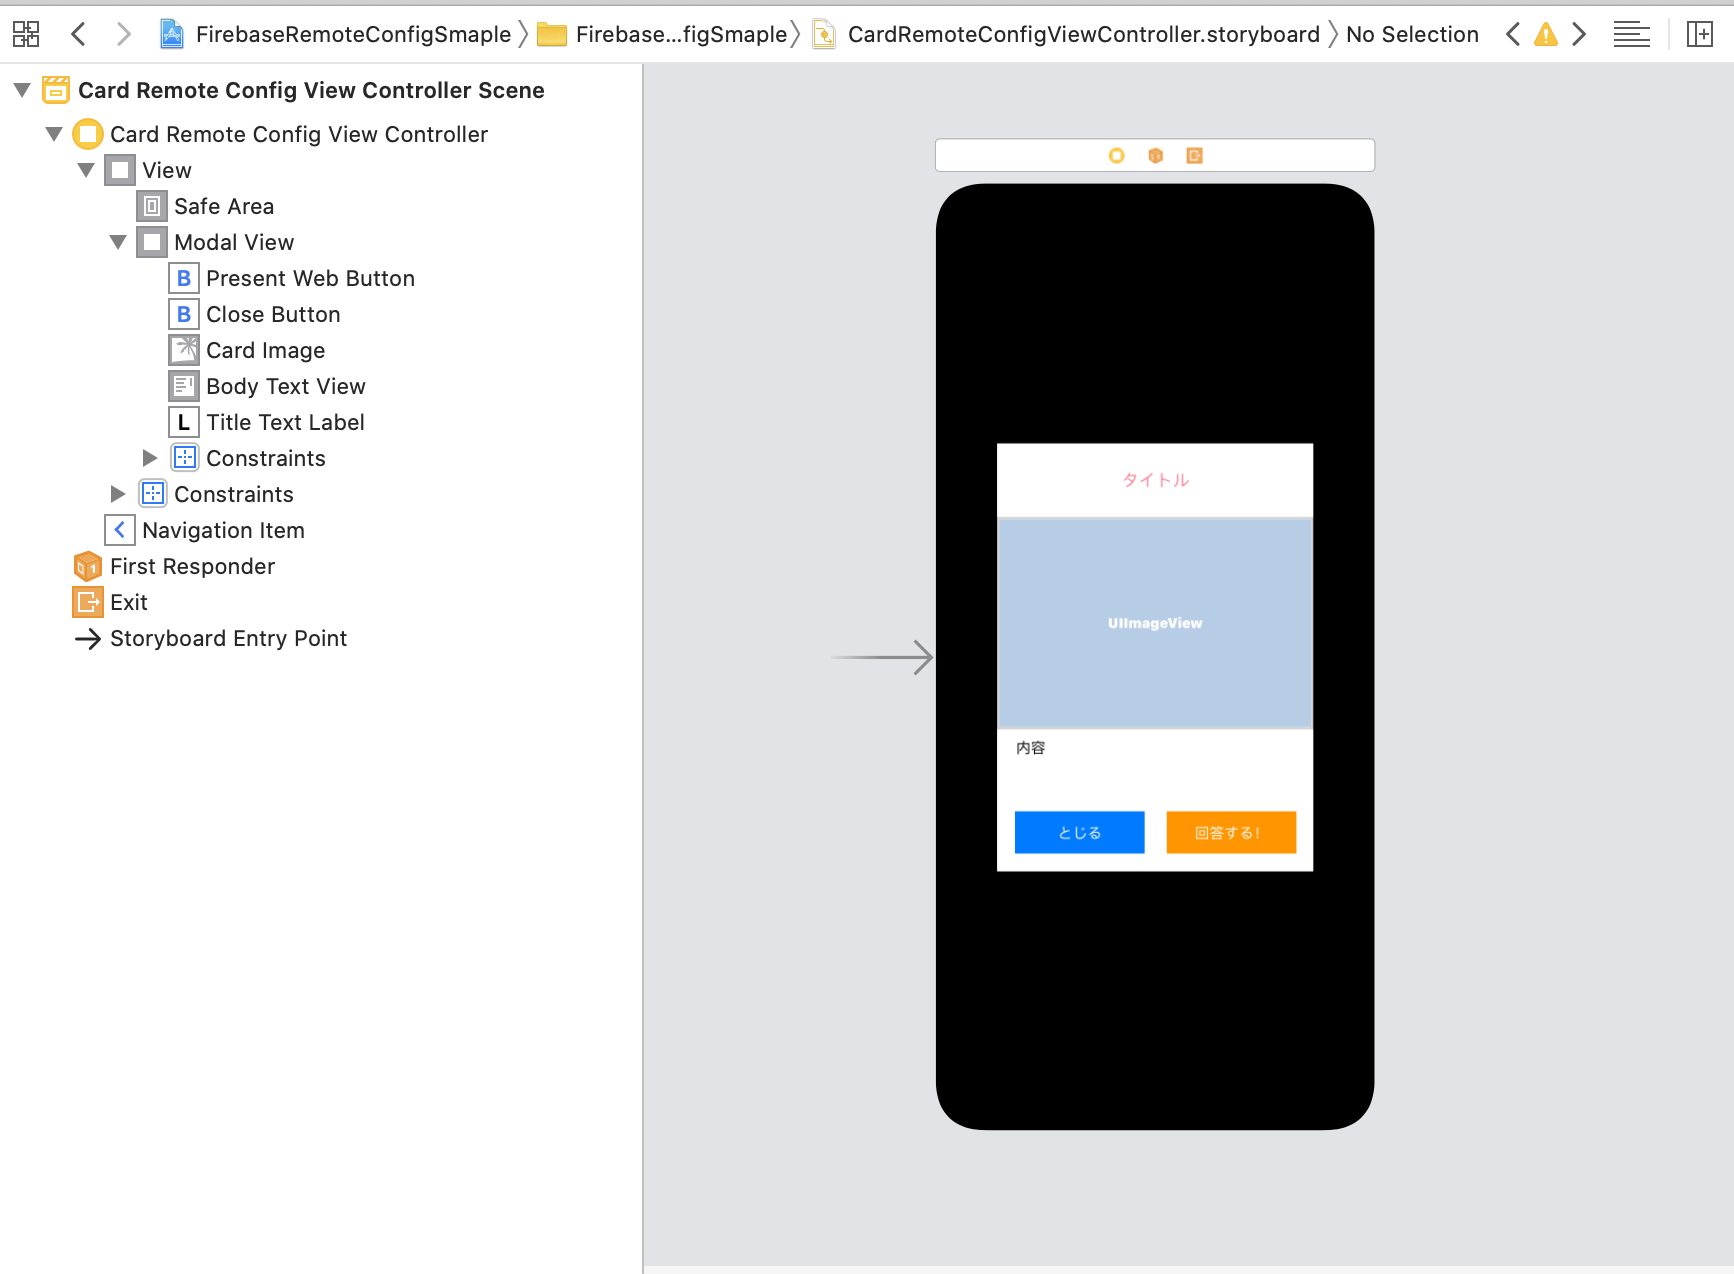
storyboardファイルで必要なパーツを配置しよう。
storyboardファイルを生成して、StoryboardIDに"CardRemoteConfigViewController"と記入します。
デザインは、以下の画像を参考にして配置してみてください。
タイトル、画像、内容のテキスト、アンケート等に遷移させるボタン、閉じるボタンを配置しています。
背景は、黒の透明度60%
画像:今回は、300×200の比率の画像を利用しています。

コーディング
はじめに、RemoteConfigからjsonのデータを受け取るEntityを作ります。
struct CardRemomteConfigEntity: Codable {
    let title: String
    let url: String
    let details: String
    let imageURL: String?
    let identifier: String

    enum CodingKeys: String, CodingKey {
        case title
        case url
        case details
        case imageURL = "image_url"
        case identifier
    }
}
RemoteConfigManagerに新しいパラメータキーとjsonを扱う変数を追加します。
import FirebaseRemoteConfig

class RemoteConfigManager {
    //以下のキーを追加
    private let cardKey = "card_key"
    //以下の2行を追加
    private let jsonDecoder = JSONDecoder()
    private var defaultValue: [String: NSObject] = [:]
RemoteConfigManagerのupdateVariables()関数でCardRemomteConfigEntityを変数にセットします。
    private func updateVariables() {
       //以下のコードを追加
       cardRemoteConfig = (try? jsonDecoder.decode(CardRemomteConfigEntity.self, from: remoteConfig[cardKey].dataValue))
    }
CardRemoteConfigViewController.swiftを新しくファイルを作成して以下のコードを記述してください。
やっていることは、モーダルに表示したいパーツとIBOutletと繋いで、初級編と同じように、RemoteConfigManagerを呼び出して必要に応じてラベルや画像に代入しています。
import UIKit

class CardRemoteConfigViewController: UIViewController {
    @IBOutlet private weak var titleTextLabel: UILabel!
    @IBOutlet private weak var bodyTextView: UITextView!
    @IBOutlet private weak var presentWebButton: UIButton!
    @IBOutlet private weak var closeButton: UIButton!
    @IBOutlet private weak var cardImage: UIImageView!
    @IBOutlet private weak var modalView: UIView!

    func setup() {
        modalTransitionStyle = .crossDissolve
        modalPresentationStyle = .overCurrentContext
    }

    override func viewDidLayoutSubviews() {
        super.viewDidLayoutSubviews()
    }

    override func viewDidLoad() {
        super.viewDidLoad()

    }

    override func viewDidAppear(_ animated: Bool) {
        super.viewDidAppear(animated)
        modalView.layer.cornerRadius = 8
        titleTextLabel.text = RemoteConfigManager.shared.cardRemoteConfig?.title
        bodyTextView.text = RemoteConfigManager.shared.cardRemoteConfig?.details
        if let url = RemoteConfigManager.shared.cardRemoteConfig?.imageURL?.convertURL {
            do {
                let data = try Data(contentsOf: url)
                cardImage.image = UIImage(data: data)
             }catch let err {
                  print("Error : \(err.localizedDescription)")
             }
        }
    }


    @IBAction func closeButton(_ sender: Any) {
        self.dismiss(animated: true, completion: nil)
    }

    @IBAction func presentWebButton(_ sender: Any) {
        if let openUrl = RemoteConfigManager.shared.cardRemoteConfig?.url.convertURL{
            if UIApplication.shared.canOpenURL(openUrl) {
                UIApplication.shared.open(openUrl)
            }
        }
    }

}

extension String{
    var convertURL: URL? {
        return URL(string: self)
    }
}
ViewControllerには、上のコードで設定したモーダルを表示するコードを追加します。
注意⚠️ viewDidLoad()で記述するとうまく画面を表示させることができません。
タップした時に表示したい場合は、タップアクションの中で呼び出すようにしてください。
今回は、ViewControllerが呼び出されたタイミングで表示したいので、viewDidAppear()の中に記述しています。
override func viewDidAppear(_ animated: Bool) {
         super.viewDidAppear(animated)
        if RemoteConfigManager.shared.cardRemoteConfig?.title != nil{
            let storyboard: UIStoryboard = UIStoryboard.init(name: "CardRemoteConfigViewController", bundle: nil)
            let cardRemoteConfigViewController = storyboard.instantiateViewController(withIdentifier: "CardRemoteConfigViewController") as! CardRemoteConfigViewController
            cardRemoteConfigViewController.modalPresentationStyle = .fullScreen
            cardRemoteConfigViewController.setup()
            self.present(cardRemoteConfigViewController, animated: false, completion: nil)
        }
    }
⚠️実装におけるの問題点⚠️
今回の仕組みでは、アプリの初期起動時やRemoteConfigの値変更後のアプリ起動時には、変更した内容は次回起動時以降にUIに反映される仕様です。RemoteConfig変更直後の起動ではデータがうまく反映されません。初回起動時の場合は、データが蓄積されていないため、モーダルを表示させないように今回はさせていただきました。
コメント
今回初めてRemoteConfigを使用したQiita記事をさせていただきました。疑問に思ったことはわからないこと、間違っている箇所がある等があれば以下のコメント欄にてお知らせください。
キャンペーン等のモーダルを非表示にしたい場合は、remoteConfigのパラメーターキーとjsonを削除することで非表示にできます。
最後までお読みいただきありがとうございました。
サンプルコードをダウンロードしたい方はGithubをクリックしよう。