M5StackのModule LLMでFunction Callingが使えれば、インターネット回線が無い環境でも使用可能なスマートスピーカーが作れるため、一気に実用性が上がると思われます。Hugging Faceで軽量かつFunction Callingを実行可能なモデルを見つけることができたため、axmodelに変換してNPUで実行するところまでを実施しました。
使用したモデル
こちらの、Qwen2-0.5BをベースにFunction Callingのデータセットで学習されたモデルを使用しました。
https://huggingface.co/haripritam/SmolLM-360M-Instruct-fncl
同じ製作者の関連するモデルとしてQwen2-0.5B-fnclというモデルも公開されており、こちらのページのほうがドキュメントが充実しています。こちらのモデルでも実行できそうですが、若干サイズは大きいようです。
Module LLMで実行する前にColabで試したものがこちらです。こちらで試したプロンプトと同じものをModule LLMで実行し、同様の回答が得られることを確認しました。
手順
以降、モデルをaxmodelに変換してModule LLMで実行するまでの手順について解説します。基本的にはPulsar2のドキュメントの4. Large Model Compilationに従っていますが、任意のモデルを変換する場合はいくつか修正が必要だったため、それも含めて解説します。
Pulsar2でモデルをaxmodelに変換する
PCのUbuntuでPulsar2による変換を行います(私はWSL2を使用しています)。Pulsar2がインストールされた環境はDockerイメージで配布されているのでそちらを使って作業を進めます。Docker自体のインストールは他の解説サイト等をご参照願います。
Pulsar2のDockerイメージをロード
こちらのGoogle DriveのリンクからDockerイメージの ax_pulsar2_${version}.tar.gz をダウンロードし任意のディレクトリに保存します。
tar.gzファイルを保存したディレクトリで次のコマンドを実行しロードします。
$ sudo docker load -i ax_pulsar2_${version}.tar.gz
ロードできたら確認します。
$ sudo docker images
REPOSITORY    TAG       IMAGE ID       CREATED         SIZE
pulsar2       3.3       80e03439aefe   8 weeks ago     7.42GB
作業ディレクトリを作成
ax-llm-buildを任意のディレクトリにクローンし、クローンしたフォルダ内に移動します。以降、ここが作業ディレクトリとなります。
$ git clone https://github.com/AXERA-TECH/ax-llm-build.git
$ cd ax-llm-build
モデルをダウンロード
作業ディレクトリでDockerイメージを起動します。
sudo docker run -it --net host --rm -v $PWD:/data pulsar2:3.3
Hugging Faceから今回使用するモデルをダウンロードするために、huggingface-cliをインストールします。
pip install -U huggingface_hub
今回使用するモデルをダウンロードします。
huggingface-cli download --resume-download haripritam/SmolLM-360M-Instruct-fncl --local-dir haripritam/SmolLM-360M-Instruct-fncl
モデルを変換
Hugging Faceのモデル(.safetensor)をaxmodelに変換します。変換結果は--output_pathで指定したディレクトリに出力されます。私のノートPC(Ryzen5 2.3Ghz)では1時間程度かかりました。
pulsar2 llm_build --input_path haripritam/SmolLM-360M-Instruct-fncl/ --output_path haripritam/SmolLM-360M-Instruct-fncl-output/ --kv_cache_len 1023 --hidden_state_type bf16 --prefill_len 512 --chip AX620E
Pulsar2ドキュメントの解説では--prefill_len 128とされていますが、この値が入力プロンプトのトークン数の上限になるようです。今回はプロンプトにFunction Calling用の関数定義を記述し400トークン程度になるため、値を512としました。
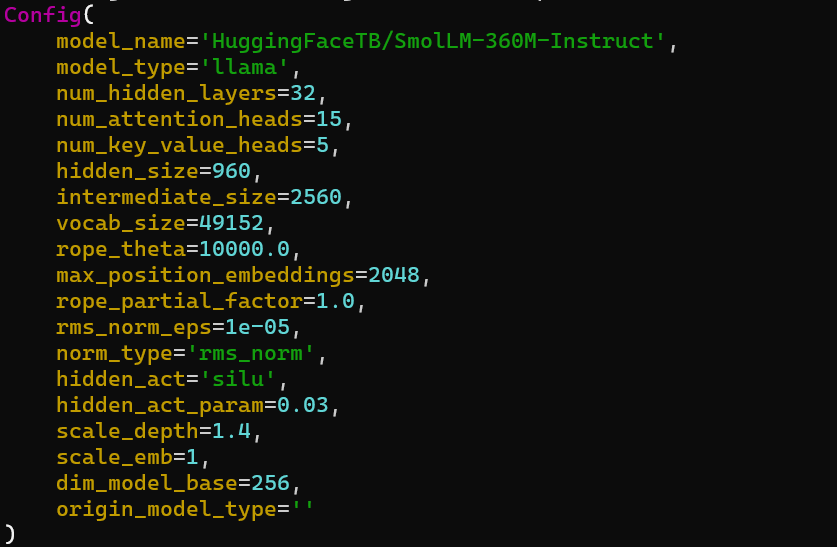
pulsar2 llm_build実行時、以下のようなConfig情報が出力されますが、この中の"hidden_size=960"と"vocab_size=49152"がこの後の手順で必要になるためメモしておきます。
toolsフォルダ内の2つのファイルに実行権限を与え、最適化を実行します。
$ chmod +x ./tools/fp32_to_bf16
$ chmod +x ./tools/embed_process.sh
$ ./tools/embed_process.sh haripritam/SmolLM-360M-Instruct-fncl haripritam/SmolLM-360M-Instruct-fncl-output/
ここまで実施すると、出力フォルダの内容は以下のようになります。
|-- llama_p512_l0_together.axmodel
|-- llama_p512_l1_together.axmodel
|-- llama_p512_l2_together.axmodel
|--            .
|--            .
|--            .
|-- llama_p512_l31_together.axmodel
|-- llama_post.axmodel
|-- model.embed_tokens.weight.bfloat16.bin
|-- model.embed_tokens.weight.float32.bin   # 一時ファイルのため削除しても問題ない
`-- model.embed_tokens.weight.npy           # 一時ファイルのため削除しても問題ない
Module LLMで実行
Module LLMにadbまたはsftpを使い必要なファイルを転送します。
最終的なフォルダ構成は以下のようになります。それぞれのファイルについて順に解説します。
|-- SmolLM-360M-Instruct-fncl-output
|   |-- llama_p512_l0_together.axmodel
|   |-- llama_p512_l1_together.axmodel
|   |-- llama_p512_l2_together.axmodel
|   |--            .
|   |--            .
|   |--            .
|   |-- llama_p512_l31_together.axmodel
|   |-- llama_post.axmodel
|   `-- model.embed_tokens.weight.bfloat16.bin
|-- main_prefill
|-- tokenizer
|   |-- tokenizer.json
|   `-- tokenizer_config.json
|-- tokenizer_fncl.py
`-- run_smoilm_fncl_ax630c.sh
・SmolLM-360M-Instruct-fncl-outputフォルダ
Pulsar2 llm_buildの出力ファイル一式です。
・main_prefill
モデルによる推論を実行する実行ファイルです。これはAXERA-TECHで公開されている他のLLMモデルのものを流用できます。私はこちら(Hugging Faceのリンク)から持ってきました。
・tokenizer.json, tokenizer_config.json
huggingface-cliでダウンロードしたモデルのフォルダに入っています。
・tokenizer_fncl.py
tokenizer.jsonを読み込んでトークナイザを起動し、HTTP経由(http://localhost:8080) で利用可能にするためのスクリプトです。こちらも、AXERA-TECH公開の他のモデルから流用できますが、システムプロンプトをFunction Calling用のプロンプトに書き換える必要があります。私は、main_prefillを流用したのと同じプロジェクトからtokenizer.pyをダウンロードして、以下のように変更しました。
変更前
        messages = [
            {"role": "system", "content": "You are Qwen, created by Alibaba Cloud. You are a helpful assistant."},
            {"role": "user", "content": prompt}
        ]
変更後
        messages = [
            {"role": "system", "content": fncl_prompt},
            {"role": "user", "content": prompt}
        ]
fncl_promptは関数の外で以下のように定義します。気温を取得する機能、TVをON/OFFする機能、アラームを設定する機能について定義しています。
fncl_prompt = """You are a helpful assistant with access to the following functions. Use them if required - [
     {
        "type": "function",
        "function": {
            "name": "get_current_temperature",
            "description": "Get current temperature at a location.",
            "parameters": {
                "type": "object",
                "properties": {
                    "location": {
                        "type": "string",
                        "description": 'The location to get the temperature for, in the format "City, State, Country".',
                    },
                    "unit": {
                        "type": "string",
                        "enum": ["celsius", "fahrenheit"],
                        "description": 'The unit to return the temperature in. Defaults to "celsius".',
                    },
                },
                "required": ["location"],
            },
        },
    },
    {
        "type": "function",
        "function": {
            "name": "ctrl_tv",
            "description": "TV on/off control.",
            "parameters": {
                "type": "object",
                "properties": {
                    "onoff": {
                        "type": "integer",
                        "description": '0 is OFF, 1 is ON.',
                    },
                },
                "required": ["onoff"],
            },
        },
    },
    {
        "type": "function",
        "function": {
            "name": "set_alarm",
            "description": "Set alarm.",
            "parameters": {
                "type": "object",
                "properties": {
                    "time": {
                        "type": "integer",
                        "description": 'Set the alarm time in minutes.',
                    },
                },
                "required": ["time"],
            },
        },
    },
  ] For each function call return a json object with function name and arguments within <toolcall></toolcall> XML tags as follows:
<toolcall>
{'name': , 'arguments': }
</toolcall>
"""
・run_smoilm_fncl_ax630c.sh
こちらもAXERA-TECH公開の他のモデルに倣って作成しますが、内容は使用するモデルに合わせて記述する必要があります。今回は以下のように記述しました。特に注意すべき点について#コメントで記載します(実行時は削除してください)。
./main_prefill \
--template_filename_axmodel "SmolLM-360M-Instruct-fncl-output/llama_p512_l%d_together.axmodel" \
--axmodel_num 32 \
        # llama_p512_l%d_together.axmodelファイルの総数を記述する
--filename_post_axmodel "SmolLM-360M-Instruct-fncl-output/llama_post.axmodel" \
--tokenizer_type 2  \
--filename_tokenizer_model "http://localhost:8080" \
        # tokenizer_fncl.pyで実行するHTTPサーバアドレスを記述する
--filename_tokens_embed "SmolLM-360M-Instruct-fncl-output/model.embed_tokens.weight.bfloat16.bin" \
--tokens_embed_num 49152 \
        # pulsar2 llm_build時に出力されたConfigの"vocab_size"と同じ値にする
--tokens_embed_size 960 \
        # pulsar2 llm_build時に出力されたConfigの"hidden_size"と同じ値にする
--eos 0 \
--live_print 1 \
--continue 1 \
--prompt "$1"
\記号はコマンドの途中で改行するためのものですが、私の環境だと実行時にエラーになってしまいました。\記号と改行を削除し一行のコマンドにするとうまく実行できました。
./main_prefill -h で、コマンドの詳細を見ることができます。
ここまで準備できたらいよいよ実行していきます。
別のターミナルを開き、トークナイザを起動します。
python3 tokenizer_fncl.py
実行権限を付けて、推論用スクリプトを実行します。
main_prefillの引数が最初に渡すプロンプトになっているので、適当なプロンプトを入れています。
$ chmod +x ./main_prefill
$ chmod +x ./run_smoilm_fncl_ax630c.sh
./run_smoilm_fncl_ax630c.sh "who are you?"
実行後は、>>にプロンプトを打ち込むとテキストが生成されます。以下のように、質問や指示に対して、使用すべき関数の名前とパラメータの値を答えてくれます。応答時間も4s程度で、十分に実用できるレベルではないかと感じました。

まとめ
Qwen2-0.5BベースのFunction Calling対応モデルをPulsar2で変換し、Module LLMで実行するまでに実施した手順を解説しました。このままだとCUIでプロンプトを入力する形式なので、M5Stack Coreから使用するにはどうすればよいのかについてはこれから知見を集めていきたいと思います。
2025.2.21追記
M5Stack Coreから使用する方法もわかったため続編を書きました。
参考サイト
-
M5stack Module LLMで好きなLLMモデルを動かす - Defios Lab.
任意のモデルを動かすという点で今回のケースと共通する部分が多く、参考にさせていただきました。