まだ発売して間もないModule LLMですが、Advent Calender 2024で、YOLO等の既存モデルを変換してNPUで実行する方法が既に調査されて報告されています。それなら、自分で学習させた簡単なモデルでも同じことができるのか?もしできたらNPUともっと仲良くなれそう!と思いチャレンジしてみました。いくつか躓いたポイントがあったものの何とか実現することができたため、私が行った手順を記事にしたいと思います。
私自身、ローカルLLMやNPUに関する知識がほとんどない中で試行錯誤したため、ここはこうする方が正しいといった箇所があるかもしれません。ご報告いただければ記事を修正したいと思います。
今回使用するモデル
ディープラーニングが注目されはじめて、まずはMNISTのサンプルプログラムで手書き文字を認識してみるというのが流行った(?)頃、私も実践してブログ記事を書いていました。今回はこの記事で扱った、MNIST用のモデル構造をそのまま使って画像内の手の指が上下左右どの方向を向いているかを学習させたモデルを使用します。
この後の手順で、このモデルをONNXに変換したファイルを使用します。Google Colaboratoryで、このモデルを私が用意した画像データセットで学習させ、ONNXに変換し、Google Driveにダウンロードするまでをできるようにしましたので、以下リンク(Github)からご利用ください。(追記 こっそりと変換結果のonnx、axmodelもGithubに置いておきますので、すぐに試したい方はこちらをご利用ください。)
上記の記事では組み込みC言語で推論実行するために、Sonyのフレームワーク Neural Network Library (nnabla)を使用していますが、今回の目的ではnnablaである必要はありません。ご自身の環境で作成したモデルのONNXファイルをお持ちであれば、以降の手順はそれを使って進めていただくことも可能です。
まずはONNXをCPUで実行してみる
ONNXをaxmodelに変換する前に、まずはONNXのままCPUで実行してみます。遠回りに思えるかもしれませんが、そもそもONNXに問題がないかを確認しておかないと、この後axmodelに変換してNPUで実行したときに期待した結果が得られなかった場合、ONNXに問題があるのか変換が失敗しているのかわかりません。また、先にCPUで実行しておけば、NPUで実行したときにどのくらい高速化できたかを比較することができます。
ここからはModule LLM側のUbuntuで作業します。SSHでログインしますが、推論に使う画像を表示できた方が便利なので、次の手順を実施しました。
Ubuntu PC(WSL2でもOK)からssh -XC root@192.168.xxx.xxxで接続し、(rootのパスワードは"123456")
apt install x11-apps
apt-get install -y python3-tk (これはmatplotlibで画像表示するため)
xeyes (動作確認)
まずはONNX runtimeをインストールします。
pip install onnx
pip install onnxruntime
適当な作業ディレクトリにONNXファイルと入力する画像を置き、次のPythonスクリプトを実行します。
import onnx
import onnxruntime
import matplotlib.pyplot as plt
import numpy as np
from PIL import Image
import time

model_path = "lenet_result.onnx"

session = onnxruntime.InferenceSession(model_path )

#
# Check model
#
model = onnx.load(model_path)
onnx.checker.check_model(model)
print(onnx.helper.printable_graph(model.graph))

#
# Get model input / output info
#
input_name = session.get_inputs()[0].name
print("Input name  :", input_name)
input_shape = session.get_inputs()[0].shape
print("Input shape :", input_shape)
input_type = session.get_inputs()[0].type
print("Input type  :", input_type)

output_name = session.get_outputs()[0].name
print("Output name  :", output_name)
output_shape = session.get_outputs()[0].shape
print("Output shape :", output_shape)
output_type = session.get_outputs()[0].type
print("Output type  :", output_type)

#
# Pre process (画像を28x28のグレースケールに変換)
#
filename = "input.jpg"
img = Image.open(filename)
img_gray = img.convert("L")
img_resized = img_gray.resize((28, 28))
np_img = np.array(img_resized)

#
# Inference
#
start = time.time()
output = session.run([output_name], {input_name: np_img.reshape(1, 1, 28, 28).astype(np.float32)})
end = time.time()

# 推論にかかった時間を表示
time_diff = end - start
print("\nInference time[s]:")
print("{:.7f}".format(time_diff))

#
# Post process(ここでは、単に分類ごとの確率を表示)
#
print("\nResult:")
print("None   :{:.2f}".format(output[0][0][0]))
print("Newtral:{:.2f}".format(output[0][0][1]))
print("Up     :{:.2f}".format(output[0][0][2]))
print("Down   :{:.2f}".format(output[0][0][3]))
print("Right  :{:.2f}".format(output[0][0][4]))
print("Left   :{:.2f}".format(output[0][0][5]))
print("\n")

# 入力した画像を表示
plt.imshow(np_img, cmap="gray")
plt.show()
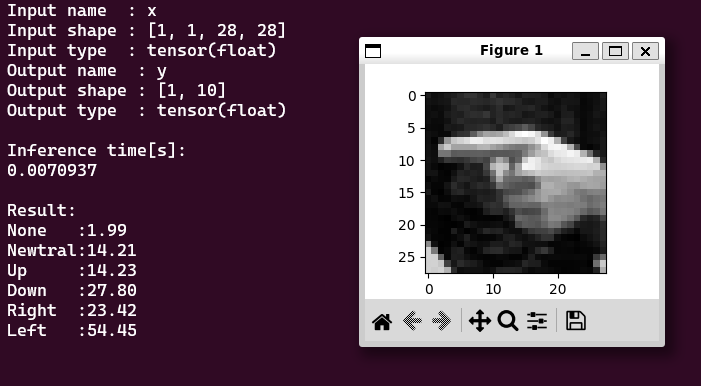
このような結果になればOKです。画像の指は左を差しているので、推論結果は正しそうです。推論に7msかかっていることもわかります。

ONNXからaxmodelに変換
ここからはPCのUbuntuでの作業になります。私はWSL2で実施しています。
Module LLMのNPUで実行させるためには、ONNXをaxmodelという形式に変換する必要があります。以下の記事を参考にしながら進めました。変換はPulsar2というツールを使いますがDockerでその実行環境が提供されています。Dockerを起動するところまでは同じ手順となるため、こちらの記事をご参照願います。
変換に必要なデータの準備
Dockerを起動できたら、作業フォルダに必要なファイルを追加します。次の3点を追加する必要があります。Configファイルの内容については以降で解説します。
- Configファイル
- 学習に用いた画像データセット(の一部)
- ONNXファイル
|-- config
|   |-- lenet_build_config.json          <--Configファイル
|   |-- mobilenet_v2_build_config.json
|   |-- yolov5s_config.json
|-- dataset
|   |-- coco_4.tar
|   |-- imagenet-32-images.tar
|   |-- lenet.tar                        <--データセット
|-- model
|   |-- lenet_result.onnx                <--ONNXファイル
|   |-- mobilenetv2-sim.onnx
|   |-- yolov5s.onnx
|-- output
|   |-- build_context.json
|   |-- compiled.axmodel
|   |-- compiler
|   |-- frontend
|   `-- quant
`-- pulsar2-run-helper
    |-- cli_classification.py
    |-- cli_detection.py
    |-- list.txt
    |-- models
    |-- pulsar2_run_helper
    |-- requirements.txt
    |-- setup.cfg
    |-- sim_images
    |-- sim_inputs
    `-- sim_outputs
Configファイルの内容について
私もまだあまり理解できていませんが、ローカルLLM向けの量子化をする際に必要な情報を記述するものと思われます。これを正しく記述しないと、Palsar2での変換がエラーになってしまいます。マニュアルもありますがなかなか難しいため、作業フォルダにexampleとして入っているmobilenet_v2のConfigファイルをベースにいろいろ変えてみて試行錯誤しました。結果として、以下の情報を書き換えることでうまく動きました。
-
quant - input_config - tensor_name
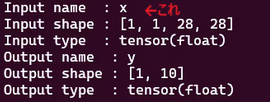
モデルに埋め込まれている入力データのラベル名です。実はONNXを実行したときに表示していたので、これをそのまま記述します。

-
quant - input_config - calibration_dataset
量子化でのキャリブレーション用のデータセットが必要なようです。詳細はわからなかったため、学習に用いた画像データセットの一部(指の向き上下左右それぞれの画像を各10枚ずつくらい)を入れてみましたが、それでうまくいきました。おそらく、プリプロセス後のデータ(28x28のグレースケールに変換したデータ)にしておく必要があります。tarでアーカイブして適当な場所に保存し、そのパスを記述します。(追記 tarアーカイブしたものをGithubに置きました。) -
input_processors - tensor_name
入力データのラベル名。quantのtensor_nameと同じ。 -
input_processors - tensor_format
-
input_processors - src_format
この2つは入力データのフォーマット。グレースケールなので”GRAY”とした。 -
input_processors - src_dtype
入力データのデータ型。floatなので”FP32”とした。
Configファイルの全体
{
  "model_type": "ONNX",
  "npu_mode": "NPU1",
  "quant": {
    "input_configs": [
      {
        "tensor_name": "x",
        "calibration_dataset": "./dataset/lenet.tar"
      }
    ],
    "calibration_method": "MinMax",
    "precision_analysis": false
  },
  "input_processors": [
    {
      "tensor_name": "x",
      "tensor_format": "GRAY",
      "src_format": "GRAY",
      "src_dtype": "FP32",
      "src_layout": "NHWC",
      "csc_mode": "NoCSC"
    }
  ],
  "compiler": {
    "check": 0
  }
}
Pulsar2による変換
ここまで準備できたら、Pulsar2による変換を実行します。
pulsar2 build --input model/lenet_result.onnx --output_dir output --config config/lenet_build_config.json --target_hardware AX620E
outputファルダにconpiled.axmodelというファイルが出来れば成功です!
Pythonのランタイムによるaxmodel実行
いよいよNPUでモデルを実行します。Module LLM発売直後は、ランタイムはC言語用しかなくPCのUbuntuでクロスコンパイルする必要がありましたが、その後Python用のランタイムが提供されました。こちらの記事で紹介されています。
手順やPythonスクリプトはONNXを実行したときとほとんど同じです。
まずはランタイムをインストールします。
wget https://github.com/AXERA-TECH/pyaxengine/releases/download/0.0.1rc1/axengine-0.0.1-py3-none-any.whl
pip3 install  --no-deps ./axengine-0.0.1-py3-none-any.whl
適当な作業ディレクトリにaxmodelファイルと入力する画像を置き、次のPythonスクリプトを実行します。
import axengine as axe
import matplotlib.pyplot as plt
import numpy as np
from PIL import Image
import time

model_path = "lenet.axmodel"

#
# Load model
#
session = axe.InferenceSession(model_path)

#
# Get model input / output info
#
input_name = session.get_inputs()[0].name
print("Input name  :", input_name)
input_shape = session.get_inputs()[0].shape
print("Input shape :", input_shape)
input_type = session.get_inputs()[0].dtype
print("Input type  :", input_type)

output_name = session.get_outputs()[0].name
print("Output name  :", output_name)
output_shape = session.get_outputs()[0].shape
print("Output shape :", output_shape)
output_type = session.get_outputs()[0].dtype
print("Output type  :", output_type)

#
# Pre process (画像を28x28のグレースケールに変換)
#
filename = "input.jpg"
img = Image.open(filename)
img_gray = img.convert("L")
img_resized = img_gray.resize((28, 28))
np_img = np.array(img_resized)

#
# Inference
#
start = time.time()
input_tensor = np_img.reshape(1, 1, 28, 28).astype(np.float32)
end = time.time()
output = session.run([output_name], {input_name: input_tensor})

# 推論にかかった時間を表示
time_diff = end - start
print("\nInference time[s]:")
print("{:.7f}".format(time_diff))

#
# Post process
#
print("\nResult:")
print("None   :{:.2f}".format(output[0][0][0]))
print("Newtral:{:.2f}".format(output[0][0][1]))
print("Up     :{:.2f}".format(output[0][0][2]))
print("Down   :{:.2f}".format(output[0][0][3]))
print("Right  :{:.2f}".format(output[0][0][4]))
print("Left   :{:.2f}".format(output[0][0][5]))
print("\n")

plt.imshow(np_img, cmap="gray")
plt.show()
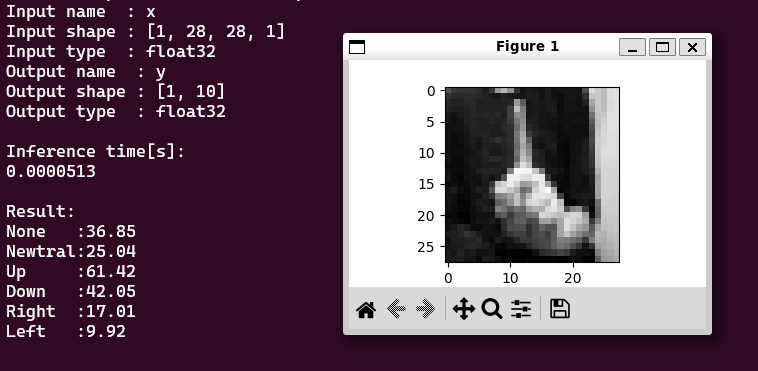
このような実行結果になります。推論時間は0.05msで、ONNXを実行したときより100倍以上高速になっているので、うまくNPUで実行できていそうです。
まとめ
以上が、自分で学習させたモデルのONNXをaxmodelに変換し、Module LLMのNPUで実行するまでの手順となります。いくつか設定内容の意味を理解できず勘に頼ってしまったところもありますので、今後もローカルLLMについて勉強していきたいと思います。それでも、簡単な自作モデルで実際にやってみることで、なんとなく仕組みが理解できたように思いますし、既存の高性能なモデルを変換する際にも役に立つのではないでしょうか。Module LLMはこれから日本のストアでも発売するという情報もあるので、使い方に関する情報も増えていけばよいなと思います。
