EC2のUbuntu 18.04.1 LTSに独自ドメイン名を割り当て、Let's EncryptでNginx、DjangoをHTTPSに対応させたときの手順です。
CloudFrontなどは使わず、直接、EC2を独自ドメイン&SSL化しています。
※この手順はElastic IP(固定のパブリックIP)を使用しています。Elastic IPは使い方次第で料金が発生するので注意してください。
なお、独自ドメインはムームードメインで取得済みのものとし、DNS設定もムームードメインでのケースを記載しています。
全体の流れ
- 外部からAWSのEC2へSSL接続できるようポートを開く。
- Elastic IPを取得しEC2インスタンスに割り当てる。
- ドメイン名でアクセスできるようにDjango、Nginxの設定を変更する。
- DNSを設定する。
- Let's Encryptの証明書を取得し、SSL接続できる様にNginxの設定を変更する。
- 証明書を自動取得するようにcron設定する。
AWSのポートを開く
EC2ダッシュボード - ネットワーク&セキュリティ - セキュリティグループで、該当するセキュリティグループのインバウンドに443を追加する。
タイプ:HTTPS
プロトコル:TCP
ポート範囲:443
ソース:0.0.0.0/0, :://0
Elastic IPの取得と設定
EC2ダッシュボード - ネットワーク&セキュリティ - Elastic IP で新しいアドレスを割り当てる。
Scope:VPC
IPv4 address pool:Amazon pool
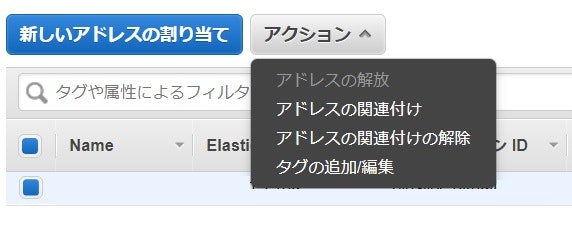
アクション - アドレスの関連付け でインスタンスにIPアドレスを割り当てる。
Django、Nginxの設定
ドメイン名でアクセスしても動作する様に設定ファイルを修正する。
Django
ALLOWED_HOSTS = ['ドメイン名','IP'] # 取得したドメイン名、IPに修正
Nginx
cd /etc/nginx/sites-available/
sudo nano Djangoプロジェクト名
この時点ではSSL化はしないのでポートは80のまま、server_nameをドメイン名に修正する。
server {
    listen 80;
    server_name ドメイン名; # 取得したドメイン名に修正

    〜
}
上記を書き換えたら、Nginx、Gunicornをrestartする。
DNSの設定
ドメインを取得したところでドメイン名とIPアドレスを紐付ける。
ムームードメインの場合、該当のドメイン名をカスタム設定にし、設定2にAレコードを追加する。
サブドメイン:空欄
種別:A
内容:IPアドレス

ここまで設定したら、クライアントのブラウザからドメイン名でアクセスできることを確認する。DNSの設定が反映されるまでしばらくかかるかもしれない。
証明書の取得とNginxの設定
CertbotのサイトでSoftwareにNginx、SystemにUbuntu 18.04 LTS (bionic) を選択すると設定コマンドが出てくるので、Install、
Get Startedをそのまま実行する。
sudo apt-get update
~
sudo certbot --nginx
# 上記までを実行する
certbot --nginxを実行すると、メールアドレスを聞かれたりするので回答していく。
NginxへのHTTPアクセスをHTTPSへリダイレクトするか聞かれたらリダイレクトするように回答し、certbotにNginxの設定を書き換えてもらう。
Saving debug log to /var/log/letsencrypt/letsencrypt.log
Plugins selected: Authenticator nginx, Installer nginx
Enter email address (used for urgent renewal and security notices) (Enter 'c' to
cancel): メールアドレス

~

Please choose whether or not to redirect HTTP traffic to HTTPS, removing HTTP access.
- - - - - - - - - - - - - - - - - - - - - - - - - - - - - - - - - - - - - - - -
1: No redirect - Make no further changes to the webserver configuration.
2: Redirect - Make all requests redirect to secure HTTPS access. Choose this for
new sites, or if you're confident your site works on HTTPS. You can undo this
change by editing your web server's configuration.
- - - - - - - - - - - - - - - - - - - - - - - - - - - - - - - - - - - - - - - -
Select the appropriate number [1-2] then [enter] (press 'c' to cancel): 2
ここまで設定したら、クライアントのブラウザからHTTPSでアクセスできることを確認する。
証明書の自動更新設定
下記コマンドが動作することを確認する。
sudo certbot renew --post-hook "systemctl restart nginx"
動作するならcronに登録する。
sudo crontab -e
# m h  dom mon dow   command
0 1 * * 1 sudo certbot renew --post-hook "systemctl restart nginx"