この記事で紹介している単体テストのカバレッジ可視化方法は古いです。カバレッジ可視化に関する新しい記事を書いたので、今後は以下を参考にしてください。
はじめに
VScode上でのpytestを利用した単体テスト実行とカバレッジ可視化の方法に関する個人的な備忘録です。
主に以下のことを記載。
- poetryを利用した単体テスト実行可能なプロジェクト雛形作成
- VScodeのテストエクスプローラー上での単体テスト(pytest)実行方法
- VScode拡張機能を利用したテストカバレッジ(pytest-cov)計測結果のVScode上での可視化設定
python=v3.8、VScode=v1.6.1で動作を確認
単体テストプロジェクト作成
下記コマンドでプロジェクト雛形(pytestdemo)を作成する。
# プロジェクト雛形作成コマンド(src layout)
poetry new pytestdemo --src
cd pytestdemo
# pytestとpytest-covを開発環境用ライブラリとしてインストール
poetry add pytest pytest-cov --dev
# プロジェクトのパッケージへのPYTHONPATH設定を追加するために実行
# このコマンドを実行しない場合、単体テスト実行時に「Module not found error」が発生するため注意
poetry install
# rstよりmdのほうが好みなので変更
mv README.rst README.md
下記の単体テストデモ用のコードを追加したプロジェクトで以降の単体テスト実行の説明を進める。
-
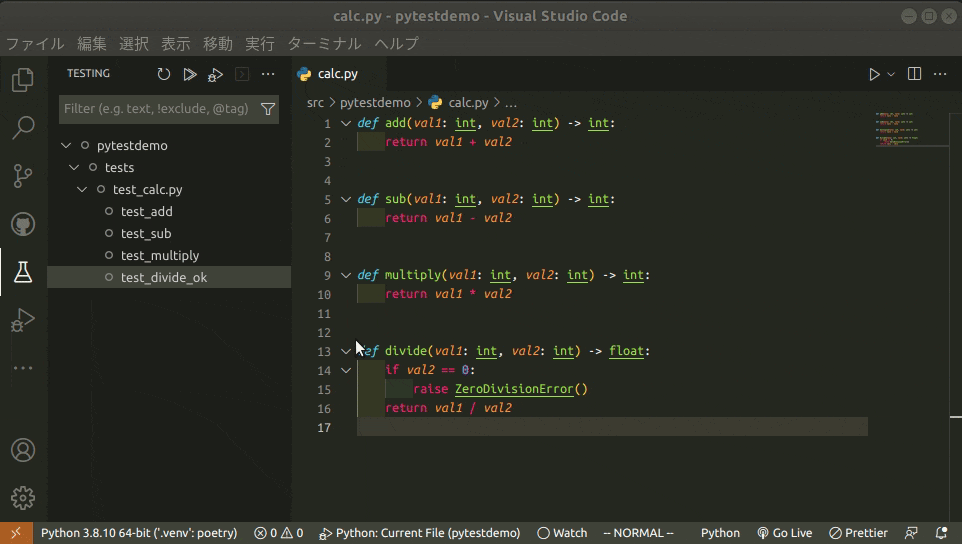
src/pytestdemo/calc.py
単純な加算(add)・減算(sub)・乗算(multiply)・除算(divide)の関数を実装 -
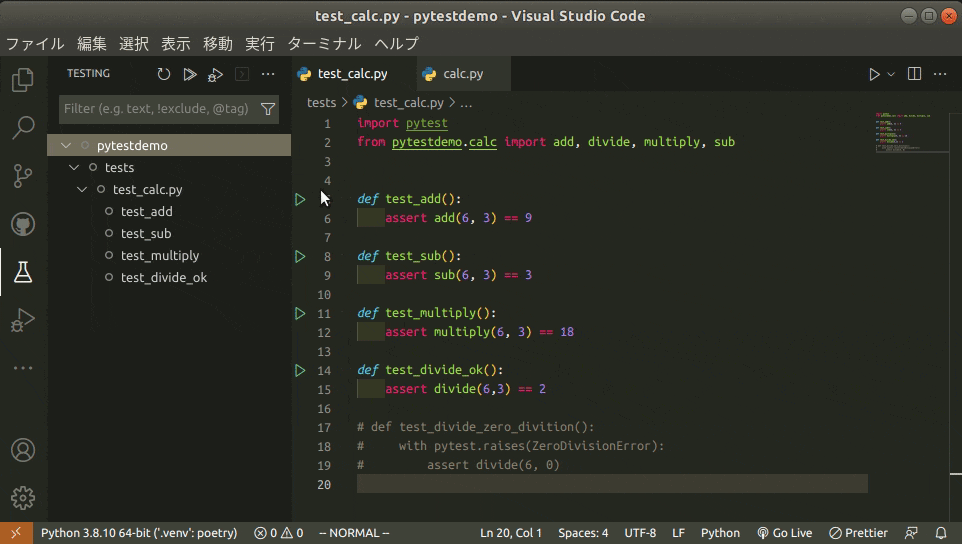
tests/test_calc.py
calc.pyの単体テストを実行
.
├── README.md
├── poetry.lock
├── pyproject.toml
├── src
│   └── pytestdemo
│       ├── __init__.py
│       └── calc.py
└── tests
    ├── __init__.py
    └── test_calc.py
def add(val1: int, val2: int) -> int:
    return val1 + val2

def sub(val1: int, val2: int) -> int:
    return val1 - val2

def multiply(val1: int, val2: int) -> int:
    return val1 * val2

def divide(val1: int, val2: int) -> float:
    if val2 == 0:
        raise ZeroDivisionError()
    return val1 / val2
import pytest
from pytestdemo.calc import add, divide, multiply, sub

def test_add():
    assert add(6, 3) == 9

def test_sub():
    assert sub(6, 3) == 3

def test_multiply():
    assert multiply(6, 3) == 18

def test_divide_ok():
    assert divide(6,3) == 2

# 「カバレッジ = 100%」にしない場合の確認のためコメントアウト
# def test_divide_zero_division_error():
#    with pytest.raises(ZeroDivisionError):
#        assert divide(6, 0)
作成したプロジェクトは自分のGitHubレポジトリにも置いているので、興味があれば参照してください。
VScode上での単体テスト実行
VScode標準のPython拡張機能はインストール済であることを想定。
単体テスト実行設定
pytestをpythonの単体テストツールとして有効化するための設定を記述する。
{
  // 単体テストツールとしてpytestを有効化
  "python.testing.pytestEnabled": true,
  // ファイル保存時にテスト対象コードを自動的に探索
  "python.testing.autoTestDiscoverOnSaveEnabled": true,
}
テストエクスプローラーでの単体テスト実行
正しく設定がされていれば、以下のようにVScode上で単体テストを実行できるようになる。
VScode上でのカバレッジ可視化実行
カバレッジ可視化はVScode拡張機能のCoverage Guttersを利用することで可能となる。事前にインストールしておく。
カバレッジ可視化実行設定
{
  // 単体テストツールとしてpytestを有効化
  "python.testing.pytestEnabled": true,
  // ファイル保存時にテスト対象を自動的に探索
  "python.testing.autoTestDiscoverOnSaveEnabled": true,
  // pytest実行時の引数設定を追加
  // --cov: カバレッジ計測の有効化
  // --cov-report xml: カバレッジ計測レポートをxml形式(coverage.xml)で出力
  "python.testing.pytestArgs": ["--cov=src", "--cov-report", "xml"],

  // エディタ上のカバレッジ表示設定
  // ガター(ブレークポイント等が表示される場所)でのカバレッジ表示有無(default: true)
  "coverage-gutters.showGutterCoverage": true,
  // エディタ行でのカバレッジ表示有無(default: false)
  "coverage-gutters.showLineCoverage": true,
  // ルーラーでのカバレッジ表示有無(default: false)
  "coverage-gutters.showRulerCoverage": true
}
pytest実行時の引数設定はpyproject.tomlからも設定が可能 (参考リンク)
カバレッジ可視化実行
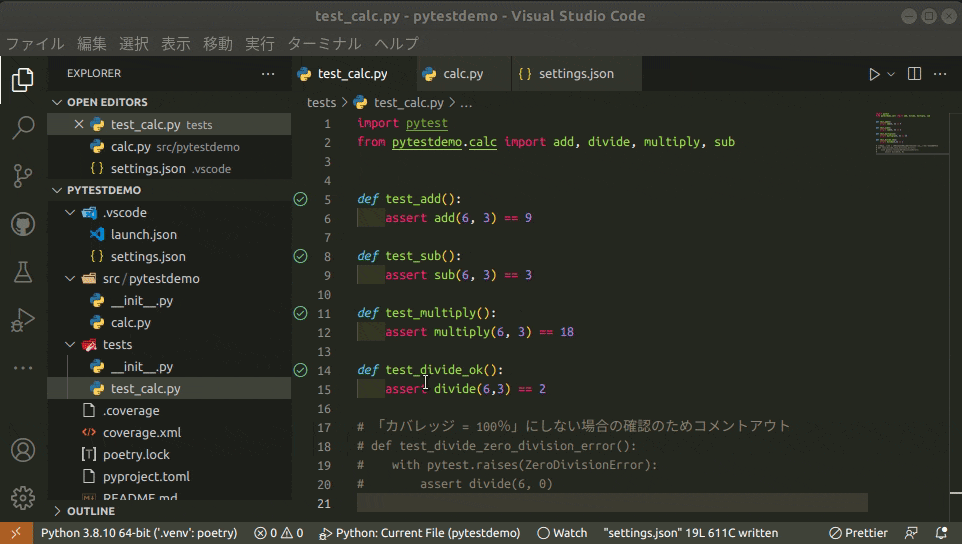
VScode上のテストエクスプローラーから単体テストを実行後、下記のようにフッターの◯ Watchをクリックすることでカバレッジをエディタ上に表示ができる。
カバレッジ計測データは、pytestが単体テスト実行時に出力・更新するcoverage.xmlより取得をしている。
単体テストが実施された「テストカバレッジ=90%」分のコードが緑色で可視化され、
残りの単体テスト未実施の0除算関連のコードは赤色で可視化されている。
デバッグ設定との競合解決方法
VScodeではpytestによるカバレッジ取得設定(--cov)時に、そのままでは単体テストでのデバッグが出来ない仕様となっている。
以下、VScode公式サイトのカバレッジ取得設定とデバッグ設定の競合に関する記載です。
Note If you have the pytest-cov coverage module installed, VS Code doesn't stop at breakpoints while debugging because pytest-cov is using the same technique to access the source code being run. To prevent this behavior, include --no-cov in pytestArgs when debugging tests, for example by adding "env": {"PYTEST_ADDOPTS": "--no-cov"} to your debug configuration. (See Debug Tests above about how to set up that launch configuration.) (For more information, see Debuggers and PyCharm in the pytest-cov documentation.)
要約すると、カバレッジ取得とデバッグで同一の技術を利用しているため、カバレッジ取得設定がされている場合にデバッグ時にブレークポイントで正常に止まらなくなるらしい。
下記のようにデバッグ用の設定ファイルに記述を加え、単体テストデバッグ時のカバレッジ取得設定をオフ(--no-cov)にすることで、正常にデバッグを実行できるようになる。
{
  // Use IntelliSense to learn about possible attributes.
  // Hover to view descriptions of existing attributes.
  // For more information, visit: https://go.microsoft.com/fwlink/?linkid=830387
  "version": "0.2.0",
  "configurations": [
    {
      "name": "Python: Current File",
      "type": "python",
      "request": "launch",
      "program": "${file}",
+     "purpose": ["debug-test"],
      "console": "integratedTerminal",
+     "env": { "PYTEST_ADDOPTS": "--no-cov" }
    }
  ]
}
上記の設定により、カバレッジ取得設定時でもデバッグが可能となったことが確認できる。
参考
Python testing in Visual Studio Code
pythonのカバレッジをpytest-covで調べる
VSCodeでカバレッジを表示する(pytest-cov)