今回いよいよレイの定義をしたいと思います。
自分が少し前に書いたブログの焼き直しみたいな感じになります。
https://nilgiri-sgt.hatenablog.com/
レイを今回は視野角から定義したいと思います。また、簡単のためひとまずz軸正方向にレイを飛ばしたと思います。
まず視野角を決めることによって、カメラとスクリーンの距離が決まります。ので、そちらから求めていきます。

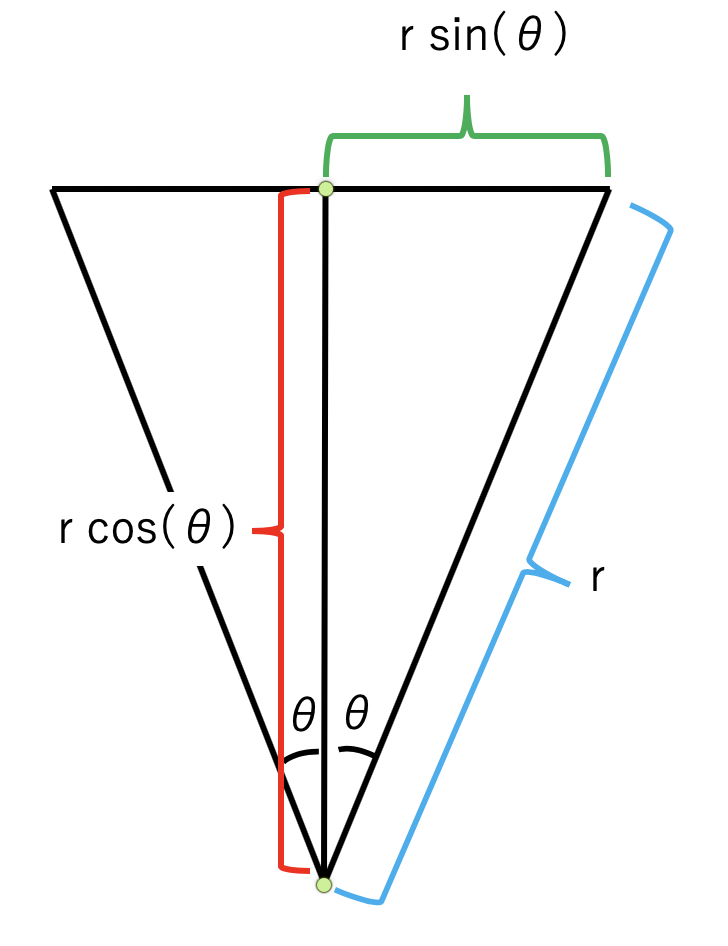
視野角を$2\theta$にすると、上の画像のような関係が成り立ちます。ここで視野角$2\theta$で想定するスクリーン全体を写すためには、$rcos\theta$だけ離れた位置にカメラを置かなくてはならないことがわかります。
この位置のカメラからスクリーン上の任意の座標$(x,y)$へレイを飛ばすことを考えると、レイのベクトルは
$$(x,y,rcos\theta )$$
となります。rがまだ不明な値なので、次にこれを決めます。
スクリーンが-1〜1の値をとると考えます。するとこのとき$rsin\theta = 1$にならなくてはならないので、
$$r = 1/sin\theta$$
となります。これをレイベクトルに代入して、正規化することなどを考えて整理すれば、レイのベクトルは
$$normalize(x sin\theta , y sin\theta, cos\theta)$$
となります。さてこれを定義して確認してみます。
まずカメラクラスを用意します。カメラクラスにはひとまず場所と向き、そして視野角をもたせておくようにします。
またスクリーンの座標とカメラの視野角からレイベクトルを生成するメンバ関数を定義しておきます。
class camera{
    public:
        camera();
        Vector3d direction;
        Vector3d position;
        double angle;
        double rad_ang_half;
    Vector3d ray(double x, double y){
        Vector3d temp;
        temp << sin(rad_ang_half)*x, sin(rad_ang_half)*y, cos(rad_ang_half);
        temp = temp.normalized();
        return temp;
    }
    private:

};

camera::camera(){
    angle = 60;
    rad_ang_half = angle*PI/180;
    direction << 0,0,1;
    position << 0,0,-3;
}
そしたら、次にスクリーン全体に対してループを回し、スクリーンの座標に対してカメラから生成されるレイによって色をつけて、みようと思います。ここでベクトルはマイナスの値をとってしまうので、0以下の場合は0に、1以上の場合は1に変換する関数saturateを定義して使います。
以下がコードです。
# include <bits/stdc++.h>
# include "Eigen/Core"
using namespace std;
using namespace Eigen;
/*
Vector3d
Matrix3d
(i,j)の形で要素アクセス
A.array().sin()で要素ごと演算
A.norm()
A.normalize()
a.dot(b)
*/

const double PI = 3.141592653589793238;
const double PI2 = 6.28318530718;
const double eps = 1e-6;


double saturate(double d){
    double ans = 0;

    if(d < 0){
        ans = 0.0;
    }else if(d > 1){
        ans = 1.0;
    }else{
        ans = d;
    }
    return ans;
}

void write_ppm(vector<vector<vector<int>>> pic){
    ofstream out;
    out.open("test.pnm");
    out << "P3" << endl;
    out << pic.size() << " " << pic[0].size() << endl;
    out << 255 << endl;
    for (int i = 0 ; i < pic.size(); ++i){
        for (int j = 0; j < pic[0].size(); ++j){
            out << pic[i][j][0] << " " << pic[i][j][1] << " " << pic[i][j][2] << endl;
        }
    }

}


class camera{
    public:
        camera();
        Vector3d direction;
        Vector3d position;
        double angle;
        double rad_ang_half;
    Vector3d ray(double x, double y){
        Vector3d temp;
        temp << sin(rad_ang_half)*x, sin(rad_ang_half)*y, cos(rad_ang_half);
        temp = temp.normalized();
        return temp;
    }
    private:

};

camera::camera(){
    angle = 60;
    rad_ang_half = angle*PI/180;
    direction << 0,0,1;
    position << 0,0,-3;
}

int main(void){
    int height = 512;
    int width = 512;
    double xstep = 2.0/width;
    double ystep = 2.0/height;
    vector<vector<vector<int>>> pic;
    pic = vector<vector<vector<int>>>(height,vector<vector<int>>(width,vector<int>(3,150)));
    camera cam ;
    for (int i = 0; i<height; ++i){
        for(int j = 0; j < width; ++ j){
            double u = xstep*j-1.0;
            double v = 1.0-ystep*i;
            Vector3d ray = cam.ray(u,v);
                pic[i][j][0] = saturate(ray(0))*255;
                pic[i][j][1] = saturate(ray(1))*255;
                pic[i][j][2] = saturate(ray(2))*255;
        }
    }
    write_ppm(pic);
    return 0;
}
これを出力するとこんな感じになります。
多分合ってると思います。
