UIViewがuserInteractionEnabled = trueの時は、レスポンダーチェーン的にそこでチェーンが止まり、その下にあるビューにタップが伝わらない。そこで、UIViewの一部のタップを無効にしてその下にあるビューにタップを伝えたい。どうすればよいか?
タップ無効領域を作る
UIViewのhitTest:withEvent:というメソッドを作って、タップ反応領域はselfを返す。タップ無効領域はnilを返すということで、簡単にUIViewをくり抜くことができます。ちなみに、今回、タップ無効領域はUIBezierPathを使って作成しています。UIBezierPathはcontainsPoint:というメソッドを持っていて、領域判定にこちらを使うとかなり便利です。
import UIKit

class HollowView: UIView {

    override func hitTest(point: CGPoint, withEvent event: UIEvent?) -> UIView? {
        let radius = 100.0 as CGFloat
        let path = UIBezierPath(ovalInRect: self.bounds)
        if path.containsPoint(point) {
            return nil
        }
        return self
    }
}
試してみると、真ん中の円の部分だけタップは反応するけれど、四隅はタップがUIViewのところで止まっているのが確認できると思います。ただ、これだと見た目的にはわかりづらいですね。繰り抜かれた感じのイメージを置くのも良いですが、そもそもイメージごと繰り抜いてしまいたくなります。
見た目的にもくり抜く
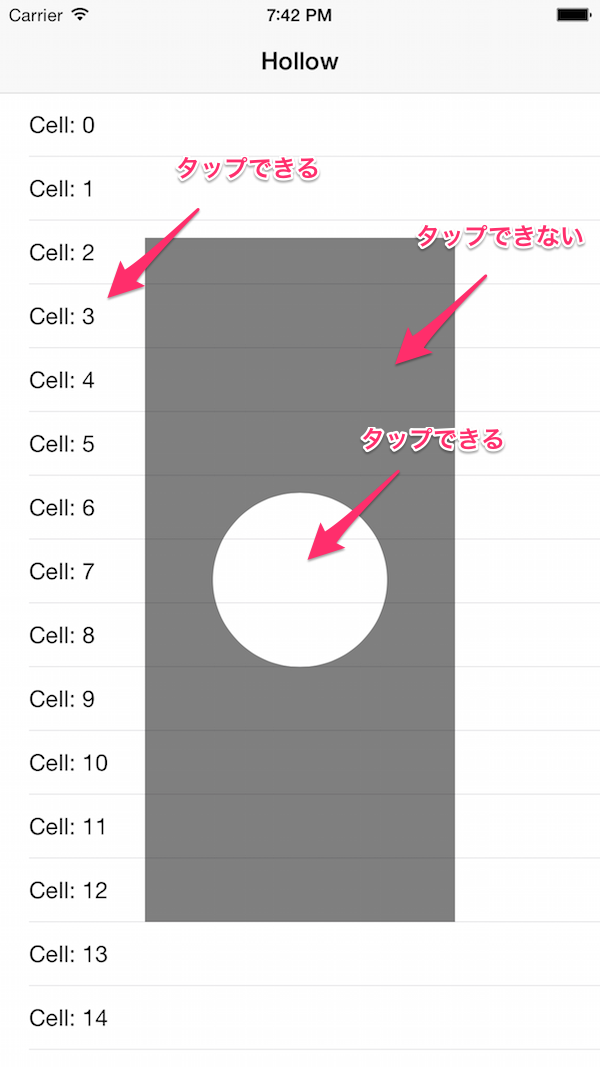
見た目的にもくり抜くのは簡単には行きません。例としてUITableViewの上に、 HollowView と名づけた四角いビューを置き、その中心部分を丸く繰り抜きます。
import UIKit

class HollowView: UIView {

    var hollowRadius = 60.0 as CGFloat
    lazy var hollowPoint: CGPoint = {
        return CGPoint(
            x: CGRectGetWidth(self.bounds) / 2.0,
            y: CGRectGetHeight(self.bounds) / 2.0
        )
        }()

    lazy var hollowLayer: CALayer = {
        // 繰り抜きたいレイヤーを作成する(今回は例として半透明にした)
        let hollowTargetLayer = CALayer()
        hollowTargetLayer.bounds = self.bounds
        hollowTargetLayer.position = CGPoint(
            x: CGRectGetWidth(self.bounds) / 2.0,
            y: CGRectGetHeight(self.bounds) / 2.0
        )
        hollowTargetLayer.backgroundColor = UIColor.blackColor().CGColor
        hollowTargetLayer.opacity = 0.5

        // 四角いマスクレイヤーを作る
        let maskLayer = CAShapeLayer()
        maskLayer.bounds = hollowTargetLayer.bounds

        // 塗りを反転させるために、pathに四角いマスクレイヤーを重ねる
        let ovalRect =  CGRect(
            x: self.hollowPoint.x - self.hollowRadius,
            y: self.hollowPoint.y - self.hollowRadius,
            width: self.hollowRadius * 2.0,
            height: self.hollowRadius * 2.0
        )
        let path =  UIBezierPath(ovalInRect: ovalRect)
        path.appendPath(UIBezierPath(rect: maskLayer.bounds))

        maskLayer.fillColor = UIColor.blackColor().CGColor
        maskLayer.path = path.CGPath
        maskLayer.position = CGPoint(
            x: CGRectGetWidth(hollowTargetLayer.bounds) / 2.0,
            y: CGRectGetHeight(hollowTargetLayer.bounds) / 2.0
        )
        // マスクのルールをeven/oddに設定する
        maskLayer.fillRule = kCAFillRuleEvenOdd
        hollowTargetLayer.mask = maskLayer
        return hollowTargetLayer
    }()

    override func awakeFromNib() {
        super.awakeFromNib()
        self.backgroundColor = UIColor.clearColor()
    }

    override func hitTest(point: CGPoint, withEvent event: UIEvent?) -> UIView? {
        let rect = CGRect(
            x: self.hollowPoint.x - self.hollowRadius,
            y: self.hollowPoint.y - self.hollowRadius,
            width: self.hollowRadius * 2.0,
            height: self.hollowRadius * 2.0
        )
        let hollowPath = UIBezierPath(roundedRect: rect, cornerRadius: self.hollowRadius)
        if !CGRectContainsPoint(self.bounds, point) || hollowPath.containsPoint(point) {
            return nil
        }
        return self
    }

    override func layoutSublayersOfLayer(layer: CALayer!) {
        layer.addSublayer(self.hollowLayer)
    }
}
こんなものができました。
hitTest:withEventのところでは、丸の中と、HollowViewの外側のタップを有効にしています。ポイントは、maskLayerの kCAFillRuleEvenOdd だと思います。even/oddルールということでUIBezierPathの重なりから、塗りと塗りではない部分を判定して処理してくれます。
