Amazon OpenSearch ServiceのBedrock連携機能を使用してRAGの仕組みを構築しました。
アーキテクチャの特徴
RAGの仕組みの構成はこういったものが多いと思います。
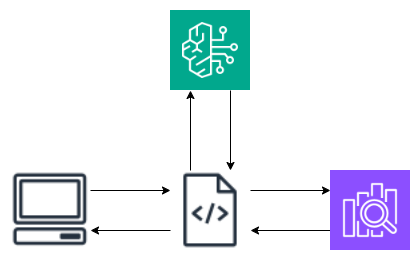
OpenSearchの最近のアップデートで以下の機能が追加されました。
- OpenSearchのセマンティック検索(今回はニューラル検索)を使用することで、OpenSearchにドキュメントを登録した際に、自動でベクトル情報も保存します。
- OpenSearchのRAG機能で検索結果を要約して回答します。
そのため アプリ側でのベクトル変換が不要 かつ、検索処理一発で RAGで要約した回答が取得 できます。

OpenSearchのRAG機能を使用する場合、最新のバージョン2.11では、機能フラグで有効にする必要がありますが、AWS上のOpenSearch Serviceではこのフラグの有効化がうまくいきませんでした。そのため、ローカル環境でOpenSearchを起動して検証しました。
設定手順
ライブラリーのインストール
pip install -Uq boto3 opensearch-py python-dotenv
opensearch-py-mlというライブラリーがあるのですが、今回使用する機能には対応していなかったため使用していません。未対応のAPI呼び出しは、直接transport.perform_requestを呼び出す方式としました。
環境変数の設定
.envから読み込みます。
AWS_ACCESS_KEY_ID=
AWS_SECRET_ACCESS_KEY=
AWS_DEFAULT_REGION=
from dotenv import load_dotenv

load_dotenv(override=True)
OpenSearch クライアントの作成
from opensearchpy import OpenSearch

host = 'localhost'
port = 9200

client = OpenSearch(
    hosts = [{'host': host, 'port': port}],
    use_ssl = False,
    verify_certs = False
)

info = client.info()
print(f"Welcome to {info['version']['distribution']} {info['version']['number']}!")
OpenSearchにBedrock(Titan Embeddings)のデプロイ
-
コネクターを作成
body = { "name": "Amazon Bedrock Connector: embedding", "description": "The connector to the Bedrock Titan embedding model", "version": 1, "protocol": "aws_sigv4", "parameters": { "region": os.getenv("AWS_DEFAULT_REGION"), "service_name": "bedrock" }, "credential": { "access_key": os.getenv("AWS_ACCESS_KEY_ID"), "secret_key": os.getenv("AWS_SECRET_ACCESS_KEY") }, "actions": [ { "action_type": "predict", "method": "POST", "url": "https://bedrock-runtime.us-east-1.amazonaws.com/model/amazon.titan-embed-text-v1/invoke", "headers": { "content-type": "application/json", "x-amz-content-sha256": "required" }, "request_body": "{ \"inputText\": \"${parameters.inputText}\" }", "pre_process_function": "\n StringBuilder builder = new StringBuilder();\n builder.append(\"\\\"\");\n String first = params.text_docs[0];\n builder.append(first);\n builder.append(\"\\\"\");\n def parameters = \"{\" +\"\\\"inputText\\\":\" + builder + \"}\";\n return \"{\" +\"\\\"parameters\\\":\" + parameters + \"}\";", "post_process_function": "\n def name = \"sentence_embedding\";\n def dataType = \"FLOAT32\";\n if (params.embedding == null || params.embedding.length == 0) {\n return params.message;\n }\n def shape = [params.embedding.length];\n def json = \"{\" +\n \"\\\"name\\\":\\\"\" + name + \"\\\",\" +\n \"\\\"data_type\\\":\\\"\" + dataType + \"\\\",\" +\n \"\\\"shape\\\":\" + shape + \",\" +\n \"\\\"data\\\":\" + params.embedding +\n \"}\";\n return json;\n " } ] } response = client.transport.perform_request( method='POST', url='/_plugins/_ml/connectors/_create', body=body ) titan_connector_id = response['connector_id'] -
モデルを作成
model_name = "titan-embedded-model" body = { "name": model_name, "function_name": "remote", "connector_id": titan_connector_id } response = client.transport.perform_request( method='POST', url='/_plugins/_ml/models/_register', body=body ) titan_model_id = response['model_id'] -
モデルをデプロイ
response = client.transport.perform_request(
        method='POST',
        url=f'/_plugins/_ml/models/{titan_model_id}/_deploy'
)
OpenSearchにBedrock(Anthropic Claude Instant)のデプロイ
同様の手順でClaude Instantもデプロイします。
-
コネクターを作成
body = { "name": "Amazon Bedrock(anthropic.claude-instant-v1)", "description": "Test connector for Amazon Bedrock", "version": 1, "protocol": "aws_sigv4", "parameters": { "region": os.getenv("AWS_DEFAULT_REGION"), "service_name": "bedrock" }, "credential": { "access_key": os.getenv("AWS_ACCESS_KEY_ID"), "secret_key": os.getenv("AWS_SECRET_ACCESS_KEY") }, "actions": [ { "action_type": "predict", "method": "POST", "url": "https://bedrock-runtime.us-east-1.amazonaws.com/model/anthropic.claude-instant-v1/invoke", "headers": { "content-type": "application/json", "x-amz-content-sha256": "required" }, "request_body": "{\"prompt\":\"\\n\\nHuman: ${parameters.inputs}\\n\\nAssistant:\",\"max_tokens_to_sample\":2000,\"temperature\":0.5,\"top_k\":250,\"top_p\":1,\"stop_sequences\":[\"\\\\n\\\\nHuman:\"]}" } ] } response = client.transport.perform_request( method='POST', url='/_plugins/_ml/connectors/_create', body=body ) -
モデルを作成
model_name = "claude-instant-model" body = { "name": model_name, "function_name": "remote", "connector_id": claude_connector_id } response = client.transport.perform_request( method='POST', url='/_plugins/_ml/models/_register', body=body ) claude_model_id = response['model_id'] -
モデルをデプロイ
response = client.transport.perform_request(
        method='POST',
        url=f'/_plugins/_ml/models/{claude_model_id}/_deploy'
)
RAG機能の有効化
body = {
  "persistent": {
    "plugins.ml_commons.rag_pipeline_feature_enabled": "true"
    }
}

response = client.transport.perform_request(
        method='PUT',
        url='/_cluster/settings',
        body=body
)
パイプラインの作成
-
ingestパイプラインの作成
ドキュメントを登録した際に自動でベクトル化して保存するパイプラインを作成します。
今回は、ドキュメント内のquestionの値をベクトル化してpassage_embeddingに保存します。ingest_pipeline_name = "nlp-ingest-pipeline" embedding_field = "passage_embedding" embedding_target_field = "question" body = { "description": "An NLP ingest pipeline", "processors": [ { "text_embedding": { "model_id": titan_model_id, "field_map": { embedding_target_field: embedding_field } } } ] } response = client.transport.perform_request( method='PUT', url=f'/_ingest/pipeline/{ingest_pipeline_name}', body=body ) -
Searchパイプラインの作成
検索時にRAGを行うパイプラインです。プロンプトはカスタマイズするとより良い回答がもらえると思います。
search_pipeline_name = 'rag-search-pipeline'

body = {
  "response_processors": [
    {
      "retrieval_augmented_generation": {
        "model_id": claude_model_id,
        "context_field_list": ["answer"],
        "system_prompt": "You are a helpful assistant",
        "user_instructions": "Generate a concise and informative answer in less than 100 words for the given question"
      }
    }
  ]
}

response = client.transport.perform_request(
        method='PUT',
        url=f'/_search/pipeline/{search_pipeline_name}',
        body=body
)
インデックスの作成
rag-indexという名前のインデックスを作成し、プロパティとしてembedding_field(ベクトルを保持する項目)とquestionとanswerを定義します。それぞれ日本語のアナライザーを指定しています。
default_pipelineの指定があるのでデータ登録時に自動でベクトル化してembedding_fieldに登録される仕組みです。
index_name = 'rag-index'

body = {
  "settings": {
    "index.knn": True,
    "default_pipeline": ingest_pipeline_name,
    "index": {
      "analysis": {
        "analyzer": {
          "custom_kuromoji_analyzer": {
            "tokenizer": "kuromoji_tokenizer",
            "filter": ["kuromoji_baseform", "ja_stop"],
            "char_filter": ["icu_normalizer"]
          }
        }
      }
    }
  },
  "mappings": {
    "properties": {
      embedding_field: {
        "type": "knn_vector",
        "dimension": 1536
      },
      "question": {"type": "text", "analyzer": "custom_kuromoji_analyzer"},
      "answer": {"type": "text", "analyzer": "custom_kuromoji_analyzer"}
    }
  }
}

response = client.indices.create(index=index_name, body=body)
ドキュメントの登録
EC2のFAQのページから質問と回答を取得して登録しました。
(ここだけLangChainの力を借ります。。)
from langchain.document_loaders import WebBaseLoader
from langchain.text_splitter import CharacterTextSplitter

loader = WebBaseLoader("https://aws.amazon.com/jp/ec2/faqs/")
data = loader.load()

text_splitter = CharacterTextSplitter(
    separator = "Q:",
    keep_separator=True,
    chunk_size = 10,
    chunk_overlap  = 0,
)

# 先頭のいらないものを消す
texts = text_splitter.split_documents(data)
texts = texts[1:]
# 末尾のいらないものを消す
texts[-1].page_content = texts[-1].page_content.split('\xa0')[0]

for text in texts:
  try:
    lines = text.page_content.splitlines()
    q = lines[0]
    a = text.page_content

    body = {
      "question": q,
      "answer": a
    }

    client.index(index=index_name, body=body)

  except Exception as e:
    print(e)
RAG実行
llm_modelの文字列は必ずbedrock/で始める必要があるとのこと。(それ以降の文字列が何に使われているかは不明。。)
question = "EC2で起動できるOSは何ですか?"
body = {
  "_source": {
    "excludes": [
      embedding_field
    ]
  },
  "query": {
    "neural": {
      embedding_field: {
        "query_text": question,
        "model_id": titan_model_id,
      }
    }
  },
  "ext": {
		"generative_qa_parameters": {
      "llm_model": "bedrock/anthropic-instant", # 必ずbedrock/で始めること
			"llm_question": question,
      "context_size": 10
		}
	}
}

params = {
  "search_pipeline": search_pipeline_name,
  "timeout": 30
}

response = client.search(index=index_name, body=body, params=params)
print(response['ext']['retrieval_augmented_generation']['answer'])
回答はこちら
Amazon EC2で起動できる主要なOSは以下のとおりです。
Linuxディストリビューション
- Amazon Linux 2
- Ubuntu
- CentOS
- Debian
- Red Hat Enterprise Linux
- SUSE Linux
- Fedora
Microsoft Windows
- Windows Server 2022
- Windows Server 2019
- Windows Server 2016
- Windows Server 2012 R2
その他
- VMware ESXi
- Oracle Linux
- FreeBSD
- Oracle Solaris
EC2上で使用できるAMI(Amazon Machine Image)から直接起動できるOSは上記のような主要なものが多く用意されています。
また、自分でプロビジョニングしたカスタムAMIから特定のLinuxディストリビューションやWindowsなどを起動することも可能です。以上がEC2で直接起動できる主要なOSの種類です。
あれ、ちょっと誤った情報が。。