目的
前回は、SpringBootの@RestControllerを用いて文字列をブラウザ上で表示する事が出来たので、
今回は、@Controllerを用いてHTMLファイルを表示させる方法を学ぼうと思います。
事前準備
SpringBootのプロジェクトが既にあるという事を前提として進めていきます。
プロジェクトの作成方法は、Spring Quickstart Guideやこちらの記事を参考にしていただけたら幸いです。
1.Controllerを作ろう!
Spring Quickstart Guideが終わった時のソースコードは以下になっていると思います。
package com.example.demo;

import org.springframework.boot.SpringApplication;
import org.springframework.boot.autoconfigure.SpringBootApplication;

import org.springframework.web.bind.annotation.GetMapping;
import org.springframework.web.bind.annotation.RequestParam;
import org.springframework.web.bind.annotation.RestController;

@SpringBootApplication
@RestController
public class DemoApplication {

	public static void main(String[] args) {
		SpringApplication.run(DemoApplication.class, args);
	}

	@GetMapping("/hello")
	public String hello(@RequestParam(value = "name", defaultValue = "World") String name) {
		return String.format("Hello %s!", name);
	}
}
今回の実装に伴い、DemoApplication.javaファイル内の不要になる箇所を削除します。
package com.example.demo;

import org.springframework.boot.SpringApplication;
import org.springframework.boot.autoconfigure.SpringBootApplication;

@SpringBootApplication
public class DemoApplication {

	public static void main(String[] args) {
		SpringApplication.run(DemoApplication.class, args);
	}

}
DemoApplication.javaと同じ階層にcontrollerフォルダを作成します。
そしてそのフォルダの中にHelloController.javaを作成して処理を記述します。
package com.example.demo.controller;

import org.springframework.stereotype.Controller;
import org.springframework.ui.Model;
import org.springframework.web.bind.annotation.GetMapping;

@Controller
public class HelloController {

	@GetMapping("/hello")
	public String hello(Model model) {
		String message = "Hello World from HelloController!!!";
		model.addAttribute("msg", message);
		return "hello";
	}
}
HelloControllerクラスのアノテーションは、@Controllerになっています。
@Controllerとする事で、htmlによって書かれたテンプレートファイルを返してくれます。
return "〇〇"の〇〇の部分がhtmlファイルの名前になるので、後でhello.htmlを作成しなければいけないという事になります。
Modelは、テンプレートで利用するためのデータを設定しています。
model.addAttribute("値の名前", 値)という書き方で、文字列が格納されているmessage変数をテンプレートに渡しています。
これでControllerは完成しました!
2.Thymeleafを使えるようにしよう!
MVCのView部分を作成していくのですが、今回はThymeleafを使用します。
Thymeleafとは、springbootで扱う事が出来るテンプレートエンジンです。
Controller側で変数に格納した値をHTMLファイルで表示する事が出来ます。
日本語で書かれたThymeleafチュートリアルもあります!
では、Thymeleafが使えるようにするために、pom.xmlファイルを編集します。
<?xml version="1.0" encoding="UTF-8"?>
<project xmlns="http://maven.apache.org/POM/4.0.0" xmlns:xsi="http://www.w3.org/2001/XMLSchema-instance"
  xsi:schemaLocation="http://maven.apache.org/POM/4.0.0 https://maven.apache.org/xsd/maven-4.0.0.xsd">
  <modelVersion>4.0.0</modelVersion>
  <parent>
    <groupId>org.springframework.boot</groupId>
    <artifactId>spring-boot-starter-parent</artifactId>
    <version>2.3.1.RELEASE</version>
    <relativePath/> <!-- lookup parent from repository -->
  </parent>
  <groupId>com.example</groupId>
  <artifactId>demo</artifactId>
  <version>0.0.1-SNAPSHOT</version>
  <name>demo</name>
  <description>Demo project for Spring Boot</description>

  <properties>
    <java.version>11</java.version>
  </properties>

  <dependencies>
    <dependency>
      <groupId>org.springframework.boot</groupId>
      <artifactId>spring-boot-starter-web</artifactId>
    </dependency>

    <dependency>
      <groupId>org.springframework.boot</groupId>
      <artifactId>spring-boot-starter-test</artifactId>
      <scope>test</scope>
      <exclusions>
        <exclusion>
           <groupId>org.junit.vintage</groupId>
           <artifactId>junit-vintage-engine</artifactId>
        </exclusion>
      </exclusions>
    </dependency>

    <!-- ↓↓↓↓↓Thymeleafを使用する為に追加↓↓↓↓↓ -->
    <dependency>
      <groupId>org.springframework.boot</groupId>
      <artifactId>spring-boot-starter-thymeleaf</artifactId>
    </dependency>


  </dependencies>

  <build>
    <plugins>
      <plugin>
        <groupId>org.springframework.boot</groupId>
        <artifactId>spring-boot-maven-plugin</artifactId>
      </plugin>
    </plugins>
  </build>

</project>
3.画面描画するためのHTMLファイルを作成しよう!
src/main/resources/templatesの中にhello.htmlを作成しましょう。
hello.htmlの中身は以下の通りです。
htmlタグにthymeleafの名前空間を定義してあげることを忘れずに!
<!DOCTYPE html>
<html lang="ja" xmlns:th="http://www.thymeleaf.org">

<head>
  <meta charset="UTF-8">
  <title>Spring Boot Lesson</title>
</head>

<body>
  <h1>ThymeleafでHello World! </h1>

  <h1 th:text="${msg}"></h1>
</body>

</html>
2個目のh1タグで、th:text="${msg}"とすることでControllerから渡ってきた値を表示しています。
4.実行してみよう!
1~3で@ControllerでHTMLファイルを描画する、Thymeleafを用いてControllerで定義した値をHTMLファイルで描画するための準備をしてきました。
実行して確認しましょう。
ターミナルで以下のコマンドを入力してEnter。
$ ./mvnw spring-boot:run
2秒ぐらい待った後、http://localhost:8080/hello にアクセスすると、
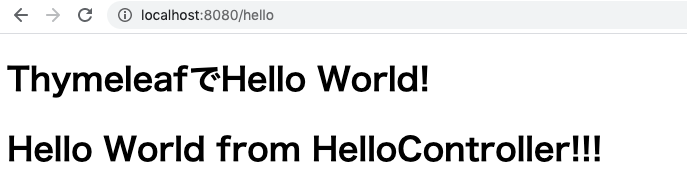
hello.htmlが描画され、Controllerで定義したmsgも正しく表示されています。
終わりに
@Controllerを用いてHTMLファイルを表示させる方法を学びました。
Thymeleafの記述方法はまだまだたくさんあるので、別の機会に記事にしたいと思います。
参考サイト
Spring Boot で『Thymeleaf』 テンプレートを使う
https://cloudear.jp/blog/?p=799
Tutorial: Using Thymeleaf (ja)
https://www.thymeleaf.org/doc/tutorials/3.0/usingthymeleaf_ja.html#thymeleaf%E3%81%AE%E7%B4%B9%E4%BB%8B