さて、Windows IoT Core の導入部分が済んだところで、もう少し突っ込んだ使い方をみていきましょう。突っ込んだ、と言いつつも例のキュレーションメディアっぽく、サンプルコードの紹介をするだけなんですけどね。
Windows IoT Core on Raspberry Pi は USB コネクタがあるので Web カメラ(UVC のカメラ)を繋げて使うことができます。Raspberry Pi 専用のカメラを使ってもできる(ハズ)ですが、安い Web カメラを付けて動画を撮ってみてもよいでしょう。
サンプルを動かしてみよう
samples/WebcamApp/CS at develop · ms-iot/samples
ドキュメントは Basic webcam app | Windows IoT にあるのですが、結構ややこしいのでポイントだけ示しておきます。
例によって、UWP アプリで作るので PC 上でも Windows IoT Core 上でも同じアプリを動かすことができます。
マニフェストを設定する
最低でも Webcam(Webカメラ)にチェックを入れます。

ファイルに保存する場合は「ピクチャライブラリ」や「ビデオライブラリ」にもチェックをいれてください。
XAML で CaptureElement で表示
<Canvas Name="PreviewCanvas" Grid.Row="1" Grid.Column="0" Width="200" Height="200" Background="Gray"  Margin="0,0,0,0" Visibility="Visible">
    <CaptureElement x:Name="previewElement" Width="200" Height="200" HorizontalAlignment="Left" Visibility="Visible"/>
</Canvas>
初期化とプレビュー
await mediaCapture.InitializeAsync();

// Set callbacks for failure and recording limit exceeded
status.Text = "Device successfully initialized for video recording!";
mediaCapture.Failed += new MediaCaptureFailedEventHandler(mediaCapture_Failed);
mediaCapture.RecordLimitationExceeded += new Windows.Media.Capture.RecordLimitationExceededEventHandler(mediaCapture_RecordLimitExceeded);

// Start Preview
previewElement.Source = mediaCapture;
await mediaCapture.StartPreviewAsync();
- MediaCapture クラスを使う
- mediaCapture.InitializeAsync で初期化
- mediaCapture.StartPreviewAsync でプレビュー表示
画像を保存
private async void takePhoto_Click(object sender, RoutedEventArgs e)
{
    try
    {
        takePhoto.IsEnabled = false;
        recordVideo.IsEnabled = false;
        captureImage.Source = null;

        photoFile = await KnownFolders.PicturesLibrary.CreateFileAsync(
            PHOTO_FILE_NAME, CreationCollisionOption.GenerateUniqueName);
        ImageEncodingProperties imageProperties = ImageEncodingProperties.CreateJpeg();
        await mediaCapture.CapturePhotoToStorageFileAsync(imageProperties, photoFile);
        takePhoto.IsEnabled = true;
        status.Text = "Take Photo succeeded: " + photoFile.Path;

        IRandomAccessStream photoStream = await photoFile.OpenReadAsync();
        BitmapImage bitmap = new BitmapImage();
        bitmap.SetSource(photoStream);
        captureImage.Source = bitmap;
    }
    catch (Exception ex)
    {
        status.Text = ex.Message;
        Cleanup();
    }
    finally
    {
        takePhoto.IsEnabled = true;
        recordVideo.IsEnabled = true;
    }
}
- mediaCapture.CapturePhotoToStorageFileAsync でファイル保存
- UWP アプリのファイル処理がちょっとややこしくて、KnownFolders.PicturesLibrary.CreateFileAsync でフォトのフォルダを開く
UWP アプリの場合、ファイルアクセスが普通のデスクトップアプリよりややこしくなっていて、一定のフォルダしか保存できないようになっています。
実行する
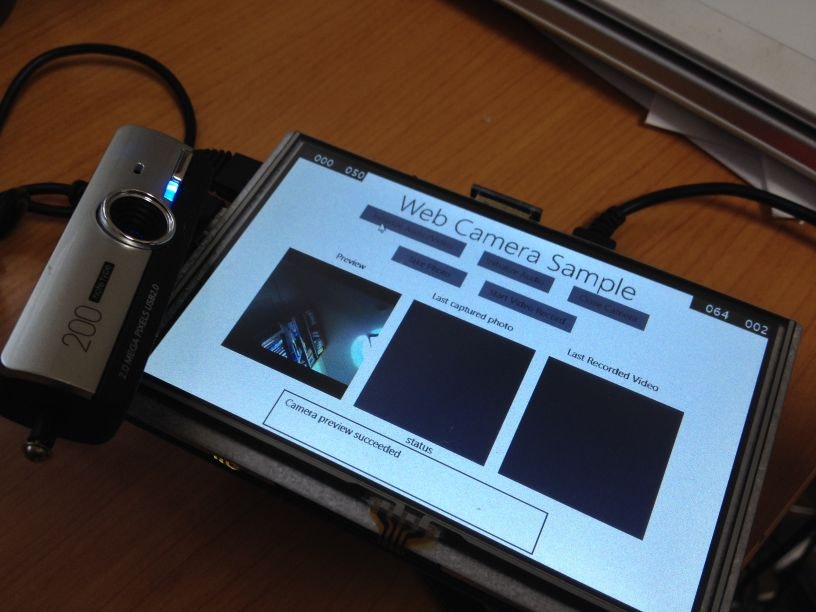
Raspberry Pi 上で実行するとこんな感じになります。
Web カメラはプラグインで認識しないらしく、OS の起動時に接続しておく必要があるみたいです。Web カメラの電源は USB から給電することになりますが、Raspberry Pi への電力が足りなくて USB から派手に給電すると Windows IoT Core の OS が落ちてしまうときがあります。なので、USB カメラは一つが限界ですね。
200万画素程度の Web カメラを使えば linyixian さんの Windows 10 IoTCore でFaceTrackingにチャレンジ - Qiita のようにフェイストラッキングも可能です。また、OpenCV も Windows IoT Core で動くので静止画の加工&WiFi で PC へ送信、のようなこともできるでしょう。
