最初のLチカができたので、次は物理的なボタンをつけてみましょう。
Lチカの場合は、電流の出力系で、物理ボタンの場合は、電流の入力系なのでワンセットで試しておきます。
ボタンのサンプル

物理ボタンを押したら、LED が光るサンプルがあります。ここでは、えらいきちんとしたボタンを使っていますが、30円のタクトスイッチとか、そもそもボタンを使わずにジャンパワイヤー同士を接触させるだけでも構いません。
ちょっと高めですが、千石電子 せんごくネット通販 に行くとアーケードゲーム用のボタンを売っているので、これを使うこともできます。
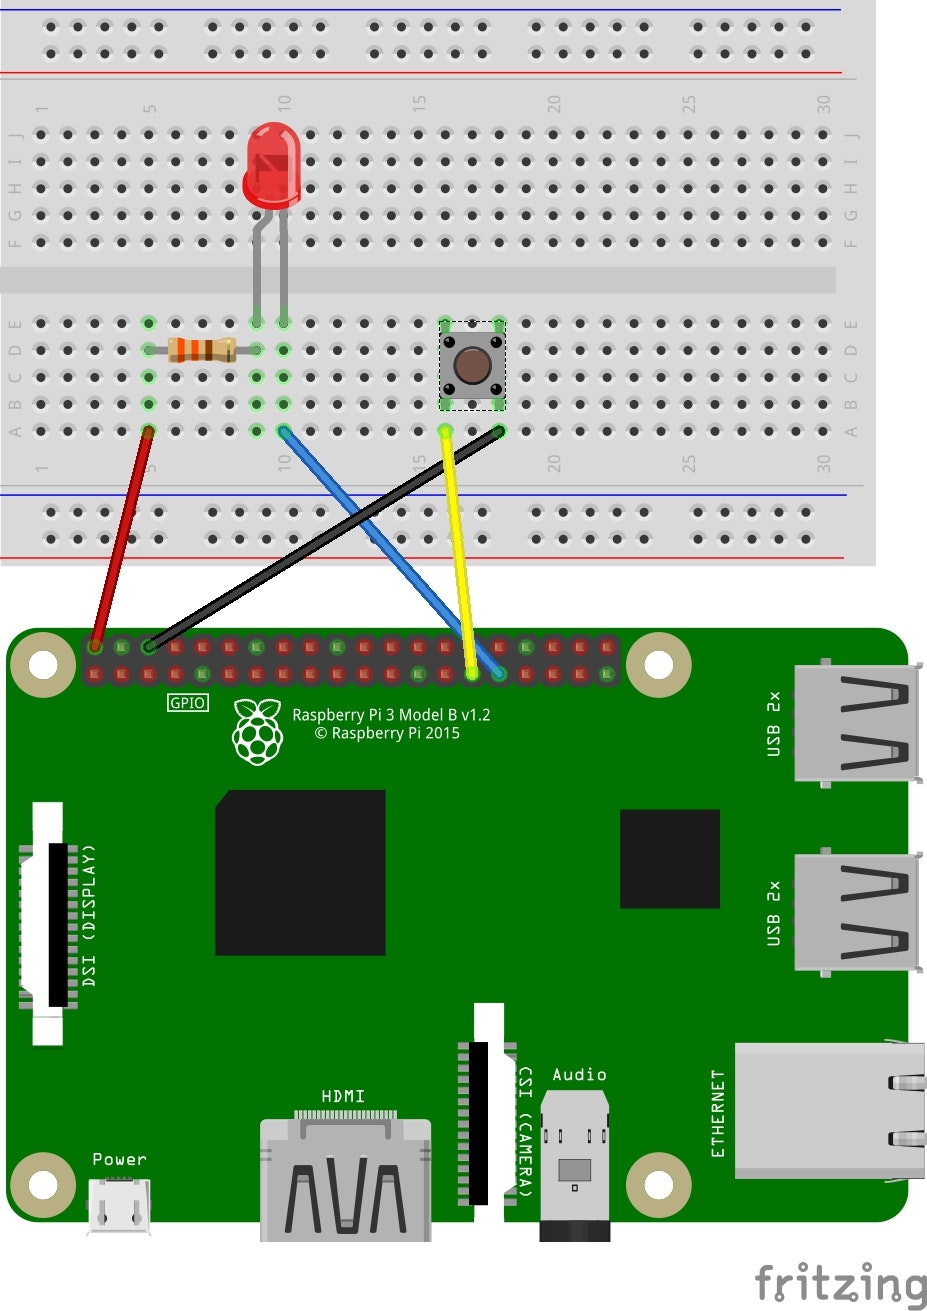
配線はこんな感じで、
- 5番ピンにボタン
- 6番ピンにLED
をつけます。例によって、ジャンパーワイヤーの色は自由に決めて構いません。
コードを見る
参照設定で「Windows IoT Extension SDK」を追加しておくところは同じで、先頭の行に「Windows.Devices.Gpio」を追加。
using Windows.Devices.Gpio;
初期化は起動時に InitGPIO メソッド内で行っています。
private void InitGPIO()
{
    var gpio = GpioController.GetDefault();

    // Show an error if there is no GPIO controller
    if (gpio == null)
    {
        GpioStatus.Text = "There is no GPIO controller on this device.";
        return;
    }

    buttonPin = gpio.OpenPin(BUTTON_PIN);
    ledPin = gpio.OpenPin(LED_PIN);

    // Initialize LED to the OFF state by first writing a HIGH value
    // We write HIGH because the LED is wired in a active LOW configuration
    ledPin.Write(GpioPinValue.High);
    ledPin.SetDriveMode(GpioPinDriveMode.Output);

    // Check if input pull-up resistors are supported
    if (buttonPin.IsDriveModeSupported(GpioPinDriveMode.InputPullUp))
        buttonPin.SetDriveMode(GpioPinDriveMode.InputPullUp);
    else
        buttonPin.SetDriveMode(GpioPinDriveMode.Input);

    // Set a debounce timeout to filter out switch bounce noise from a button press
    buttonPin.DebounceTimeout = TimeSpan.FromMilliseconds(50);

    // Register for the ValueChanged event so our buttonPin_ValueChanged
    // function is called when the button is pressed
    buttonPin.ValueChanged += buttonPin_ValueChanged;

    GpioStatus.Text = "GPIO pins initialized correctly.";
}
- GpioController.GetDefault で gpio を取得
- gpio.OpenPin で BUTTON_PIN(5) をオープン
- gpio.OpenPin で LED_PIN(6) をオープン
- ledPin.SetDriveMode で、LED をアウトプットモード(出力モード)に設定
- buttonPin.SetDriveMode でボタンをインプットモード(入力モード)に設定。ピンによってプルアップなどの設定があるので、これを IsDriveModeSupported 自動判別しています。
- buttonPin.DebounceTimeout でチャタリングの時間間隔を設定。物理ボタンの場合、ボタンを押した瞬間は ON/OFF が交互に現れるチャタリングという現象が起こります。このために、50msec ON/OFF の状態が続いたらボタンが変化したという設定になります。これは、スマートフォンやディスプレイでは起こらない現象(実は内部的に起こっているけど、ソフトウェア的に回避している)ので、物理ボタン特有の面白いところです。
- buttonPin.ValueChanged で、ボタンの変更時にイベントを発生させます。ここは、Windows アプリケーションを作ったときのイベント処理と同じです。
次に、ボタンの状態が変更したときのイベントを作ります。
private void buttonPin_ValueChanged(GpioPin sender, GpioPinValueChangedEventArgs e)
{
    // toggle the state of the LED every time the button is pressed
    if (e.Edge == GpioPinEdge.FallingEdge)
    {
        ledPinValue = (ledPinValue == GpioPinValue.Low) ?
            GpioPinValue.High : GpioPinValue.Low;
        ledPin.Write(ledPinValue);
    }

    // need to invoke UI updates on the UI thread because this event
    // handler gets invoked on a separate thread.
    var task = Dispatcher.RunAsync(CoreDispatcherPriority.Normal, () => {
        if (e.Edge == GpioPinEdge.FallingEdge)
        {
            ledEllipse.Fill = (ledPinValue == GpioPinValue.Low) ?
                redBrush : grayBrush;
            GpioStatus.Text = "Button Pressed";
        }
        else
        {
            GpioStatus.Text = "Button Released";
        }
    });
}
- ボタンの状態は、e.Edge でチェックをします。GpioPinEdge.FallingEdge は、状態が変化したという印です。
- Dispatcher.RunAsync でスレッドを切り替えているのは、物理ボタンの変更イベント(ValueChangedイベント)は UI スレッドではないからです。通常の Windows アプリのボタンは Click イベントで直接テキストボックスのTextプロパティの値を変更できますが、Windows IoT Core の場合は画面に出力するときは、Dispatcher.RunAsync でスレッドを切り替えます。
これを Raspberry Pi 上で動かすと、ボタンを押したときに LED が光るようになります。もうちょっと工夫すれば、Amazon Dush Button のように、ボタンを押したらインターネット経由で Amazon に注文ができるようにできそうですよね。