元記事はこちらです
Pythonのパッケージ管理とか仮想環境を管理するツールのお話です。
Pipenvは普通に使っているのですが、poetryはまだまともに使ったことがないので、ちょっと試してみました。
環境
- OS: Windows 10 Pro
- Python: 3.7.5と2.7.17がインストール済み、Py Launcherは有効
今回の目標
poetryで3.7用と2.7用のプロジェクトフォルダを作り、それぞれのフォルダでpoetry run python --versionを実行して表示されるPythonのバージョンが違ったら成功、といったところです。
poetryインストール
poetry公式のインストール方法でおすすめされている
curl -sSL https://raw.githubusercontent.com/sdispater/poetry/master/get-poetry.py | python
の方法だと、Windowsにおいては下記の問題があります。
- 最後の
pythonがPython2.7でも3.7でもない、謎のpython.exeに当たってしまう。 - (問題という程ではありませんが)poetryの0.12系がインストールされる。1.0.0bxxをインストールするには
--previewオプションをつけたいが、この方法ではオプションをつける方法がないっぽい。
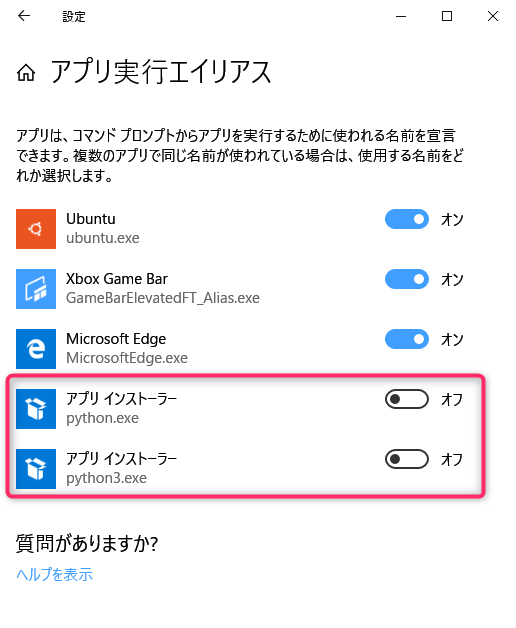
まず1点目の謎のpython.exe問題についてですが、これはWindows 10に割と最近導入されたらしいアプリ実行エイリアスの影響です。Windowsの設定→アプリと機能→アプリ実行エイリアスを開くと**アプリ インストーラー(python.exe)とアプリ インストーラー(python3.exe)**があるので、両方オフにします。(パスの優先順を変更するでもいいですけど)
2点目については別のインストール方法に変えるしかありません。ドキュメントで非推奨扱いされていますが、Pipenvと同じようにpipコマンドでユーザグローバルにインストールしちゃいます。おすすめの方法でもいい感じにインストールできるようになることを待ちましょう。なお、この方法だとpoetry、poetry.batの2ファイルがあるフォルダ(今回はPython3.7にインストールしたので%APPDATA%\Python\Python37\Scripts)に手動でパスを設定する必要があります。
- Powershellなどのシェルで
py -3 -m pip install --user --pre poetryを実行 - (今回はユーザ)環境変数PATHに
%APPDATA%\Python\Python37\Scriptsを追加 - シェルを再起動
- シェル上で
poetry --versionを実行、今回はPoetry version 1.0.0b8が返ってくる
これでpoetryのインストールは終了です。
poetry設定変更
poetryは仮想環境(virtualenv)も管理してくれるのですが、標準設定だと仮想環境の設置先が%USERDIR%\Local\pypoetry\Cache\virtualenvsとなっています。Visual Studio Codeなどで使う分にはプロジェクトフォルダの中に仮想環境が作られる方が何かとやりやすかったりするので、poetryの設定を一部変更します。
> poetry config --list
cache-dir = "C:\\Users\\xxxxxxxx\\AppData\\Local\\pypoetry\\Cache"
virtualenvs.create = true
virtualenvs.in-project = false    (←これをtrueにしたい)
virtualenvs.path = "{cache-dir}\\virtualenvs"

> poetry config virtualenvs.in-project true
> poetry config --list
cache-dir = "C:\\Users\\xxxxxxxx\\AppData\\Local\\pypoetry\\Cache"
virtualenvs.create = true
virtualenvs.in-project = true
virtualenvs.path = "{cache-dir}\\virtualenvs"
この状態でpoetryに仮想環境を作らせると、[プロジェクトフォルダ]\.venvに作られます。
プロジェクト切り替えテスト
ではpoetryを使ってPython3.7と2.7のプロジェクトを1つずつ作ってみます。今回はpoetryをPython3.7にインストールしているので、特に指定をしないとPython3.7用のプロジェクトが作られます。
> poetry new py3test
Created package py3test in py3test

> cd py3test
> poetry install
Creating virtualenv py3test in C:\Work\py3test\.venv
Updating dependenciesResolving dependencies... (0.4s)
(pytestや依存パッケージがインストールされます)

> poetry run python --version
Python 3.7.5
次にPython2.7用のプロジェクトを作ります。ポイントは下記の2点です。
- 依存するPythonのバージョンを2.7に変更する
- pytestはPython2.7に対応しているのは4.6系まで
> cd ..
> poetry new py2test
Created package py2test in py2test

> cd py2test

【重要】ここでpyproject.tomlを編集します。
python = "^3.7" → python = "^2.7"
pytest = "^5.2" → pytest = "^4.6"

> poetry env use C:\Python27\python.exe
Creating virtualenv py2test in C:\Work\py2test\.venv
Using virtualenv: C:\Work\py2test\.venv

> poetry install
Updating dependencies
Resolving dependencies... (1.1s)
(pytestや依存パッケージがインストールされます)

> poetry run python --version
Python 2.7.17
確認のため、Python3.7用プロジェクトに移動してみます。
> cd ..\py3test
> poetry run python --version
Python 3.7.5
カレントフォルダによってPythonの仮想環境を使い分けていることがわかります。これで実験は終了です。
まとめ
WindowsでpyenvではなくPy Launcherを使い、poetryで仮想環境を操作することができました。おそらくこのやり方で使えるだろうとは思いますが、今のところWindows上ではPipenvの方がまだ楽な状況かなと思います。
